Ultra-portable astro rig
Last month I picked up an iOptron SkyGuider Pro, because, well who doesn't have one of these best-in-class star trackers? I felt left out. It also gave me an excuse to get the Stronghold Tangent Alt-Az base from AstroShop on AliExpress (https://www.aliexpress.com/item/32822479423.html). I've been looking at images of this one for a while, and in reality it doesn't disappoint. It's a nicely machined piece of equipment, very sturdy, with a 10kg/22lb carrying capacity! I'm using this instead of the very compact light-weight version that comes with the SkyGuider Pro.
Here's my ultra-portable astro setup, with the William Optics ZS61 APO, ZWO ASI071MC cooled color, ZWO ASI120MM-S guide cam, DeepSkyDad AF1 focuser, homemade powerbox (2 x 12v out, 1 x 5v 4 amp out, 1 x dew control out), controlled by a Raspberry Pi 4 4GB running Stellarmate 1.4.2 beta. The SkyGuider Pro has it's own battery for power, and the scope, cameras, focuser only require a single 12v 7-10 amp input. All other cabling and control functions are mounted on the ZS61. I'm using an old Celestron tripod--I tightened the bolts on the legs, and it's definitely sturdy and stable enough for any payload the iOptron can handle.

Posted August 24, 2019
Wide Field, Narrow Band
Going to run some manual focus tests on my wide-field narrowband setup, if I can see the stars tonight. I just want to see if I have the backfocus correct for the Nikon f/2.8 180mm lens. I'm using a 2" Optolong 7nm Ha filter with the Atik 414EX mono CCD camera. No guiding with this tonight, but normally I would have the 130mm guide-scope and ZWOASI120MM-S on top of the aluminum camera/lens ring (ZWO 78mm Holder Ring for ASI Cooled Cameras). My hydrogen-alpha filter is in the AstroShop 2" Filter Drawer System with the tripod foot, which just adds more stability to this setup. You may also notice--if you're familiar with the iOptron CEM25P--that I'm using the short counterweight bar with a single weight. I can carry this whole rig around without taking anything apart.

Posted July 5, 2019
NGC 2174 in the Hubble Palette and Bi-color HO
NGC 2174, the Monkey Head Nebula. I went with the Hubble Palette, SHO, on this one. Exposures: 24 x 120 seconds Ha, 26 x 120 seconds OIII, 24 x 120 seconds SII. Equipment: William Optics GT81 APO refractor, ZWO ASI1600MM-Pro monochrome 16MP camera (unity gain 139/21), Astronomik filters, iOptron CEM25P mount, INDI/Ekos/KStars control software. NGC 2174 is a faint emission nebula located in the constellation Orion, about 6400 light-years away. This was a test of my field setup that I'll taking on the road in a week. I'll have to come back to NGC 2174 with longer exposures--and more of them. And dark frames. I didn't shoot any calibration frames in this run.

Here's my processing of NGC 2174 in Hydrogen-alpha and Oxygen (without the Sulfur frames).

Posted February 22, 2019
iOptron Mods: October 26, 2018
According to several weather sources it's not going to be clear after 8pm tonight, but I set up the William Optics GT81 anyway. Two reasons: I need to test out an adjustment I made in the spacing from the WO FLAT 6AII, to see if it corrects some star elongation at the corners--I added a 3mm M48 spacer just between the flattener/reducer and the off-axis guider. Second, I'm testing out some plans I have with Stellarmate (INDI, Ekos, KStars) on a Rasp Pi 3B+ (faster, with AC wifi). This one will be dedicated to this color imaging rig, with an auto-starting Ekos equipment profile.
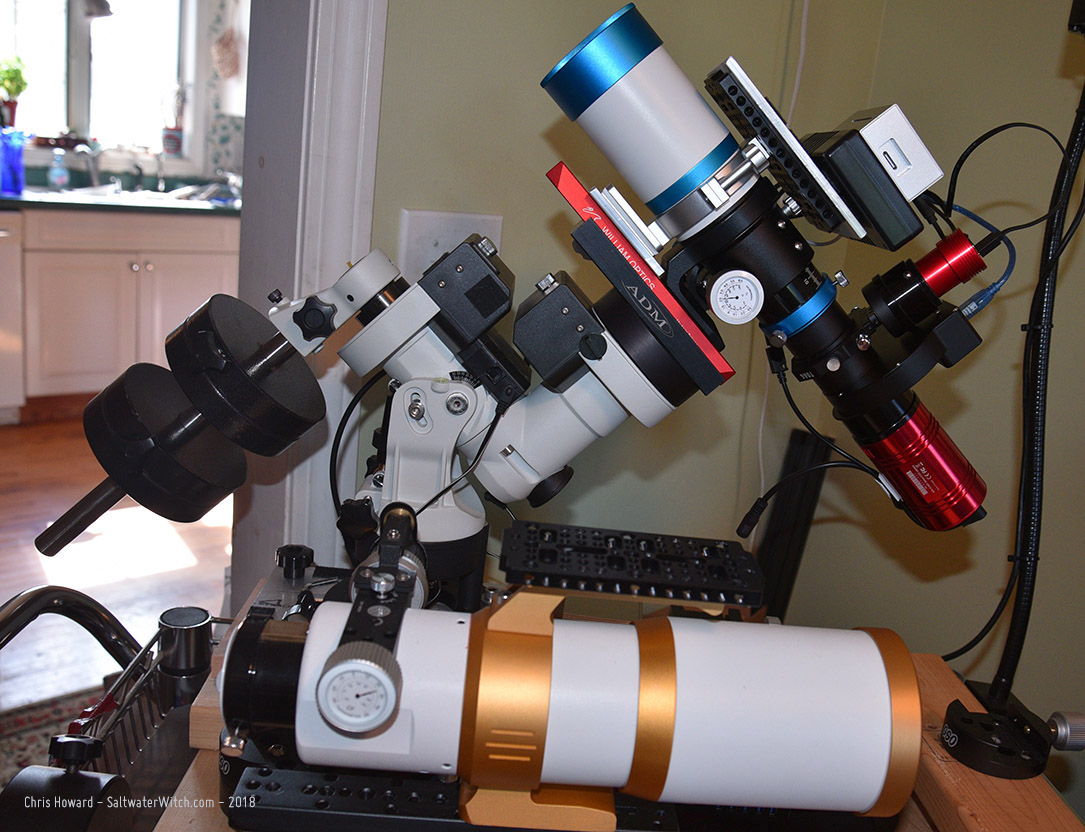
I put together a list of modifications and upgrades I have added or built for my IOptron CEM25P mount, and included them in one handy image--with arrows and descriptions (see below). Over the last year this has become my primary telescope mount (over my Orion Atlas EQ-G), partly because I've been doing most of my astro-imaging work with 81 and 61mm aperture refractors (that's a William Optics GT81 in the upper right). The other advantage of the CEM25P is quick setup time. I can have this bolted to the pier plate, polar aligned, and ready to image in about five minutes.


Posted October 26, 2018
Astro Automation: August 19, 2018
Running a distributed INDI-based astro-imaging setup
This sounds grander than it is, but it’s not incorrect. And INDI makes it easy, with distributed processing built into the protocol, so that once you have your devices plugged into some number of machines (e.g., Raspberry Pi's) and you establish a chain of priority--who's calling who, there's no difference in the way any app (like Ekos) interacts with the INDI-based system, whether it's a single computer or a group of computers.
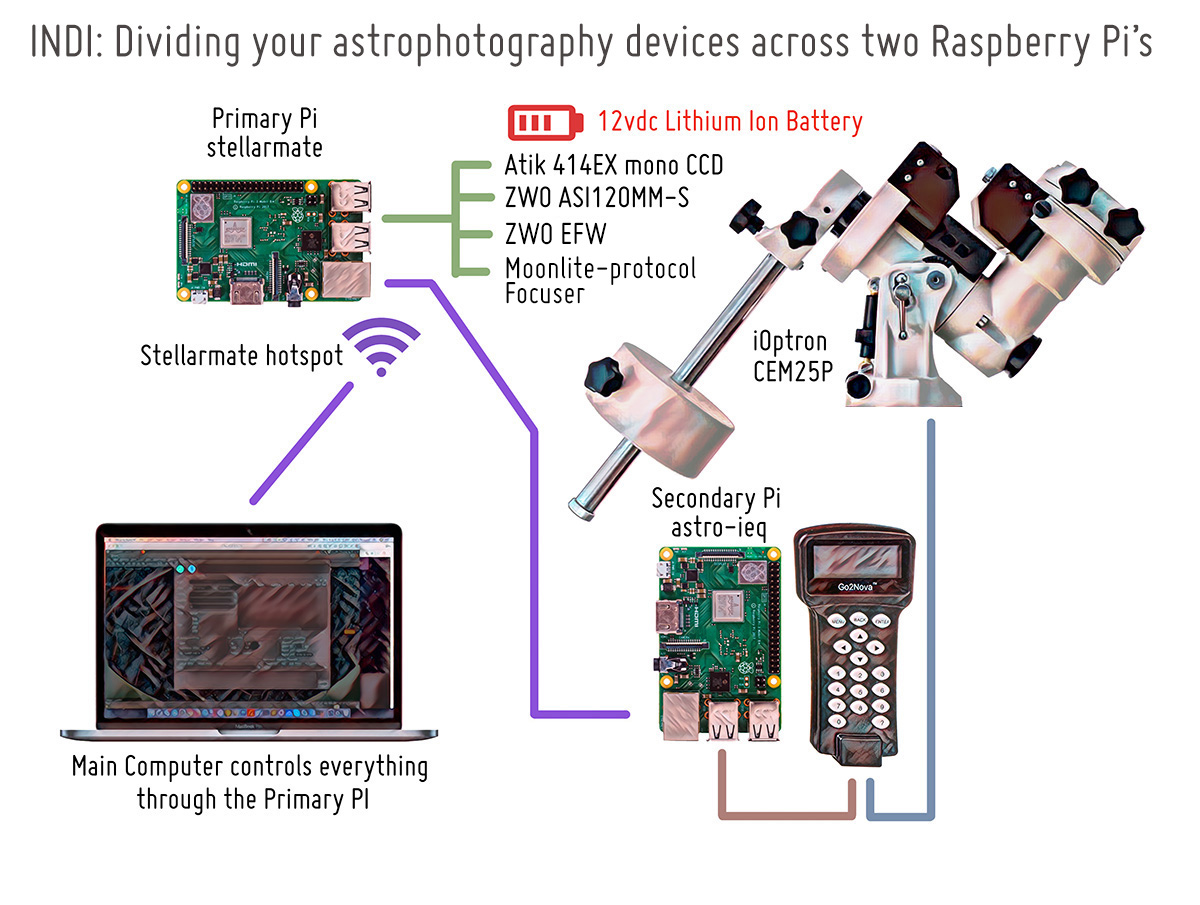
My main reason for dividing instances of the INDI server across two Raspberry Pi's is to separate my iOptron CEM25P mount from the rest of the hardware (CCD, filter wheel, focuser, guide camera). I want to run the telescope-based components over wifi, with a dedicated battery pack, so there are no cables running from the mount to...anything. Everything is attached to the scope, including the rechargeable battery. And everything is controlled from my Macbook Pro over wifi. The problem to solve, which started me down the chained INDI server path, was to exclude the Go2Nova 8408 hand-controller from the mix. The iOptron mount passes all slewing and guiding commands (and everything else) through the controller over serial. I don't know if this is unique to iOptron mounts, but I don't have to do this with my Orion Atlas EQ-G; the serial cable from the computer plugs directly into the mount, without having the SynScan controller in the middle. Here’s the general idea with the CEM25P: in order to control the mount from any command software using INDI or ASCOM you connect the Go2Nova controller to the mount as usual, and then run a serial cable (RS232 -> RJ9) cable from the controller to your computer, in this case, a Raspberry Pi3B+ mounted on the telescope. This is fine if you don’t mind running cables to and from your scope, cameras, focuser, filter wheel--for power and data. This is how I’ve run things on this mount for the last year or so.
What changed? I’ve been looking at the StellarMate gadget for a while now, and Jasem’s presentation on the Astro Imaging Channel (https://youtu.be/XkgwY_KsBjc) tipped me toward checking it out. He did a great overview of single-board computers in astro automation, with particular focus on Raspberry Pi's and the Atom-based Windows machines that have become popular. My goals with astrophotography have also changed over the last couple years; I've been moving more toward portability and automation, minimizing setup time, and using smaller refractors and lightweight but accurate EQ mounts. (Another general reason to go with StellarMate OS is it works great with the faster Rasp Pi 3B+. Just purchase the OS on stellarmate.com, download, flash an SD card, and you’re good to go).
Here's a diagram that shows one of my astro device setups. I spent the day getting this going, but haven't been able to get out under the stars with this yet. So far I've tested out the startup process several times, and successfully used all the connected equipment--slewing in KStars, taking a dozen exposures with the main CCD and guide camera, testing the focusing system. Everything worked well, but I think the final test will be guiding. I don't expect any problems, but that's the one connection that relies on one INDI server talking to another without any complications.
 Any downsides to this setup? I don’t see any with the system distribution side of things. The only critique of chaining INDI servers I’ve read is about potential inefficiency and network latency, but I don’t see a problem here. Correct me if I’m wrong, but network speeds, even over a slow-ish wifi connection, are still going to be astronomically faster than the serial communication rates we use--9600 bits/sec to control a telescope mount, for instance. Even for guiding, where you need response times in seconds, latency shouldn't be a problem. With these inexpensive Raspberry Pi’s that can support 5.0 GHz wifi with speeds in the hundreds of millions of bits/sec, one second is still a long time.
I have only done some preliminary testing on the power side of this setup, with a boost converter (DC step-up) to maintain a fairly constant 12vdc output for the devices, and with a load the battery and converter can handle. I'm also looking at mounting a separate battery dedicated to dew control, and again it's about maintaining voltage and current.
Some helpful links, including Jasem’s distributed INDI tutorial:
http://indilib.org/support/tutorials/159-indi-on-multiple-devices.html
http://indilib.org/forum/wish-list/811-connecting-ekos-to-multiple-indi-servers.html
Here’s an overview of the settings I'm using:
All three systems--primary pi, secondary pi, Macbook Pro--are running over the Stellarmate Wifi hotspot. The secondary Pi (astro-ieq) has a static IP of 10.250.250.105
Secondary Pi: astro-ieq
Connect through USB to Serial to the iOptron Go2Nova 8404 controller and CEM25P
Run this command:
indiserver -m 100 -v indi_ieq_telescope
Primary Pi: stellarmate
Connect USB to: Atik CCD, ZWO guide camera, ZWO Filter Wheel, Moonlite-protocol focuser, and the remote connection you just started on the Secondary Pi: iOptron CEM25 on astro-ieq
Add a hostname to /etc/hosts that identifies the Secondary Pi
10.250.250.105 astro-ieq
Run this command:
indiserver -m 100 -v indi_atik_ccd indi_moonlite_focus indi_asi_ccd indi_asi_wheel "iEQ"@astro-ieq:7624
I don't think you need to sudo these commands, but I did in my tests. The "iEQ" designates the device ID for the iOptron CEM25 series of mounts. This parameter "iEQ"@astro-ieq:7624 tells the INDI server to connect to the "iEQ" device (iOptron mount) on astro-ieq (the secondary pi) through port 7624 (default INDI port). The tip from Jasem's tutorial (link above) on chaining multiple Raspberry Pi's together is to run indiserver -m 100 -vv indi_ieq_telescope first to get the verbose output and grab the device IDs. That's how I found the ID "iEQ", which works for several iOptron mounts, including the CEM25P and iEQ30.
Main computer
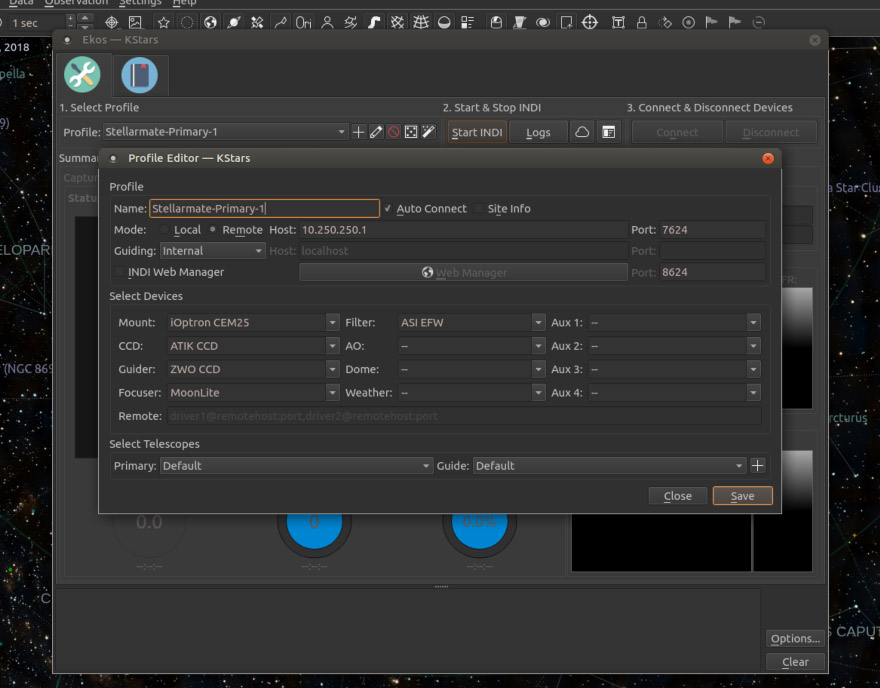
I have a Macbook Pro running Ubuntu Mate 16.04 in a Parallels VM. From here I setup a remote mode profile for the Stellarmate Primary Pi, which is running on 10.250.250.1. From the main computer's point of view--my point of view--there's nothing different about any of the operations in Ekos. That is the advantage of using the underlying INDI protocol, which supports distributed components at a deep level. After startup, you just do your imaging runs like you always do: polar alignment, create or manage your sequence queue, schedule new sequences. Everything just works!
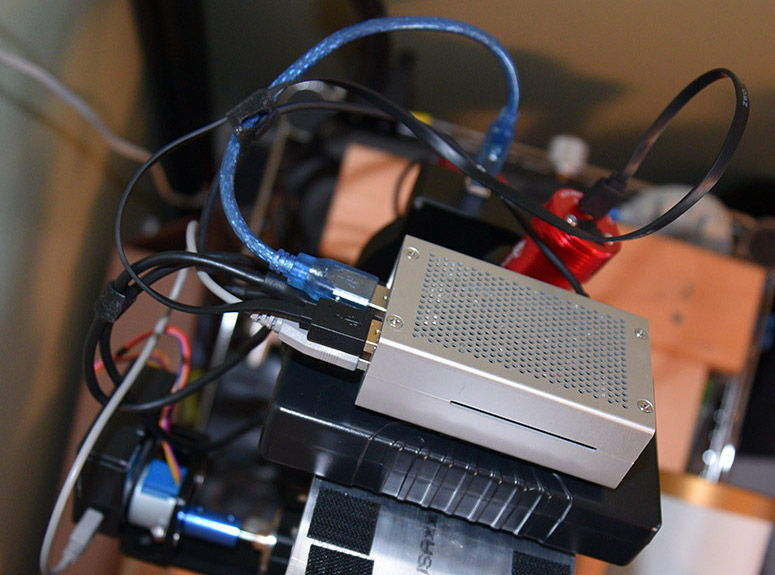
Here are three shots of my working multi-node setup, showing the primary Pi (running StellarMate OS). The aluminum box on the top is a Raspberry Pi 3B+, with all four telescope-mounted components plugged in: Atik 414EX mono CCD, ZWO filter wheel, ZWO ASI120MM mini guide camera, and Moonlite-protocol focuser (not in view, other side of the scope. This is a new DIY focuser and controller I'm also testing out, which uses an Arduino Nano, 28BYJ-48 stepper motor, and ULN2003 motor driver board). The black box beneath the Raspberry Pi is a 6000mAh Li-ion battery with 12vdc out (https://www.amazon.com/dp/B00ME3ZH7C), along with a 5vdc USB power port. I run the Pi off the USB port, and the Atik camera off the 12v line, with a step up (boost) converter between to make sure we keep a steady 12v. You see that cable hanging down by the camera? That's the power line. I disconnected it before I took the pics because I'm measuring the boost converter for a 3d-printed case. For the system test I just velcro'd the PC board to the battery pack.
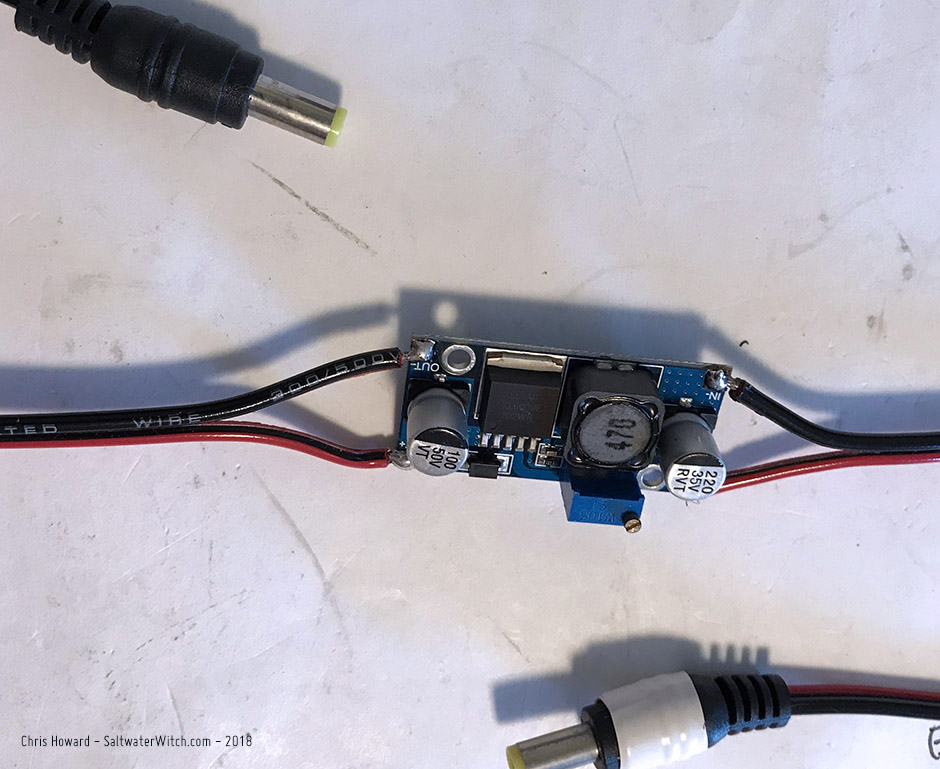
Close-up of the boost converter I used my testing so far, the XL6009 DC-DC step-up power converter https://www.amazon.com/dp/B06XWSV89D. I put this inline between the battery and the camera's 12v connector. The problem I'm solving is the battery pack will drop voltage over time as the batteries discharge, and I'm willing to trade-off amperage in order to keep the voltage stable at 12v along that curve. Again, this is a test, so we'll see how this works out. My concern with real-world use is how much the camera draws for TEC (thermoelectric cooling) when I'm maintaining a sensor temperature at -20C? I still have to figure this out and see what I need to do for power to support this.
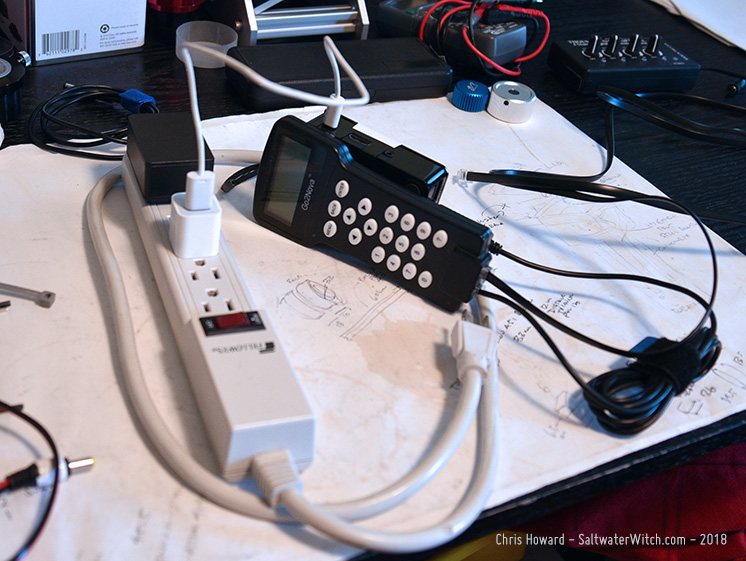
This next pic shows the secondary Pi, the black box velcro'd to the back of the iOptron CEM25P hand controller. The RJ-11 line from the conroller plugs into the mount, the RJ-9 (4-pin serial -> USB) cable plugs into the secondary Pi. For now I'm testing this off AC power, but for portability I will also run this side off of a battery pack.
Another shot (from the top) showing the Pi running Stellarmate, with the four telescope-mounted devices using all the USB ports.
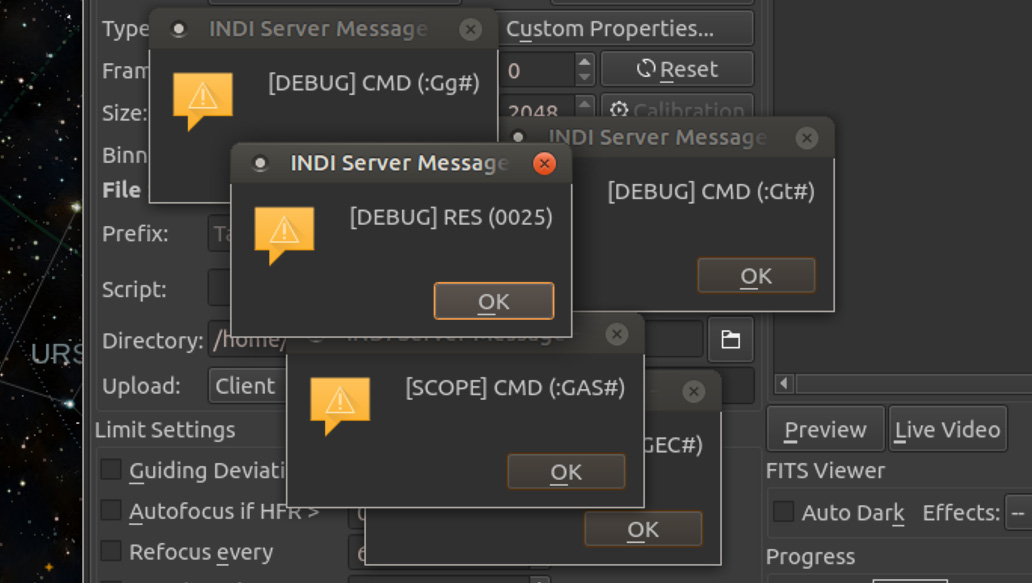
Here's a tip for you: if you're not actually doing any debugging, turn off debug on the Options tab in the INDI control panel for all your devices or you’re going to see a bunch of dialogues with commands sent to devices, status codes, and other fun stuff.