All Sky Cam with Solar Charging
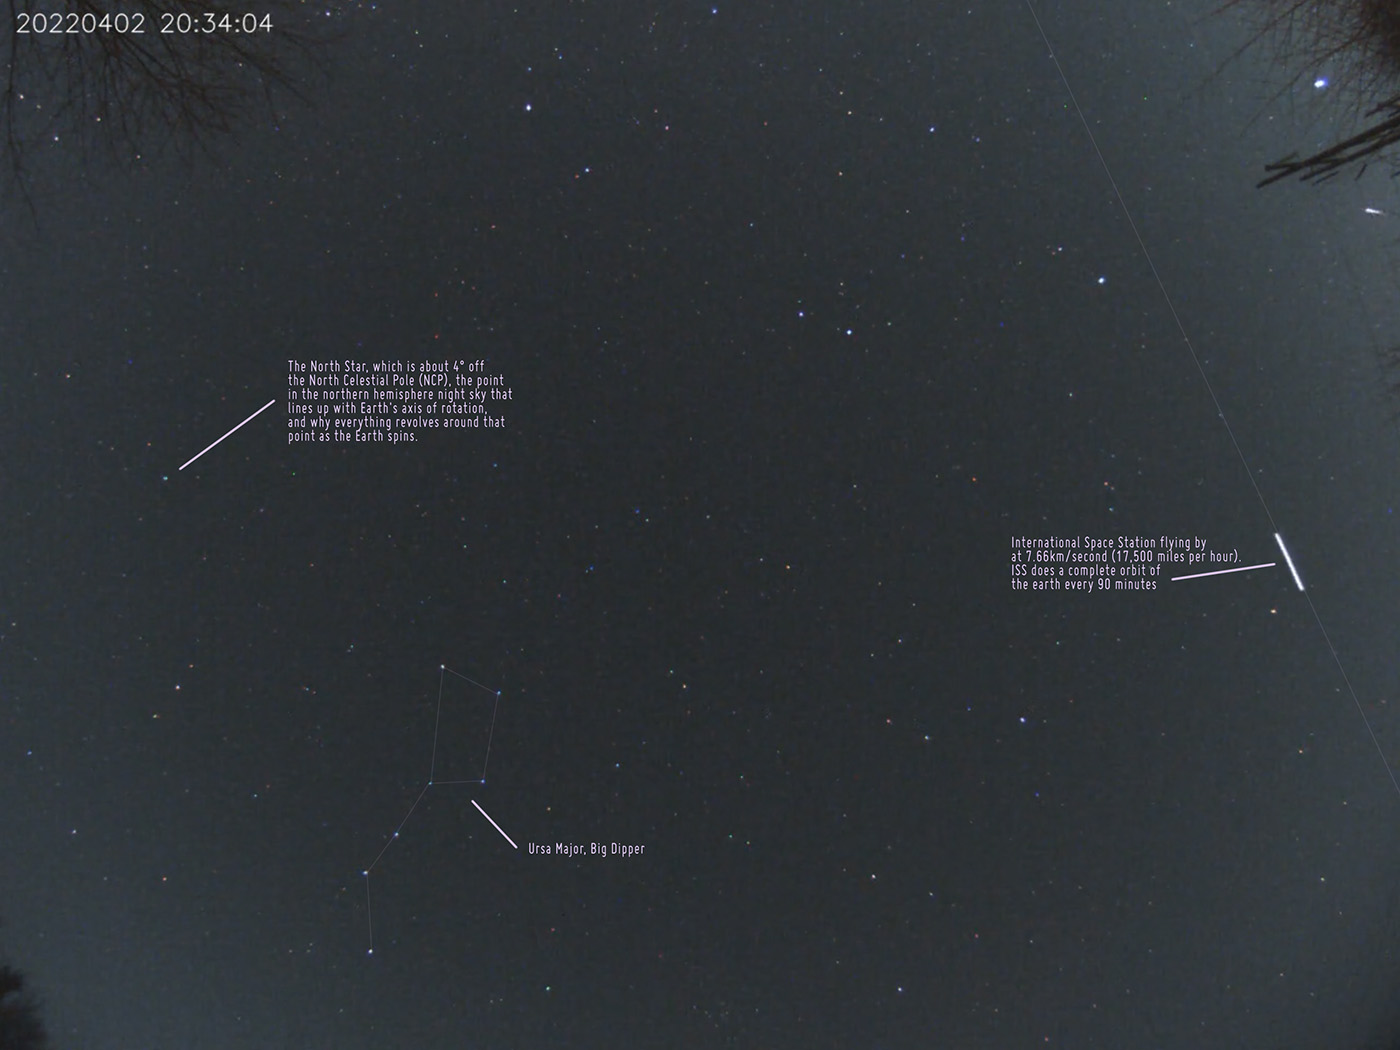
The evening weather hasn't been super clear lately, but it has given me a chance to test out the all-sky camera. This takes a pic every 20 seconds through the night and creates a time lapse video, a stacked star-trails image, and a keogram (a keogram is single image visualization that represents an entire night's atmospheric activity). And of course, there's a "Live View" so I can always check on the sky's current conditions.
I'm running Thomas Jacquin's awesome open-source AllSky software for Raspberry Pi:
https://github.com/thomasjacquin/allsky
Today starts my first full test of the setup, with daylight solar charging and continuous operation. Here's the current system, with the dome taped down for now, ZWO ASI120MC color astro camera, 6mm super wide-angle lens, Raspberry Pi 3b, lithium battery, and 10 amp PWM solar controller. I drilled two holes for ventilation, mainly to test the need for separate dew control. My hope is that there's enough heat rising from the Raspberry Pi CPU fans to get warm air circulating under the dome--with enough of a temp boost to prevent condensation from forming.

Examples of the camera's field of view from the back deck, close to the house. I have it in the middle of the backyard now, with a full view of the sky.


A snapshot from the April 3rd night sky:
Posted March 27, 2022
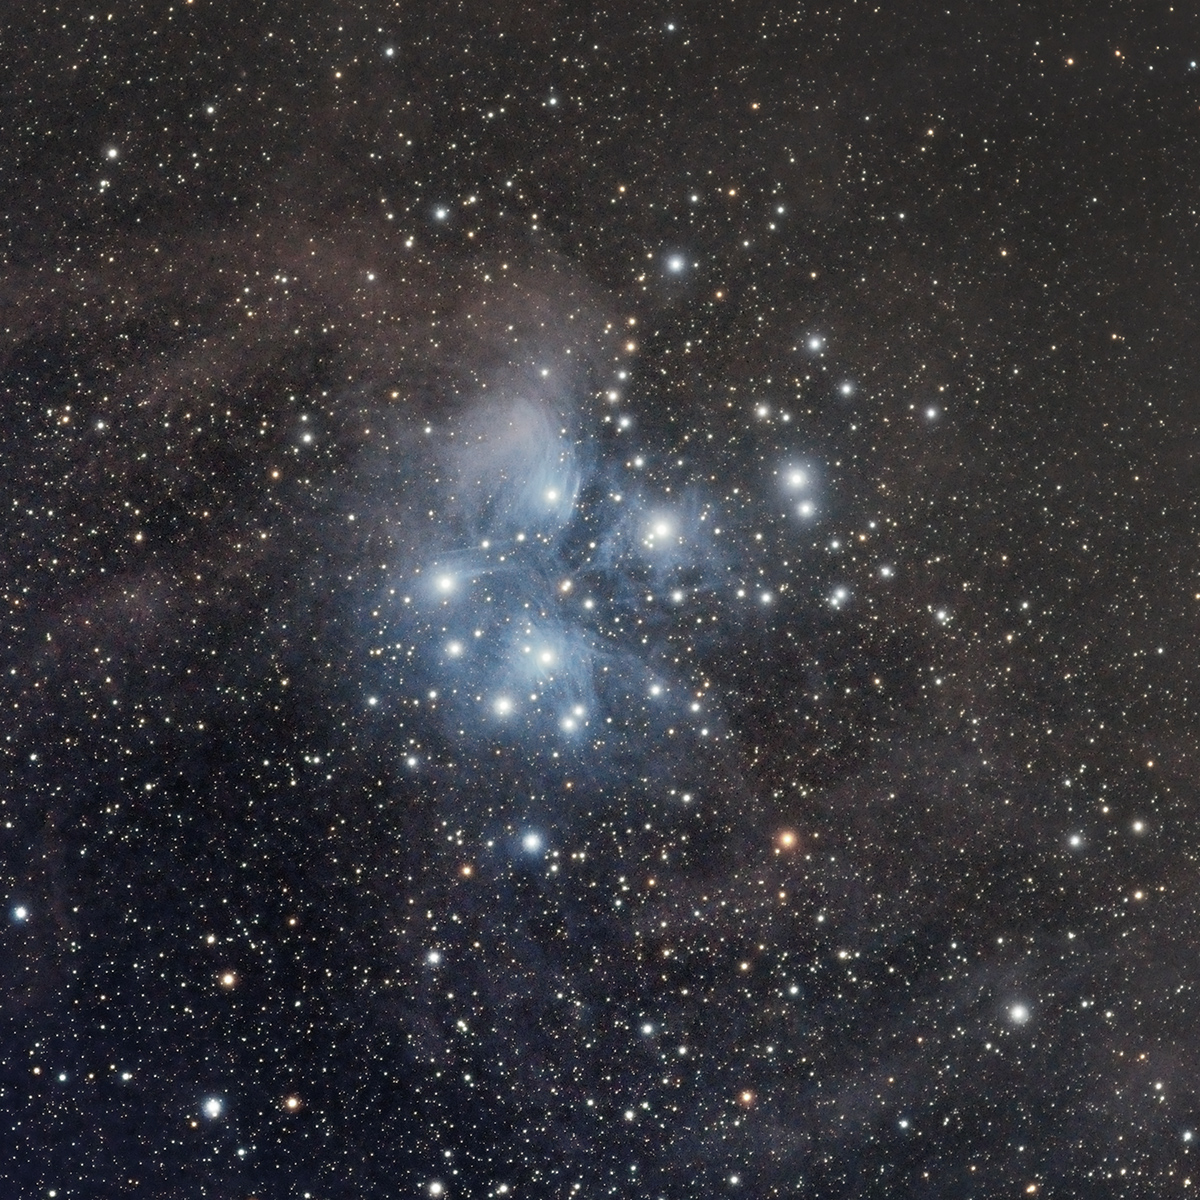
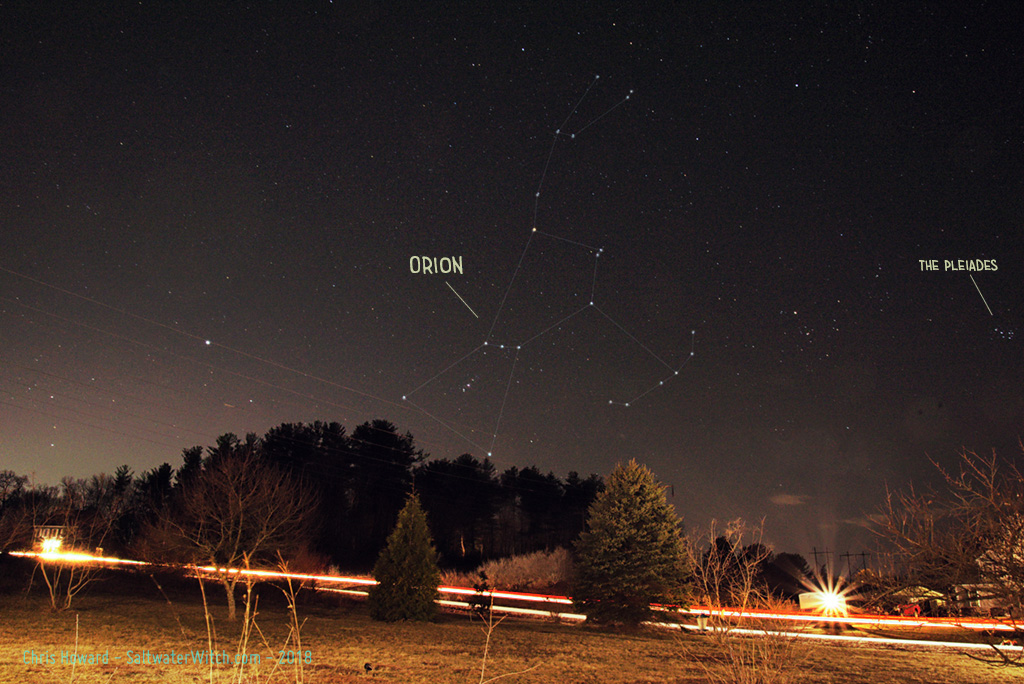
M45, the Pleiades, The Seven Sisters
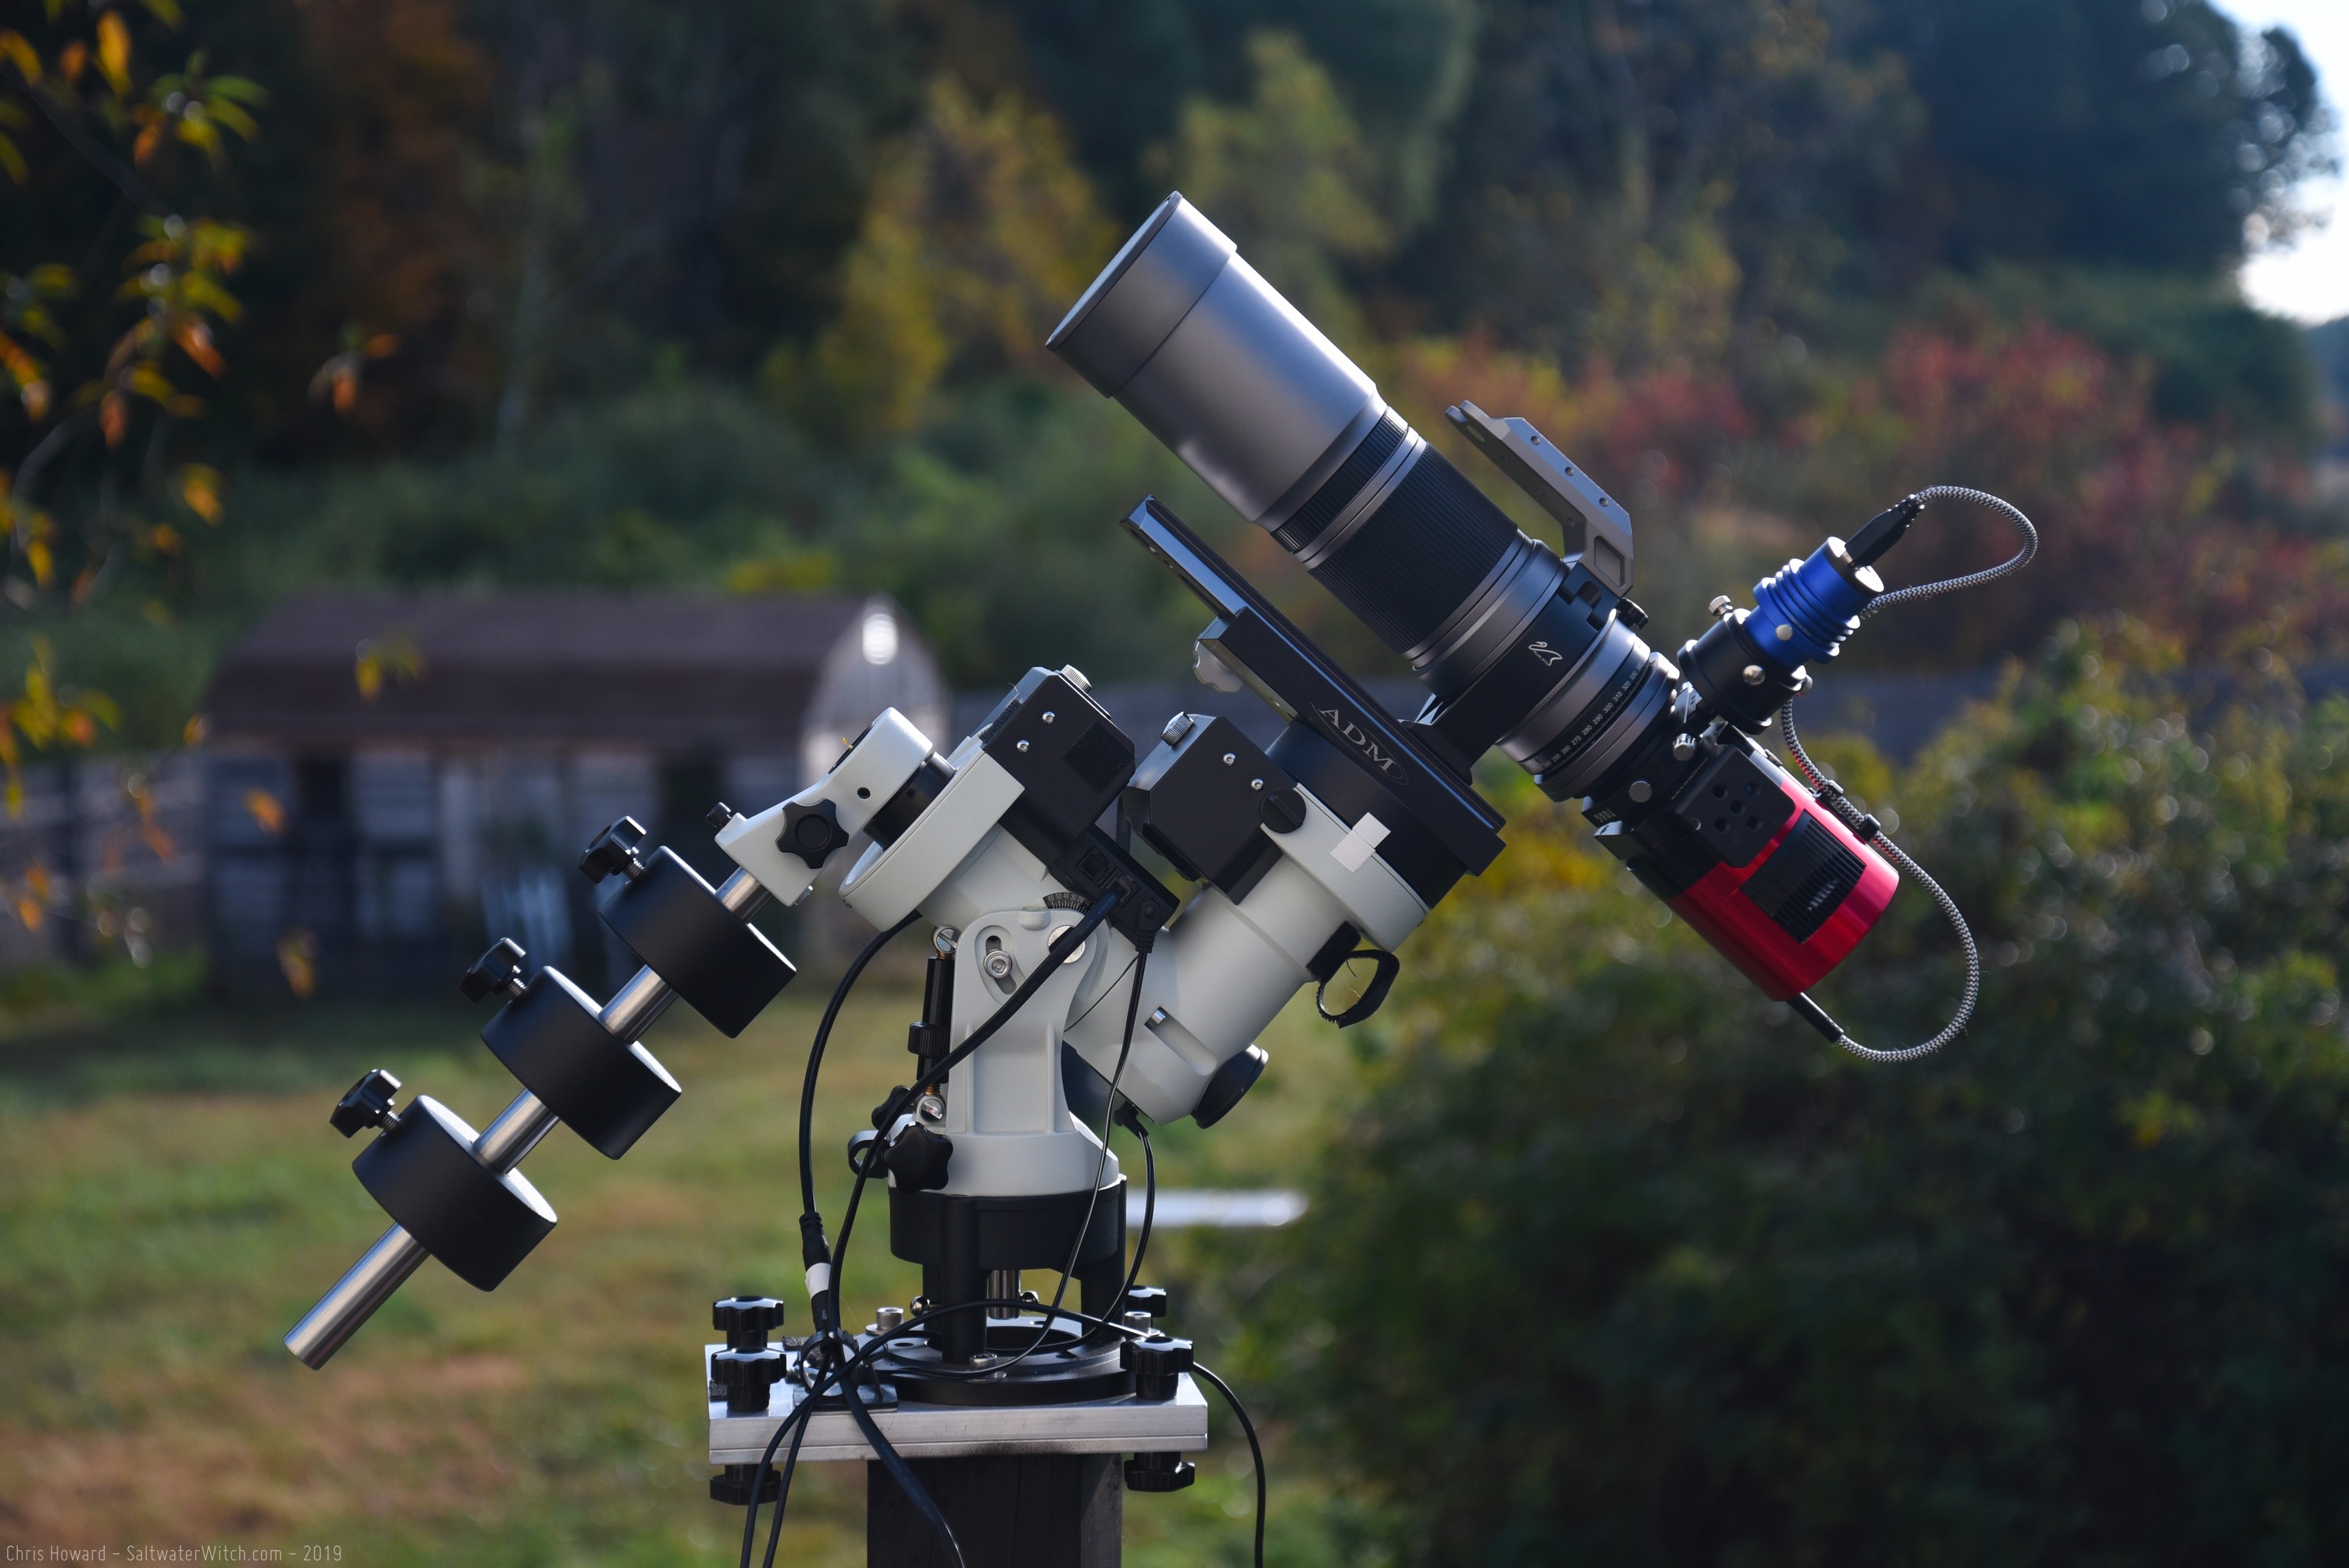
About 450 lightyears away, the Pleiades, Messier 45 is one of the most recognizable open star clusters in northern hemisphere skies. Imaging Notes: 28 x 480 + 28 x 600 second subs, William Optics SpaceCat 51 APO Refractor, ZWO ASI071MC camera, iOptron CEM25P mount.
Astro setup for this imaging run:
Posted February 16, 2022
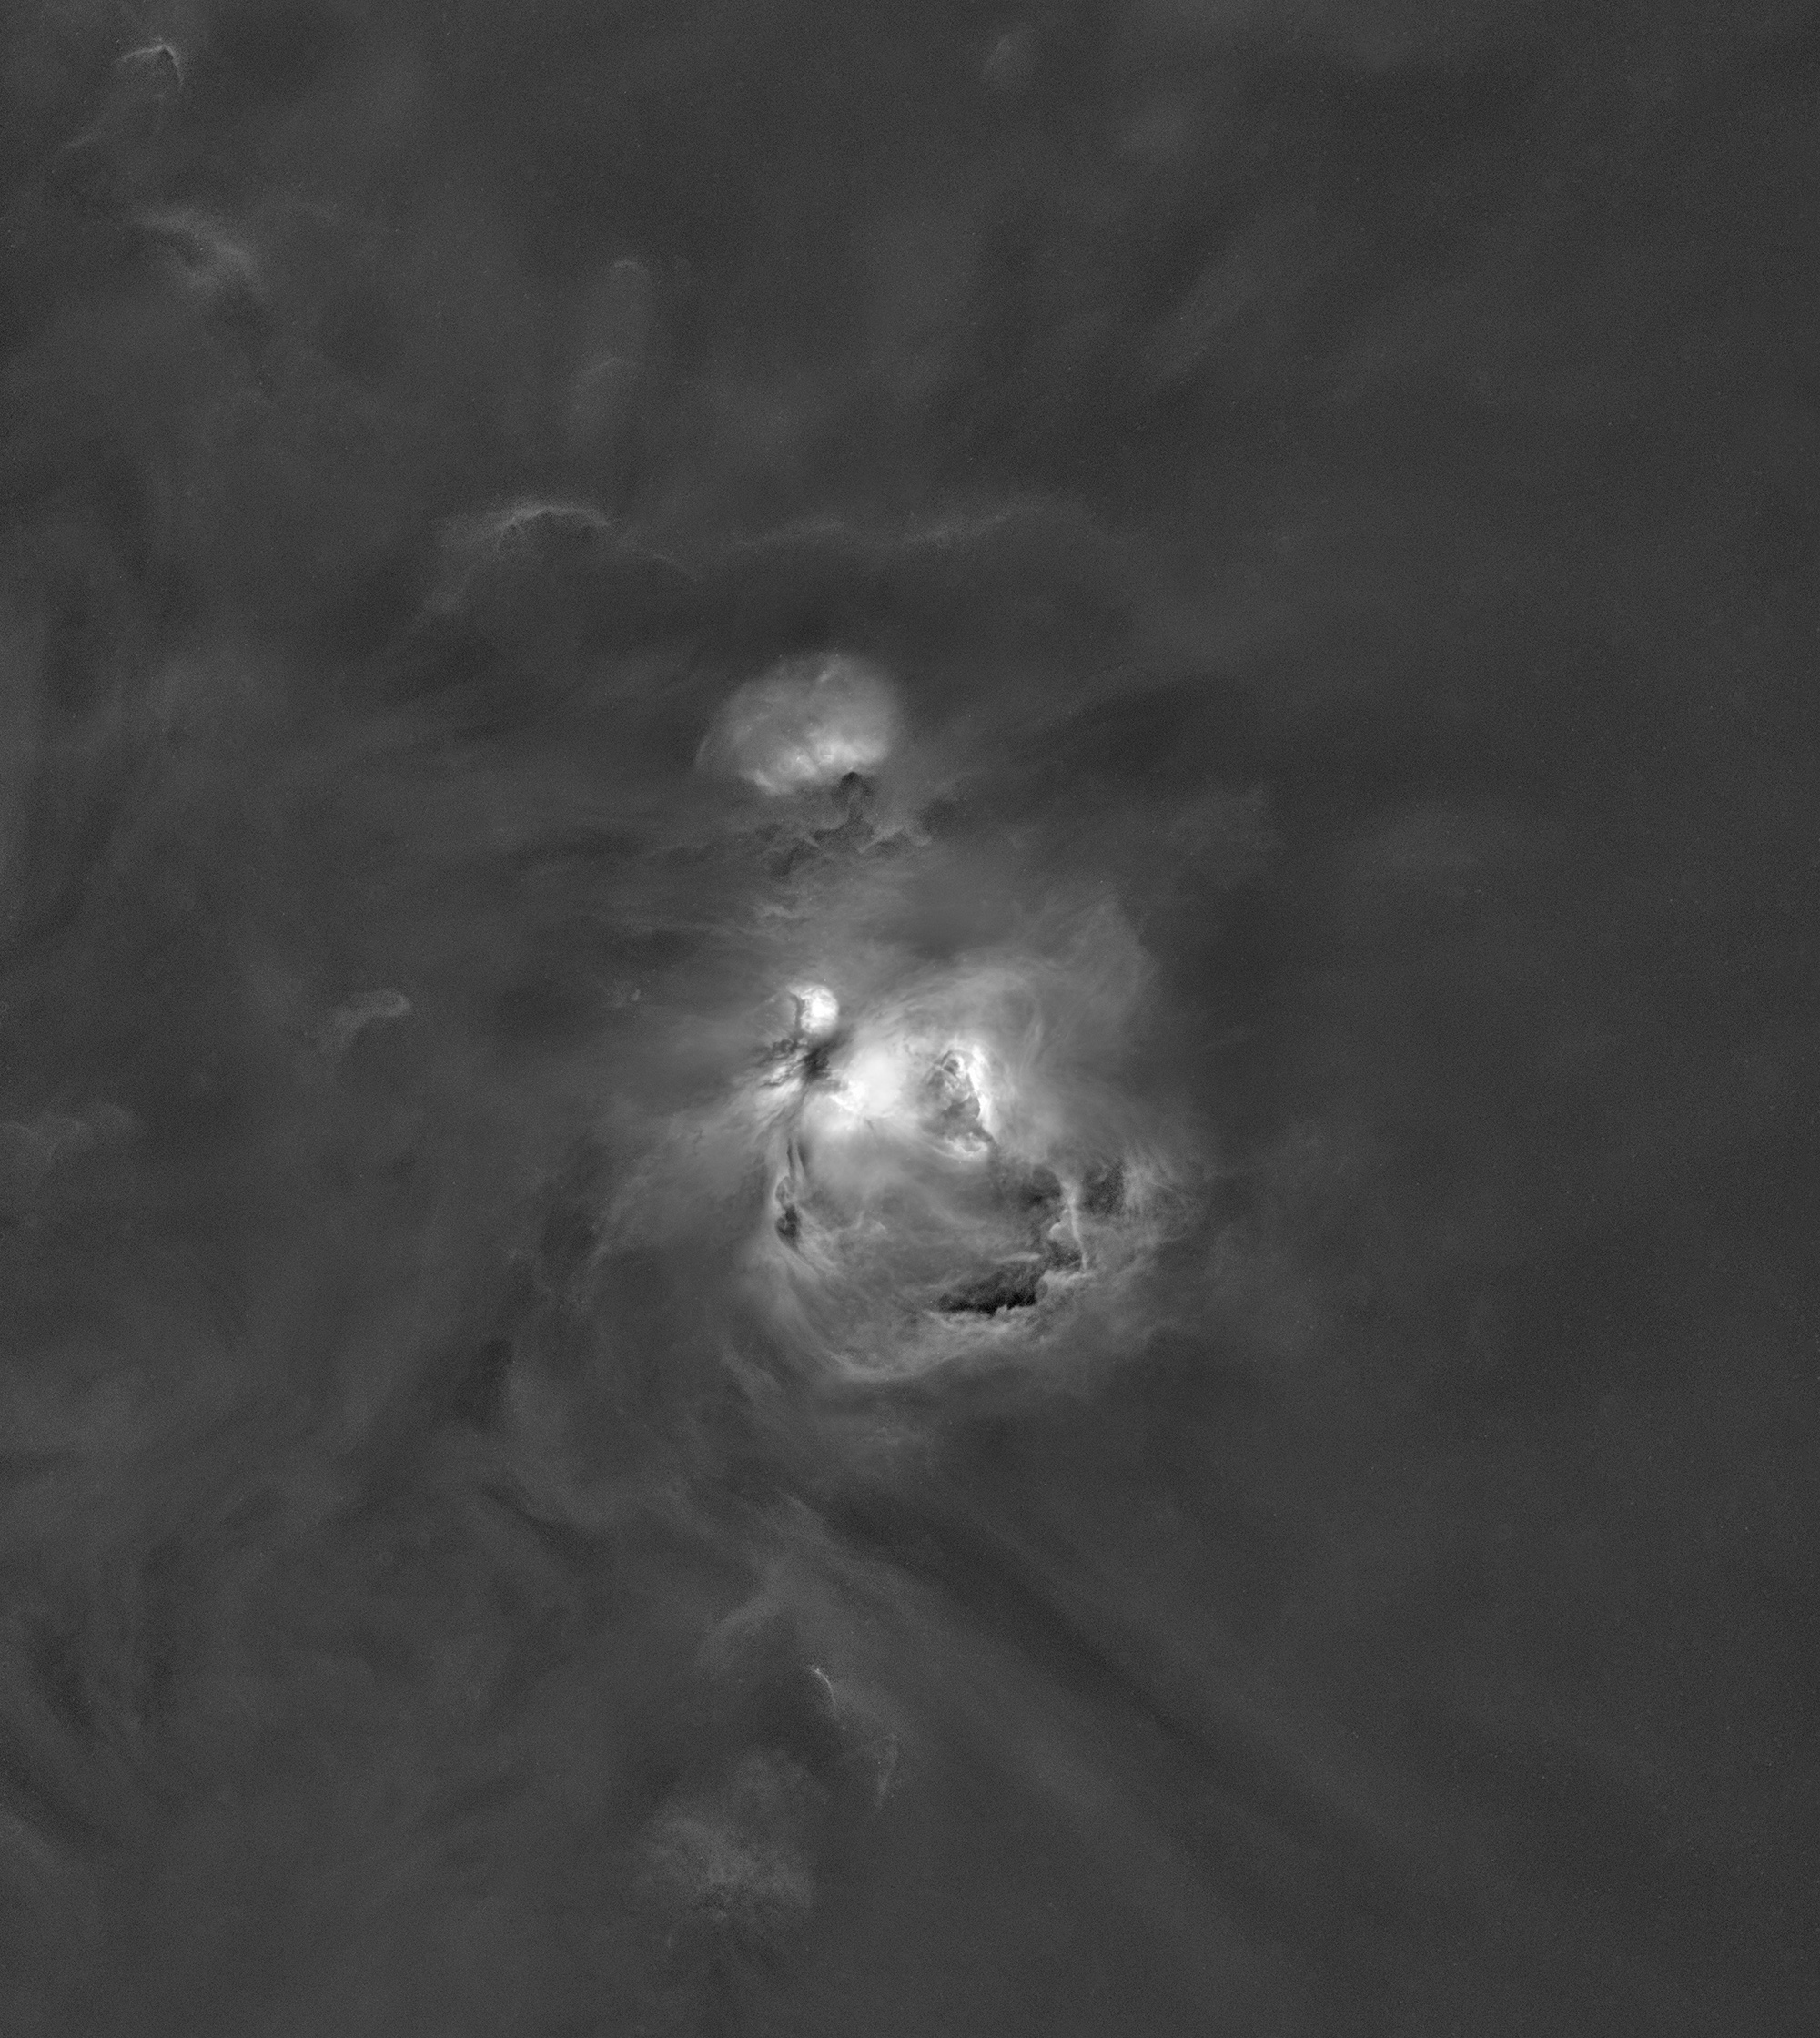
Orion (M42, NGC 1976) and surrounding region
With the stars removed you can really see the hydrogen cloud structures. It is the intense radiation from those stars that drives the currents and eddies and walls of cloud. And then there's the "finger of Orion", middle left, pointing at NGC 1976, and clearly saying, "that's my favorite nebula in the whole galaxy".
Posted December 9, 2021
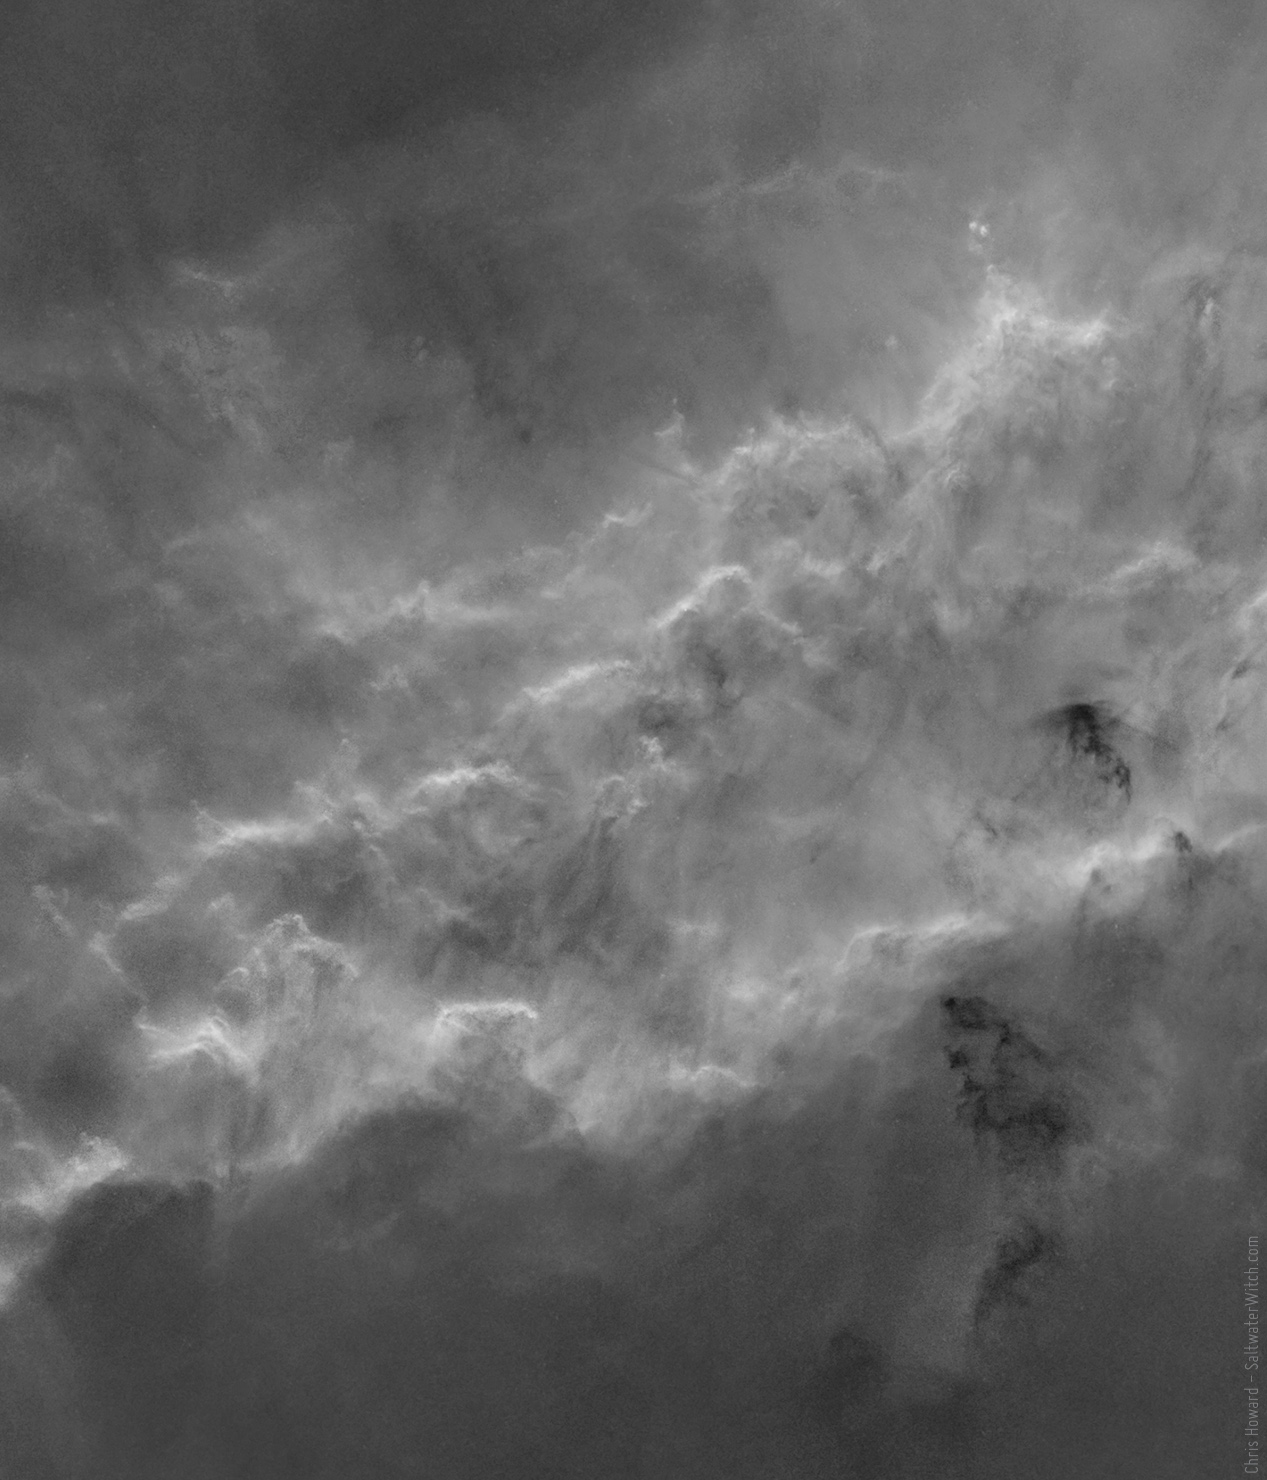
NGC 1499, California Nebula in Ha
Narrowband (3 nanometer hydrogen-alpha) crop of the central region of the California Nebula (NGC 1499) in the Constellation Perseus. I used the neural-net based StarNet to remove the stars from the final image. So we're only seeing the trillions of miles of hydrogen, along with dark bands of dust and interstellar debris.
Posted December 7, 2021
Connecting your astro devices without cables
If you're like me, you like the idea of running one power cable to the scope and that's it. Everything but the mount is there—your cameras, filter wheel, focuser, rotator, dew control, everything but the mount. But what if you could also eliminate the cable running down to the mount and free up a USB port at the same time?
With my INDI-based setups, using Ekos to control it all, it's easy to have a separate Raspberry Pi running indiserver connected to the mount and then your main controller on the scope can treat all remote devices as if they're connected locally. That's built into the INDI protocol. There's actually nothing to stop you from using a separate controller (e.g., a separate Raspberry Pi) for every single device, with one acting as the controller for all the others—Sauron mode, one ring to rule them all style. I don't know why you would want to do this with INDI (also looking at you, Sauron), but it will work.
If this decentralized approach is built into ASCOM, I've never seen it. To accomplish this with ASCOM-supported mounts I used Shoestring Astronomy's bluetooth adapter with my Orion Atlas EQ-G (also worked for the EQ6), and I have a StarFi Wifi adapter for my iOptron mount. I don't have anything like these devices for the Sky-Watcher EQ6-R, and when I did some research I didn't run into any astro-specific solutions for the newer Sky-Watcher mounts.
So, I turned to a generic solution, using a virtual USB hub to connect the EQ6-R and then running the virtual USB client on the main Windows controller. Everything functions properly and should work with any astro apps you're currently using in Windows. I've been using NINA for the past couple months—some great stuff in the latest beta releases: advanced sequencer, the new plug-in model with some awesome plugins, polar alignment built in, and more.
Going wireless with the Sky-Watcher:
Let's cut to the chase. I'm using a VirtualHere server (https://www.virtualhere.com) running on a Raspberry Pi 4 with my Sky-Watcher EQ6-R Pro connected by USB cable, and then my Windows 10 machine is running the VirtualHere client, which creates a COM port that EQMOD or Green Swamp Server connects to. Seriously, it's as simple as that.
Here's my Windows machine stacked on a Pegasus Pocket Powerbox. This is attached to the telescope, with all USB and dew PWM cables going directly to the devices and dew strips. I run power directly from the Pocket Powerbox to the camera and focuser. The only cable that has to leave the scope is the 12v 10amp line to power the PPB.
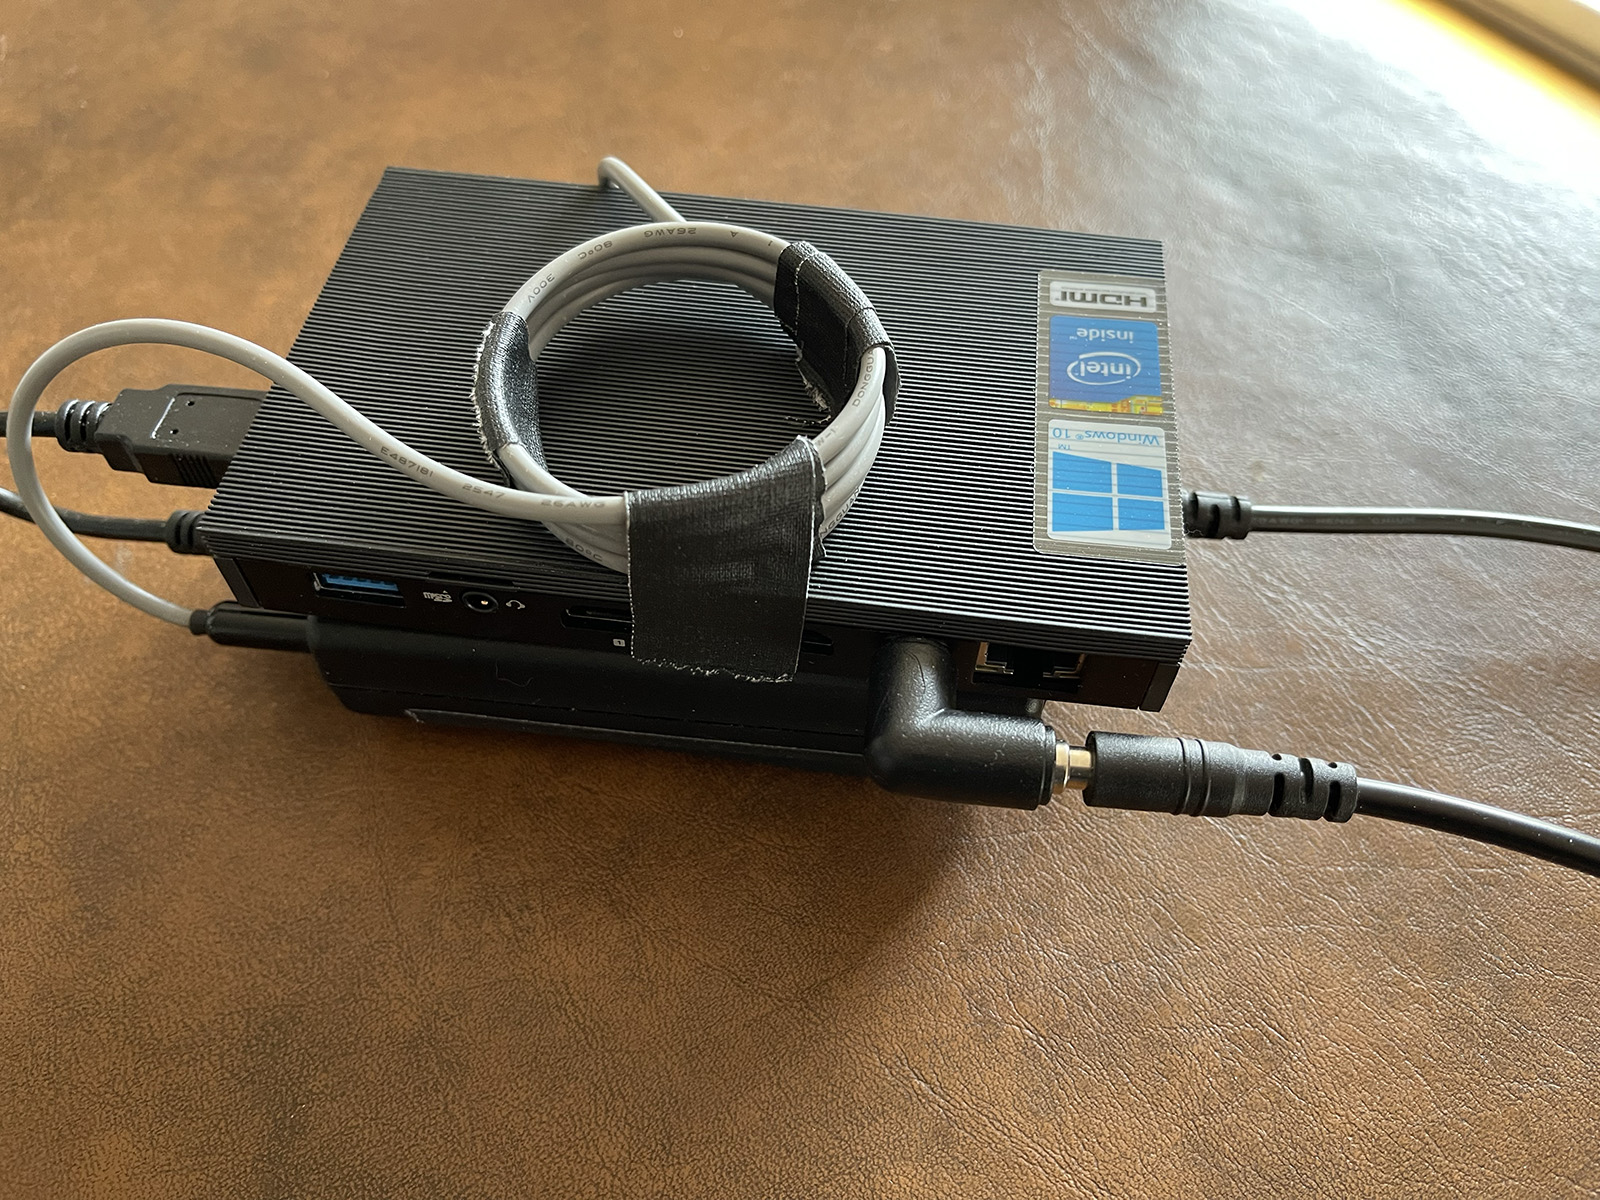
Here's my Sky-Watcher EQ6-R mount with Raspberry Pi 4 attached. Another 12v 10amp line runs from my power supply to these two with a splitter.
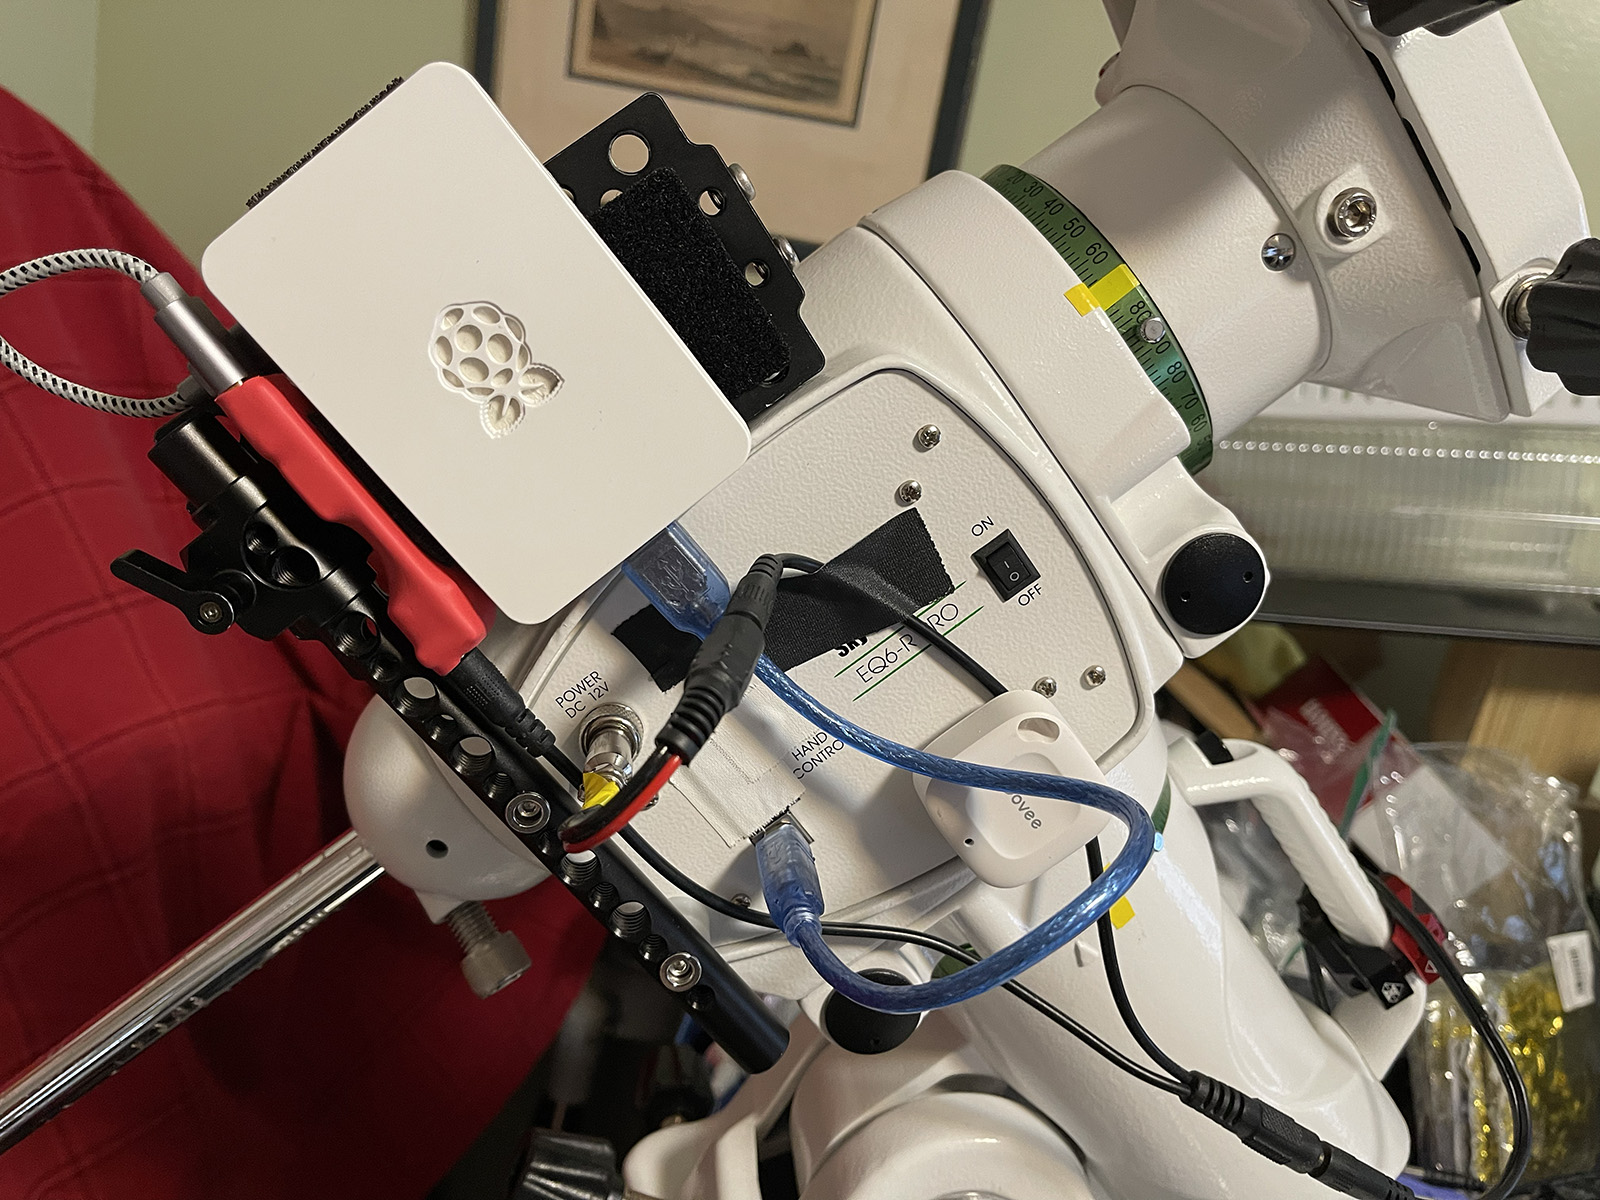
NOTE: you don't need to run the server (where the mount connects) on Windows, even if your astro apps all use ASCOM in Windows. An inexpensive Raspberry PI will work just fine, even one of the $15 Raspberry Pi Zero 2 W boards.
NOTE 2: Network speed should not be a problem. The guiding system is the obvious one to look at—let's say with a guide cam image every second, deviation calculation, and then pushing a signal to the mount. The way I'm thinking about this set up is that if there's going to be latency in the system, it's not going be across the network. The Sky-Watcher EQ6-R mount is expecting data at 115k BAUD. This is the number of signal changes per second (which I think is changes in voltage—someone correct me if I'm wrong), and 115,200 BAUD ends up being about 11,520 bytes per second, or 92,160 bits per second. I don't know what you're using for wifi, but it's going to be measured in Mbps—millions of bits per second. And with processing speeds and USB data rates also high, I don't see a way for latency to play a role in this setup.
Don at Novaspirit Tech has a great video, walking through the complete setup on the Pi, using Linux on both ends, but it works basically the same with Windows on the client side. (https://youtu.be/I5zA1lU5Tw0). VirtualHere has servers for just about every OS and hardware combination imaginable, and clients for MacOS, Linux, and Windows. Whatever you're running, it's probably supported.
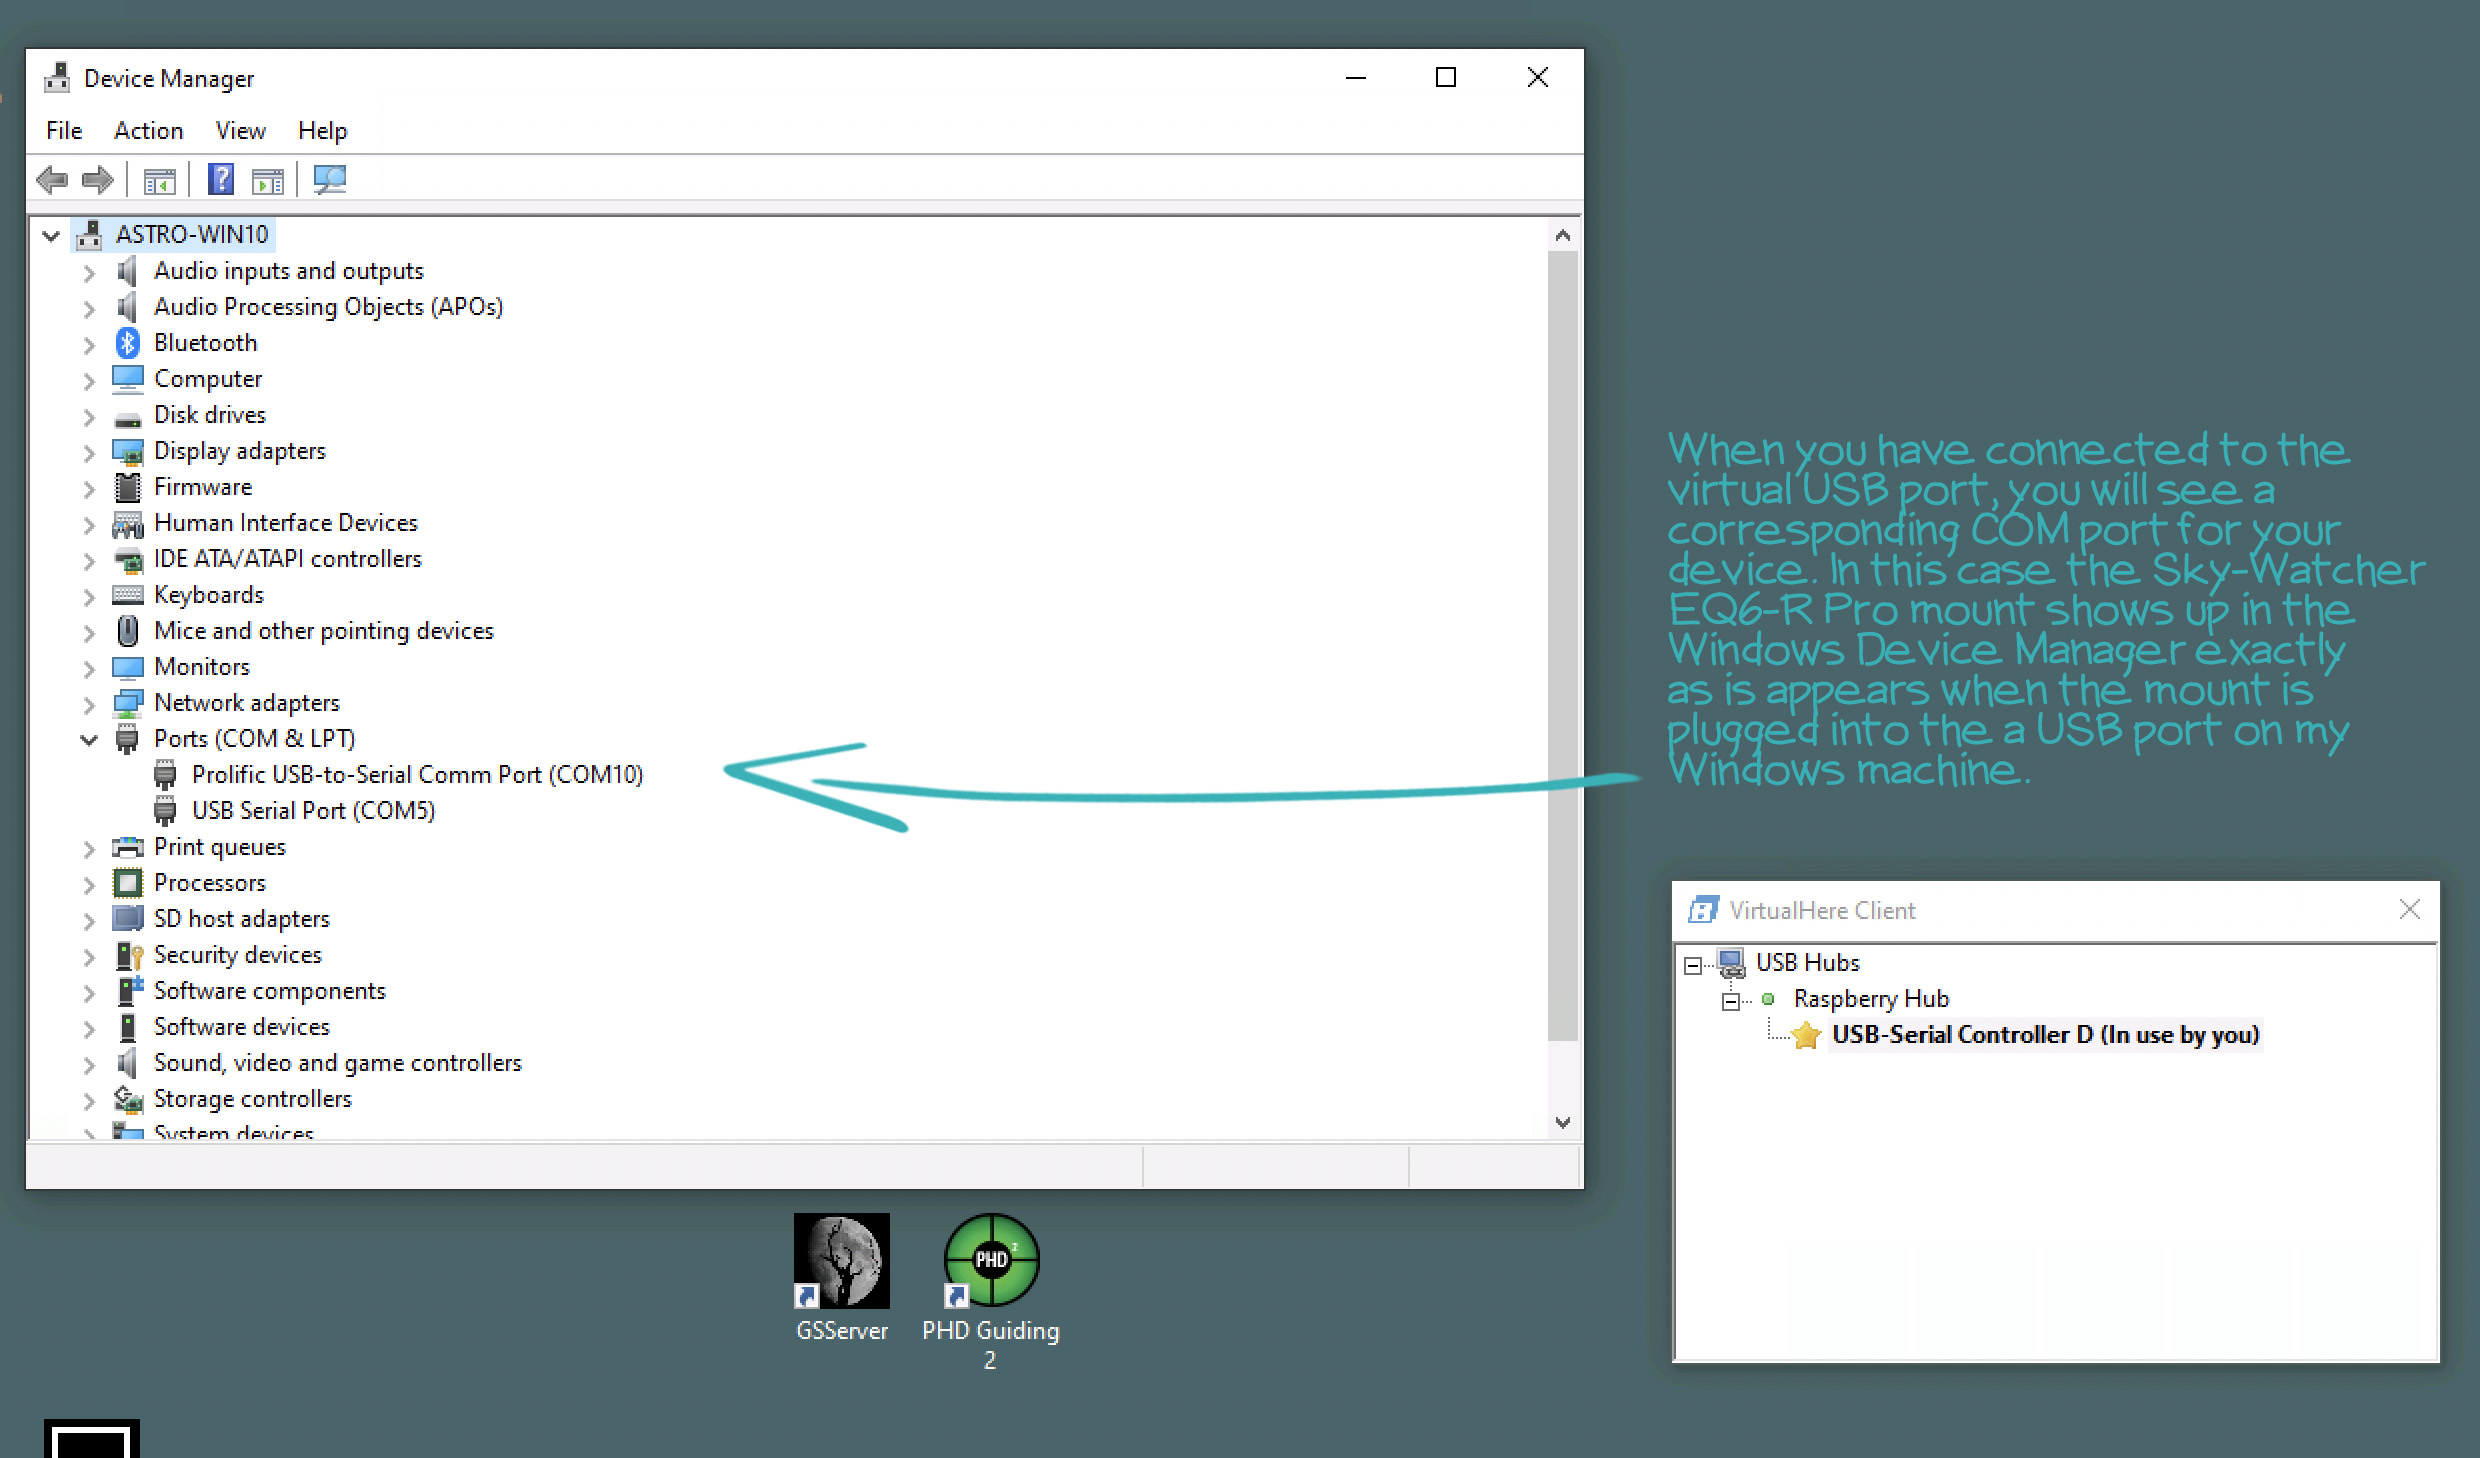
It's the coolest thing when you open the Windows Device Manager and see the "Prolific USB-to-Serial Comm Port (COM10)" under Ports (COM & LPT). That's the EQ6-R Pro virtually connected. From there, you run everything normally—start up EQMOD or Green Swamp Server, connect your stuff, and start imaging.
The VirtualHere server is tied to a single device and will allow you to share one USB connection without time restrictions—which may be all you need. To purchase and share more devices with VirtualHere, get a license for $49 USD.
Here's what I did to get things going:
Once you have Raspberry Pi OS running on the same network as your astro controller, open a terminal and get the ARM version of the server. (If you're fairly new to Raspberry PI single-board computers and want to get the basics of installing the OS, check out TheMakersWorkbench video here https://youtu.be/eS-N8NCB9rk).
Find the download links to the VirtualHere server: https://www.virtualhere.com/usb_server_software
Here are the basic steps. Open a Terminal and get the ARM version of the VH server:
wget https://www.virtualhere.com/sites/default/files/usbserver/vhusbdarm
Make it executable:
chmod +x vhusbdarm
Setup the server to start with the Pi's boot, adding it to rc.local, using nano to edit the file:
sudo nano /etc/rc.local
Move the cursor down to the empty line before the exit 0
Add the following, pointing to where you downloaded the Virtualhere server for ARM processors:
/home/pi/vhusbdarm -b &
Save rc.local using the following commands in nano:
Control-O, <enter>, control-X
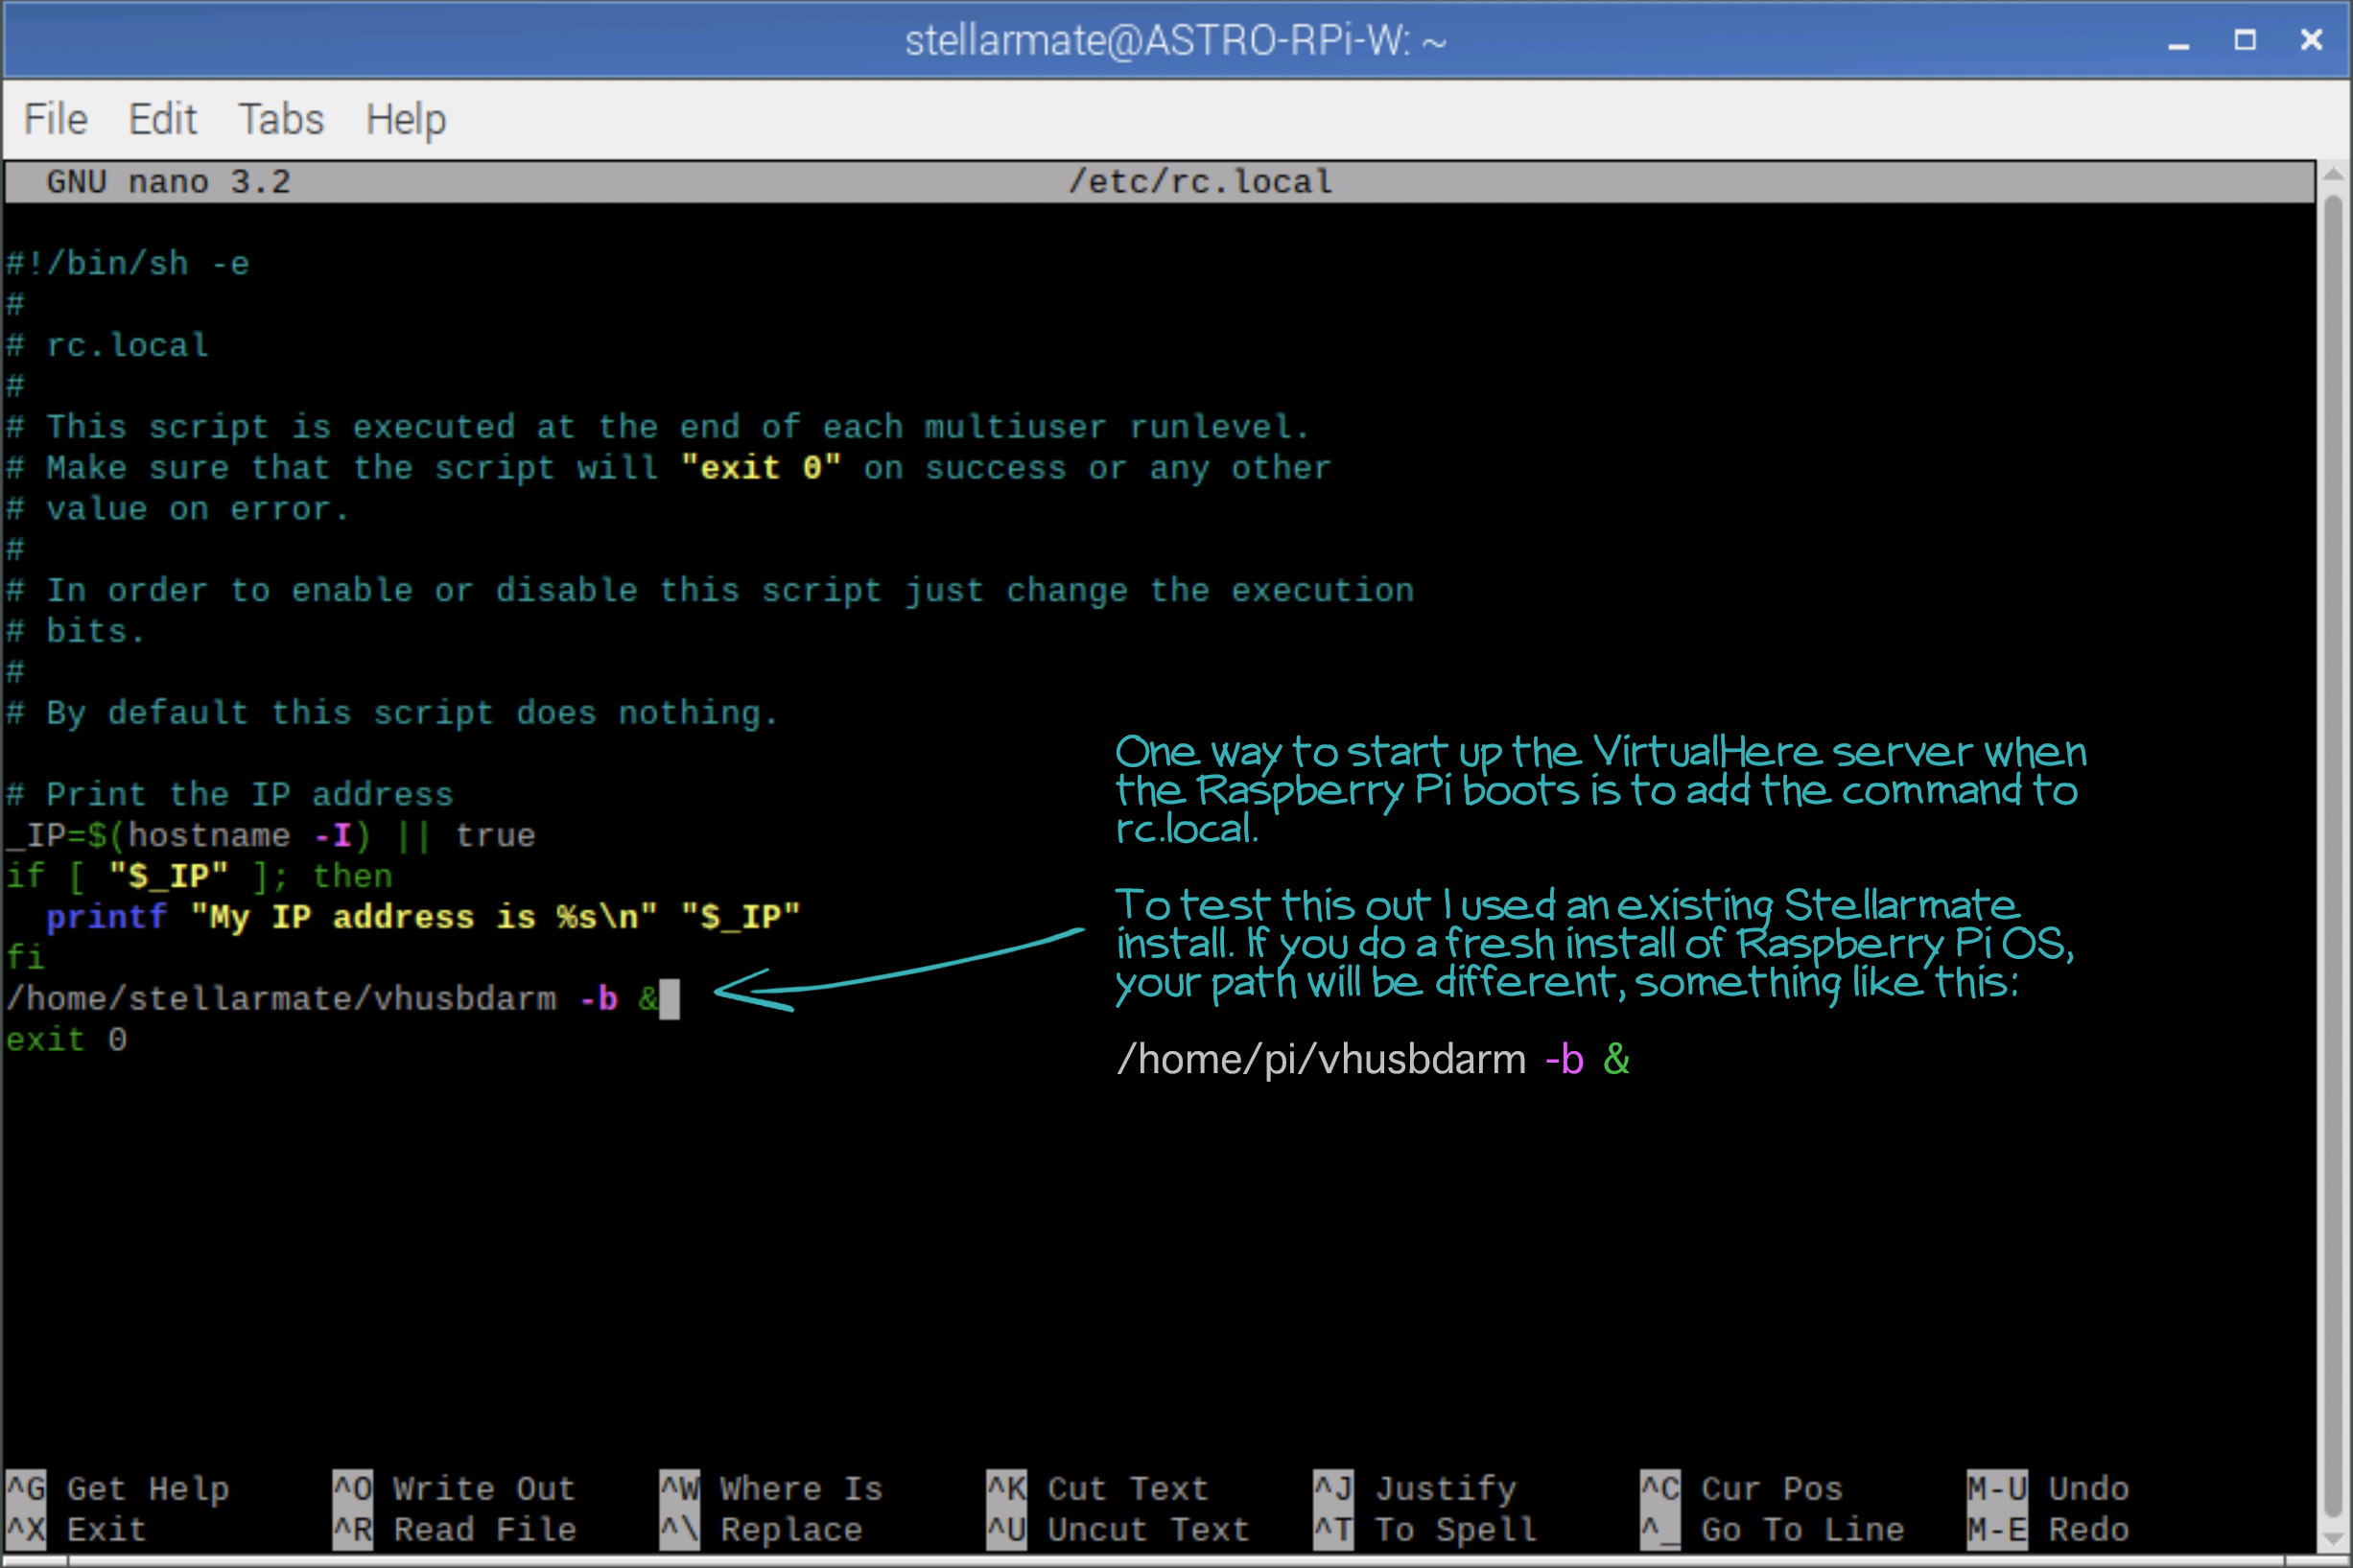
At this point you can reboot and plug in your mount.
On your Windows machine (or Mac, Linux), download the VirtualHere client: https://www.virtualhere.com/usb_client_software
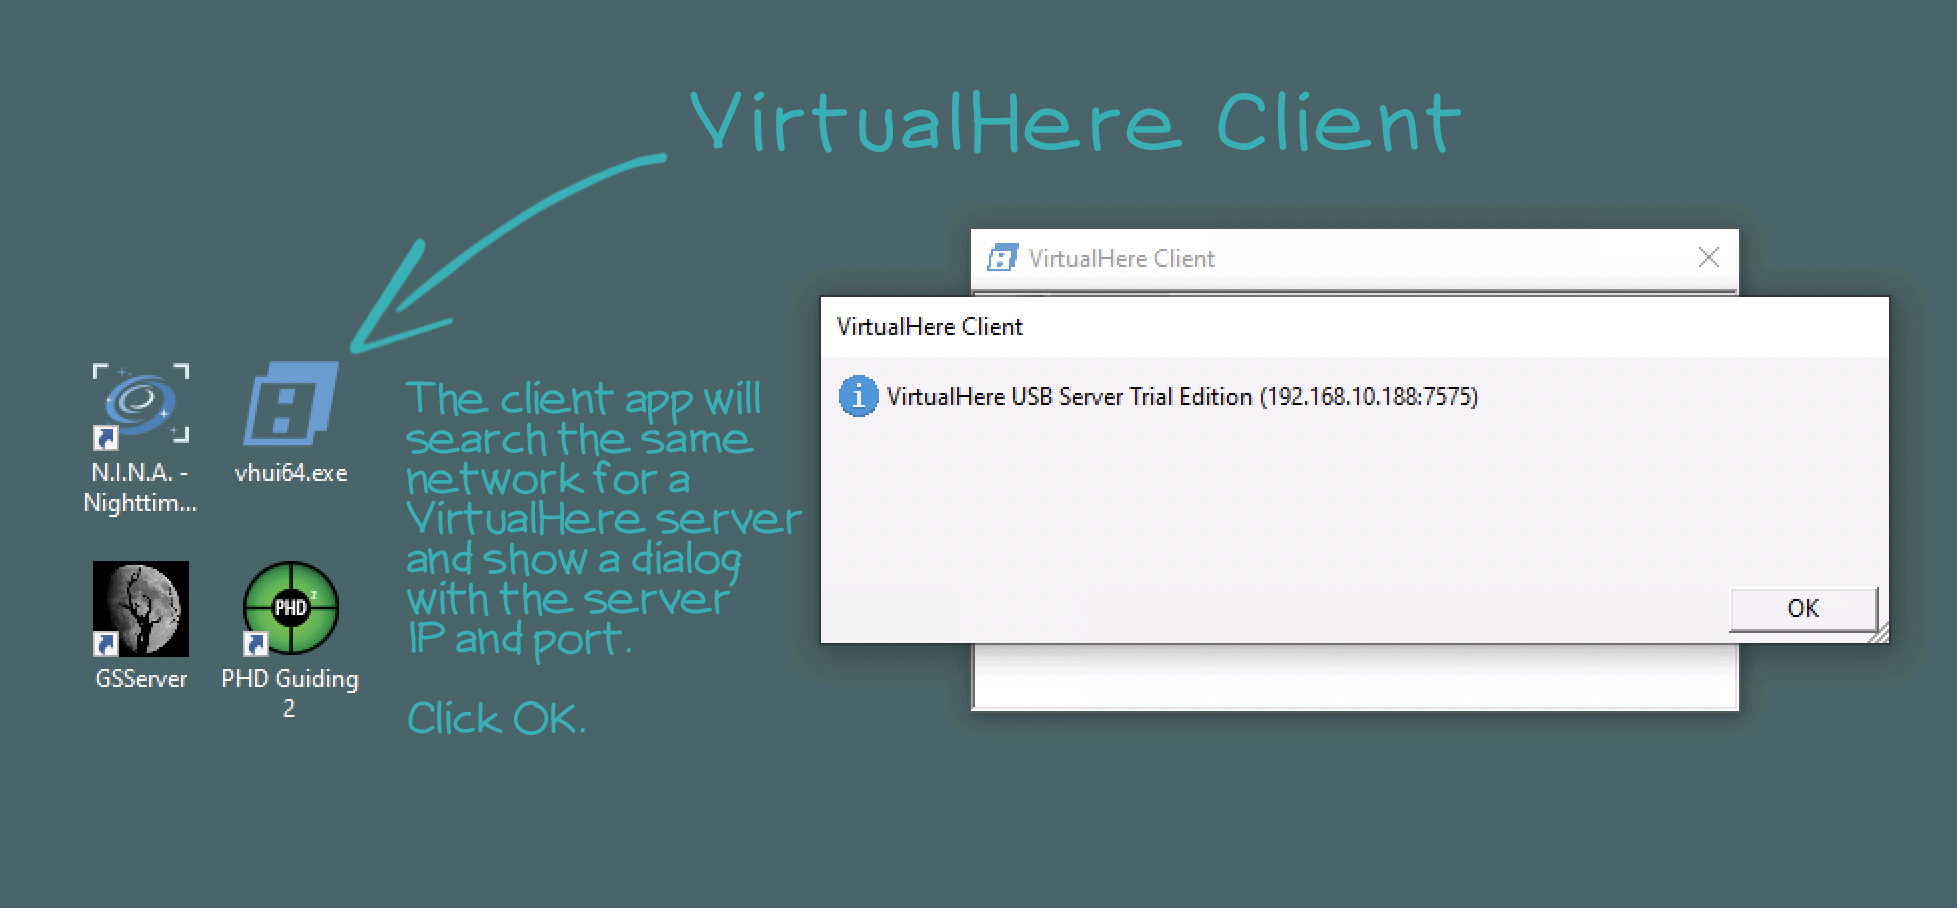
Double-click the app. On Windows it's vhui64.exe (Windows 64-bit VirtualHere Client app), and you should see the VH Client open with a dialog that gives some info about the VirtualHere Server it found on the network—the one running on the Raspberry Pi.
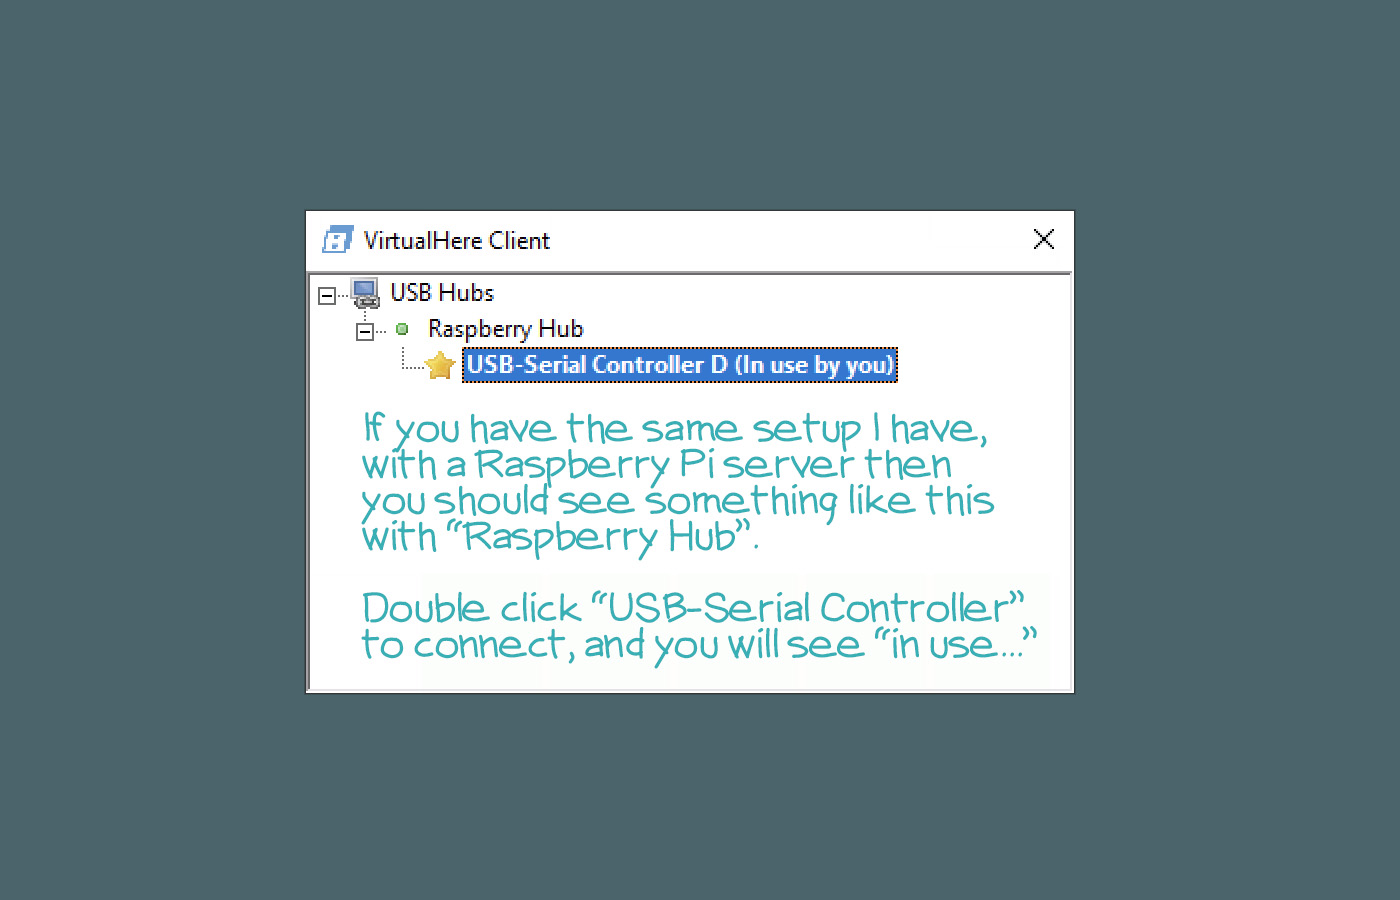
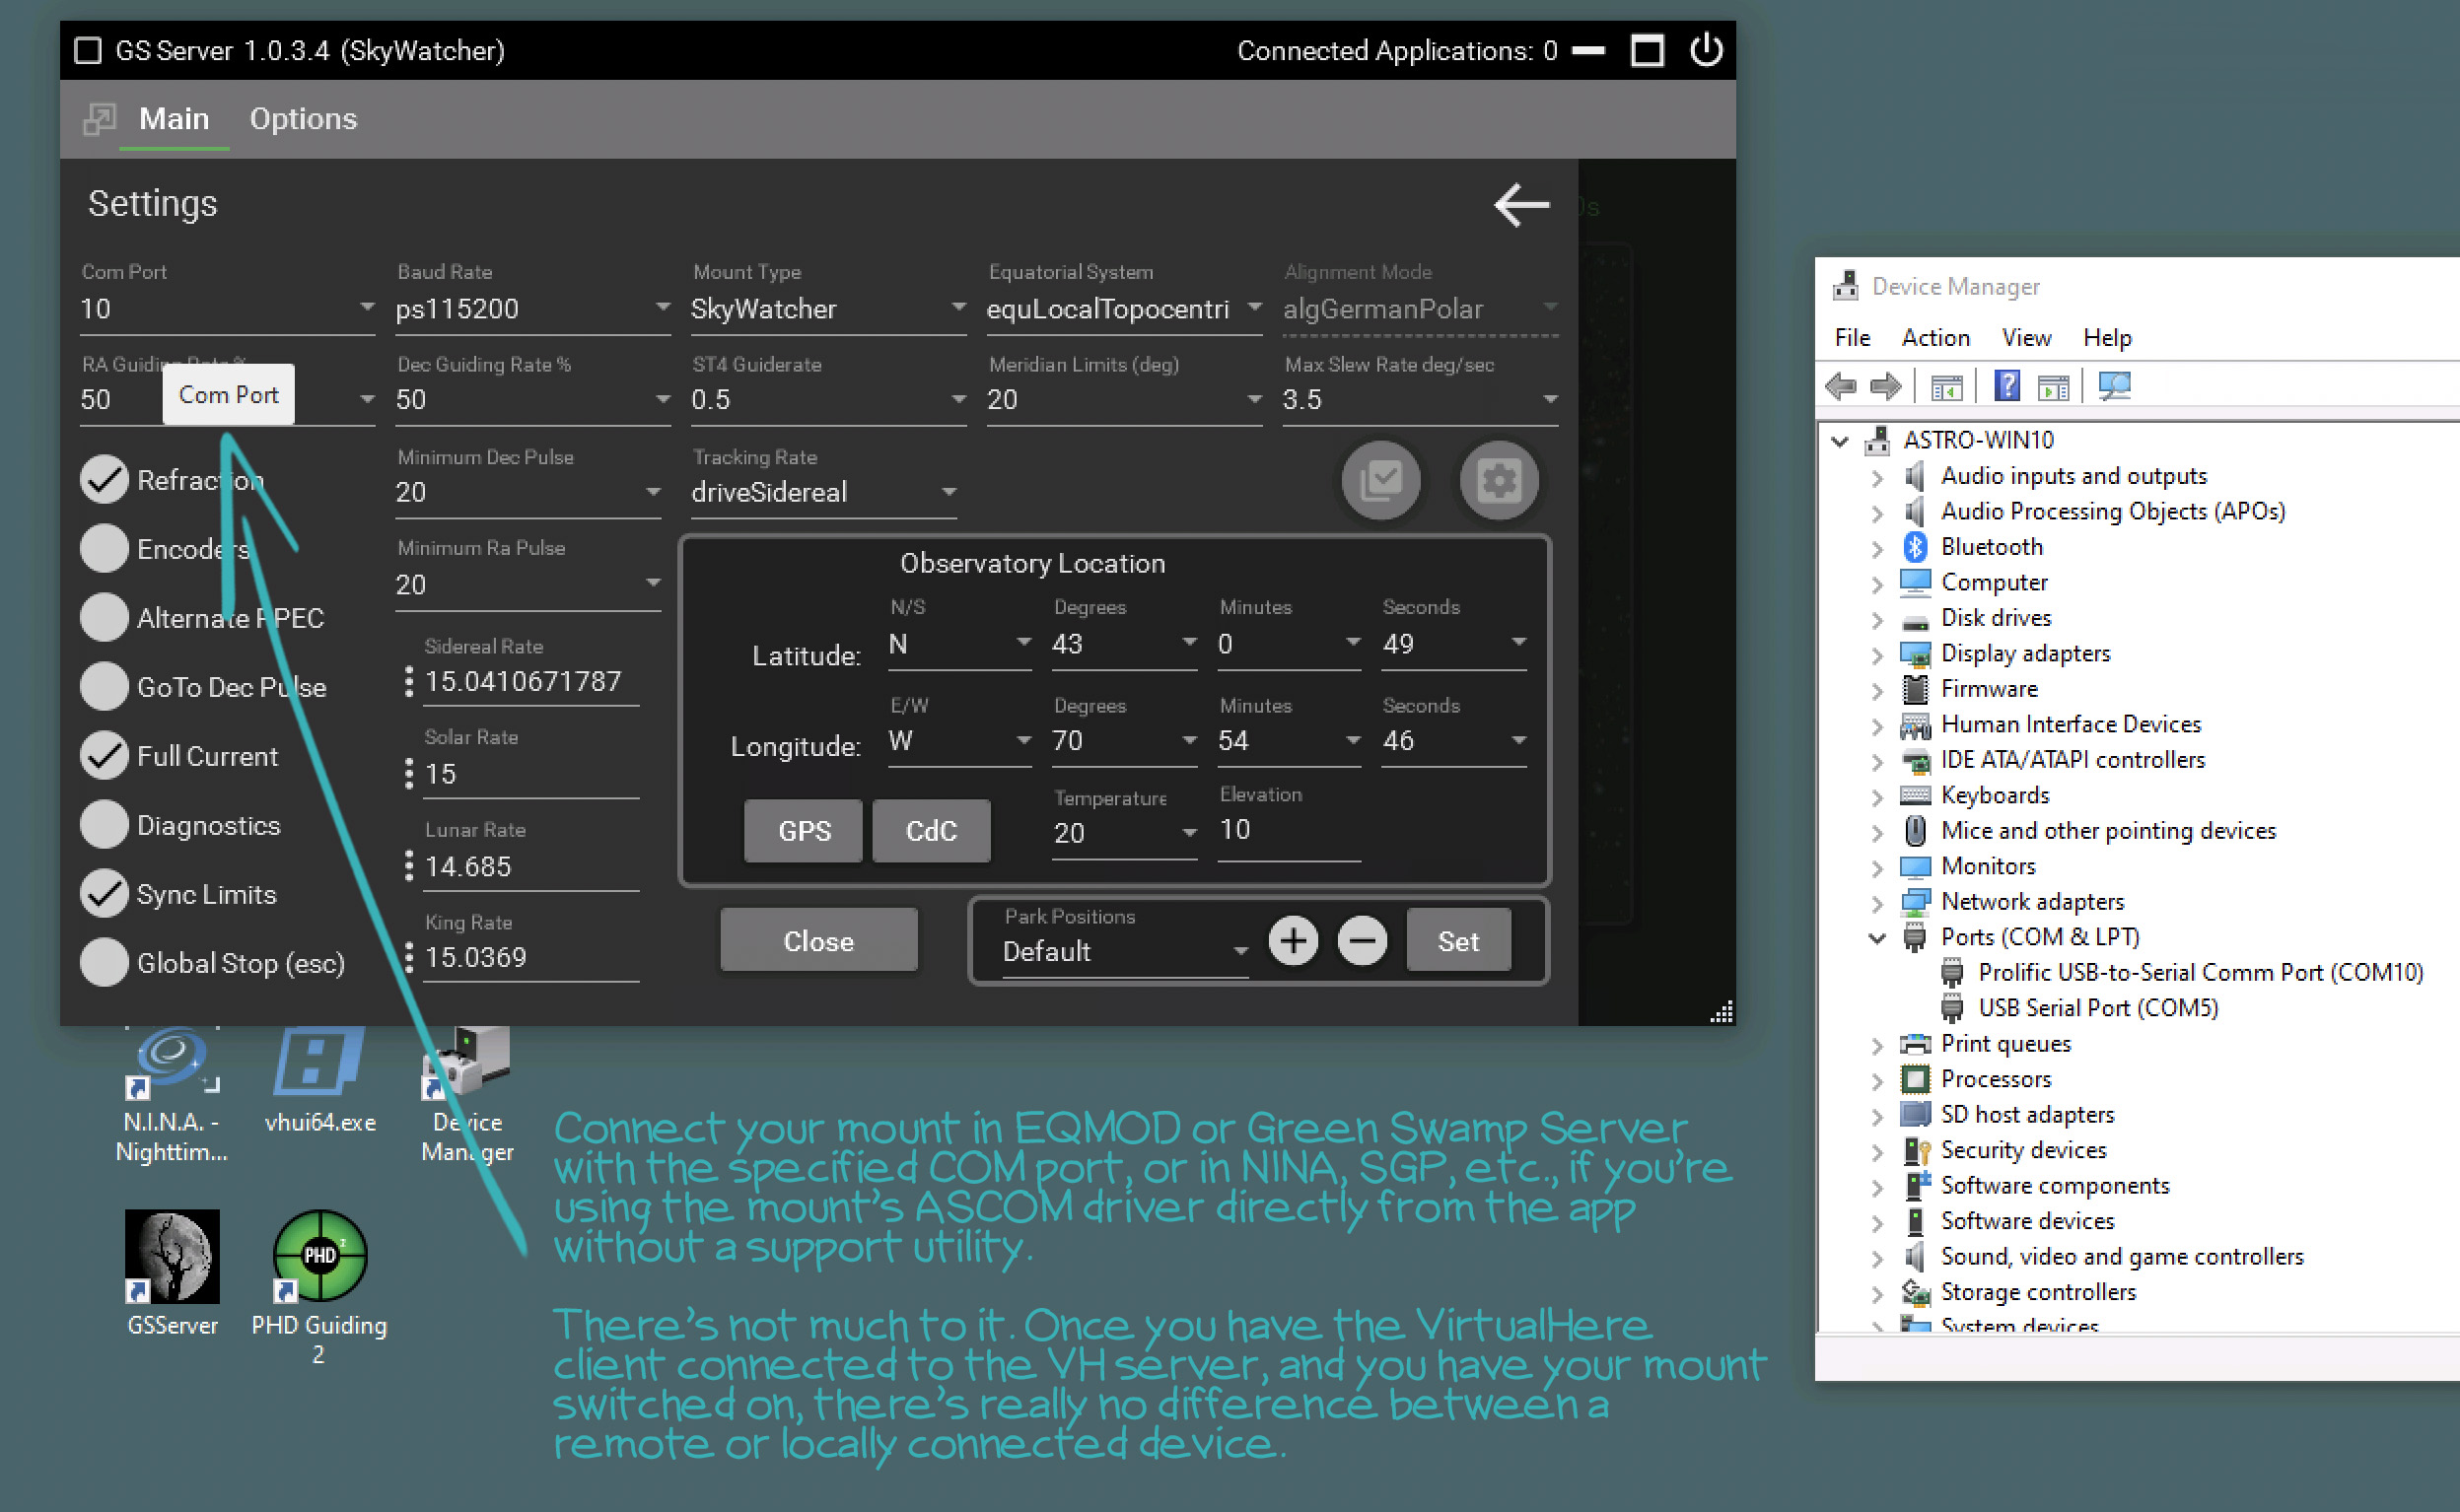
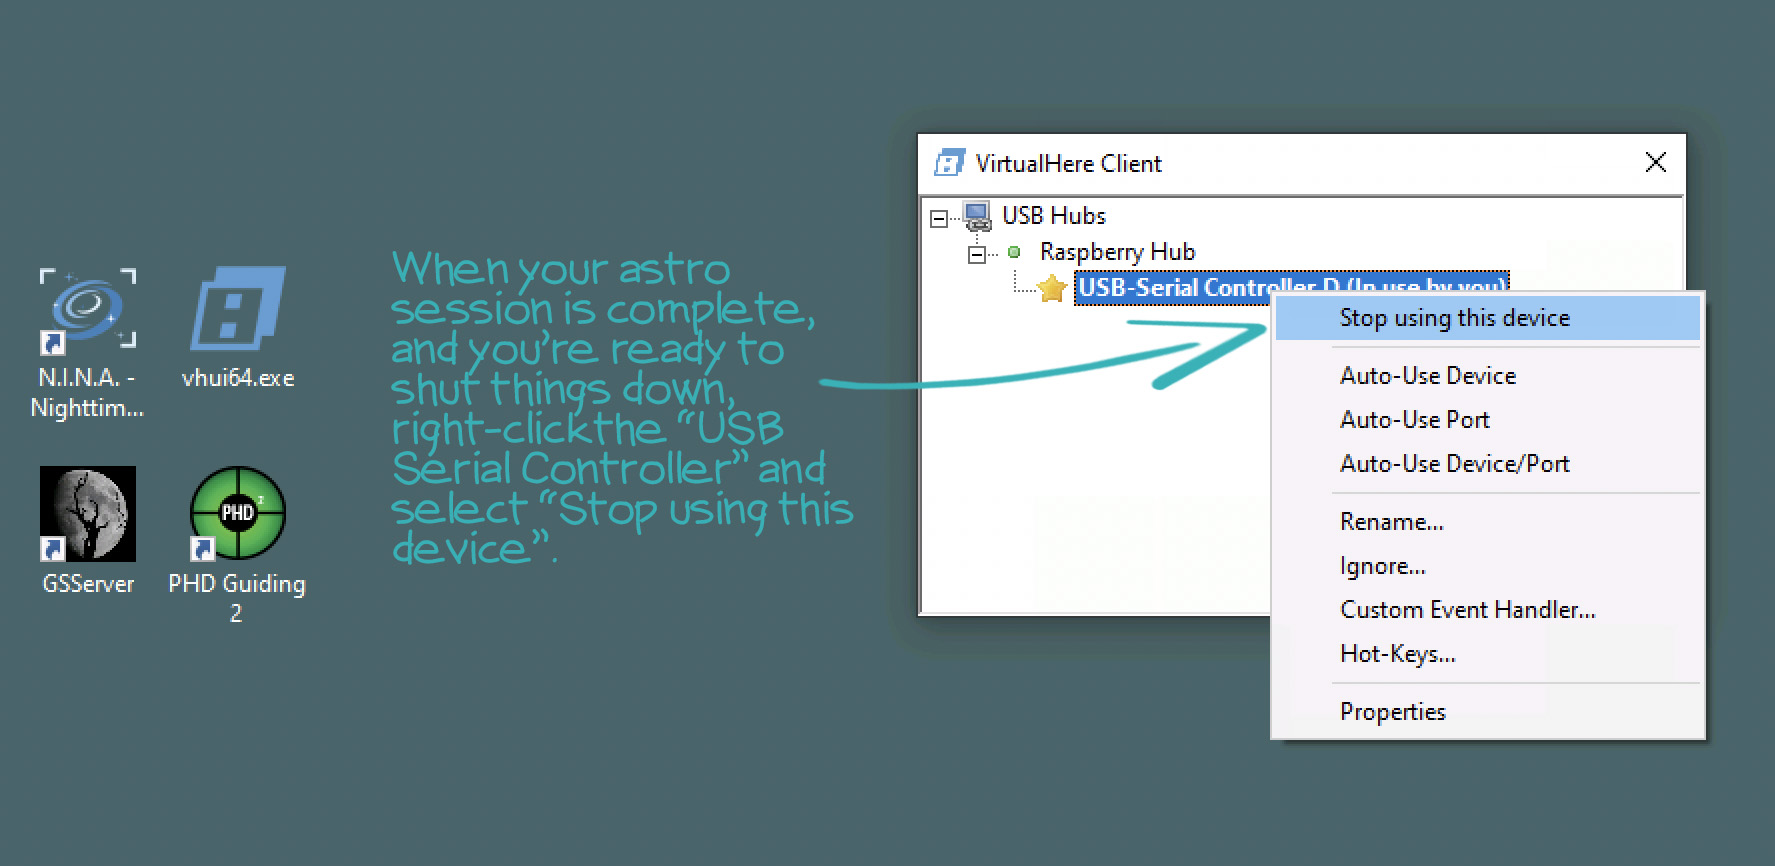
The last step, after you have disconnected the Mount in EQMOD, GS Server, NINA, SGP, etc., go back to the VirtualHere client app and select "Stop using this device" to disconnect the link to the Virtual USB server.
Posted December 5, 2021
Testing out the Newt - leaking light
I was out for a few hours last night with the 800mm Newtonian, mostly to test out the focuser setup and get autofocus working with the AF3. I got about halfway through that--I think I have backlash accounted for, but still had some weirdness with the AF routing, and thinking that was the tension screw on the GSO focuser being too loose. In the middle of testing I kept running into wide bands of reflected light that changed from target to target--I jumped around to NGC 1499, Witches Head in Orion, and last, M45, the Pleiades. There were bands of light of various directions for all but the Witches Head, which is the only one in the southern sky.
Spent the day shooting dark frames and covering up various parts of the scope to track down the source of unwanted light. (I remember Cuiv had a video on this a while back, with a similar issue with his Vixen 800mm Newt). I now have a black cloth sleeve that rolls up from the focuser base to the camera. It works, and it doesn't even look that weird. Really.
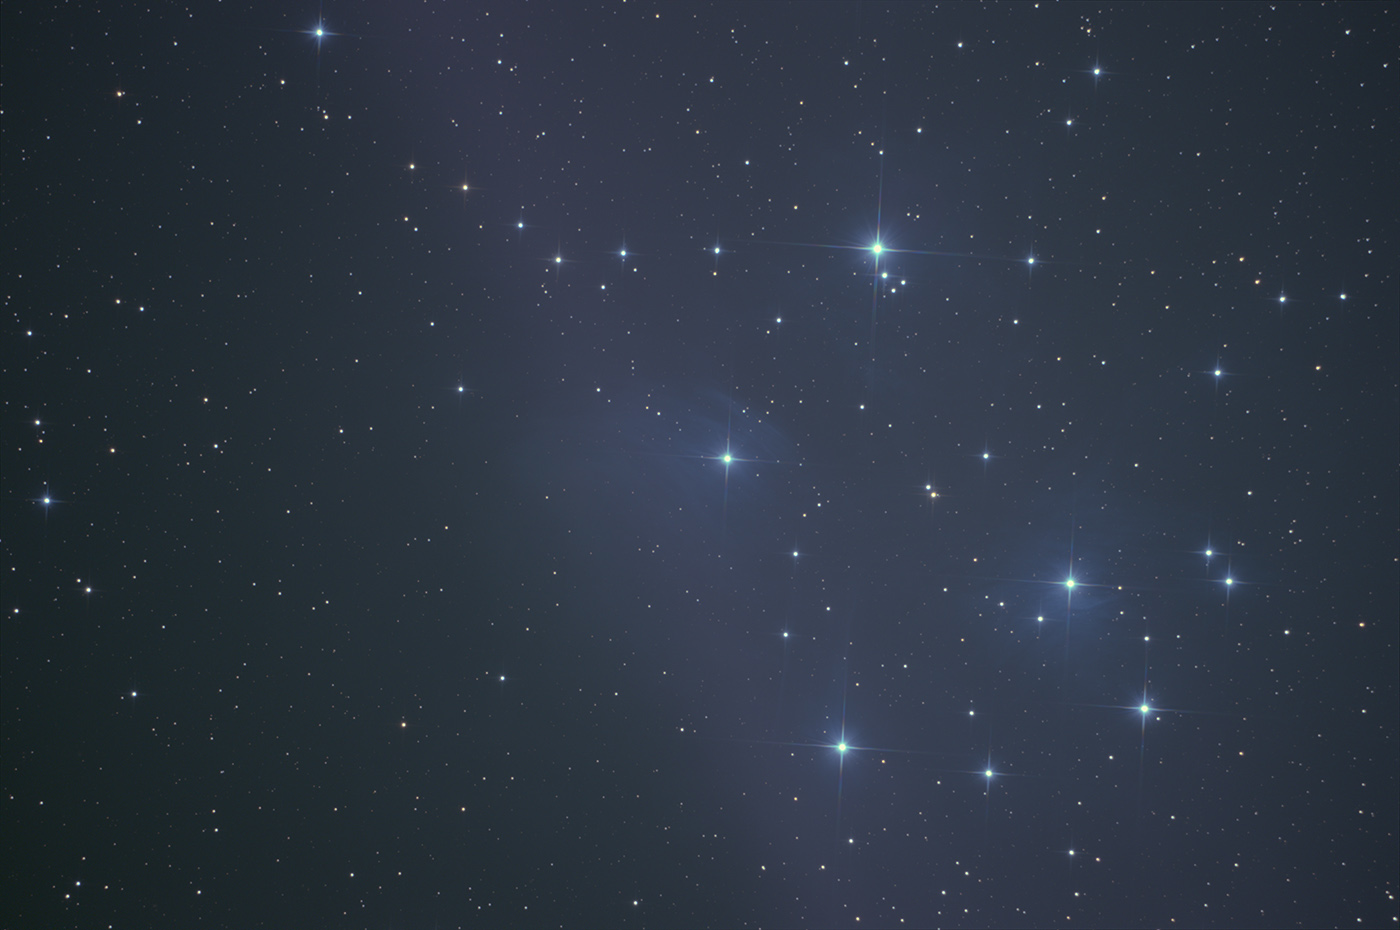
Here's an example of 30 stacked subs of M45, no cal frames, with the band of bad light diagonally across the center--sort of reddish with RGB lined up. I didn't even try to stretch the image, just wanted to see how much showed up after stacking. And the real issue here is that this changed with targets, so no extracting it with flats.
Update: I'm now wondering if my Wyze cam with the IR lights was part or all of the problem. It's one of the Wyze Cam 3s with pretty good low-light video. I usually don't run it with in night vision mode with the IR lights, but I was this time.
Posted December 4, 2021
The Underutilized Ferromagnetism Advantage
When you see reviews of Newtonian astrographs, you sometimes hear—if the option is available—that you should get the carbon fiber version—for a variety of good reasons, including reduced weight, less susceptible to temperature fluctuations like steel tubes, and that cool carbon fiber look. Steel OTAs (Optical Tube Assemblies) are cheaper, but they also have an underutilized ferromagnetic advantage—meaning magnets love to stick to them. I bought a ZWO EAF (auto focuser) for my Apertura 8" (203mm) newtonian with an 800mm focal length at f/4, but I ended up removing it and using it with the William Optics SpaceCat 51. I have a couple Deep Sky Dad autofocusers, including a new-ish AF3 I had bought for a scope I sold.
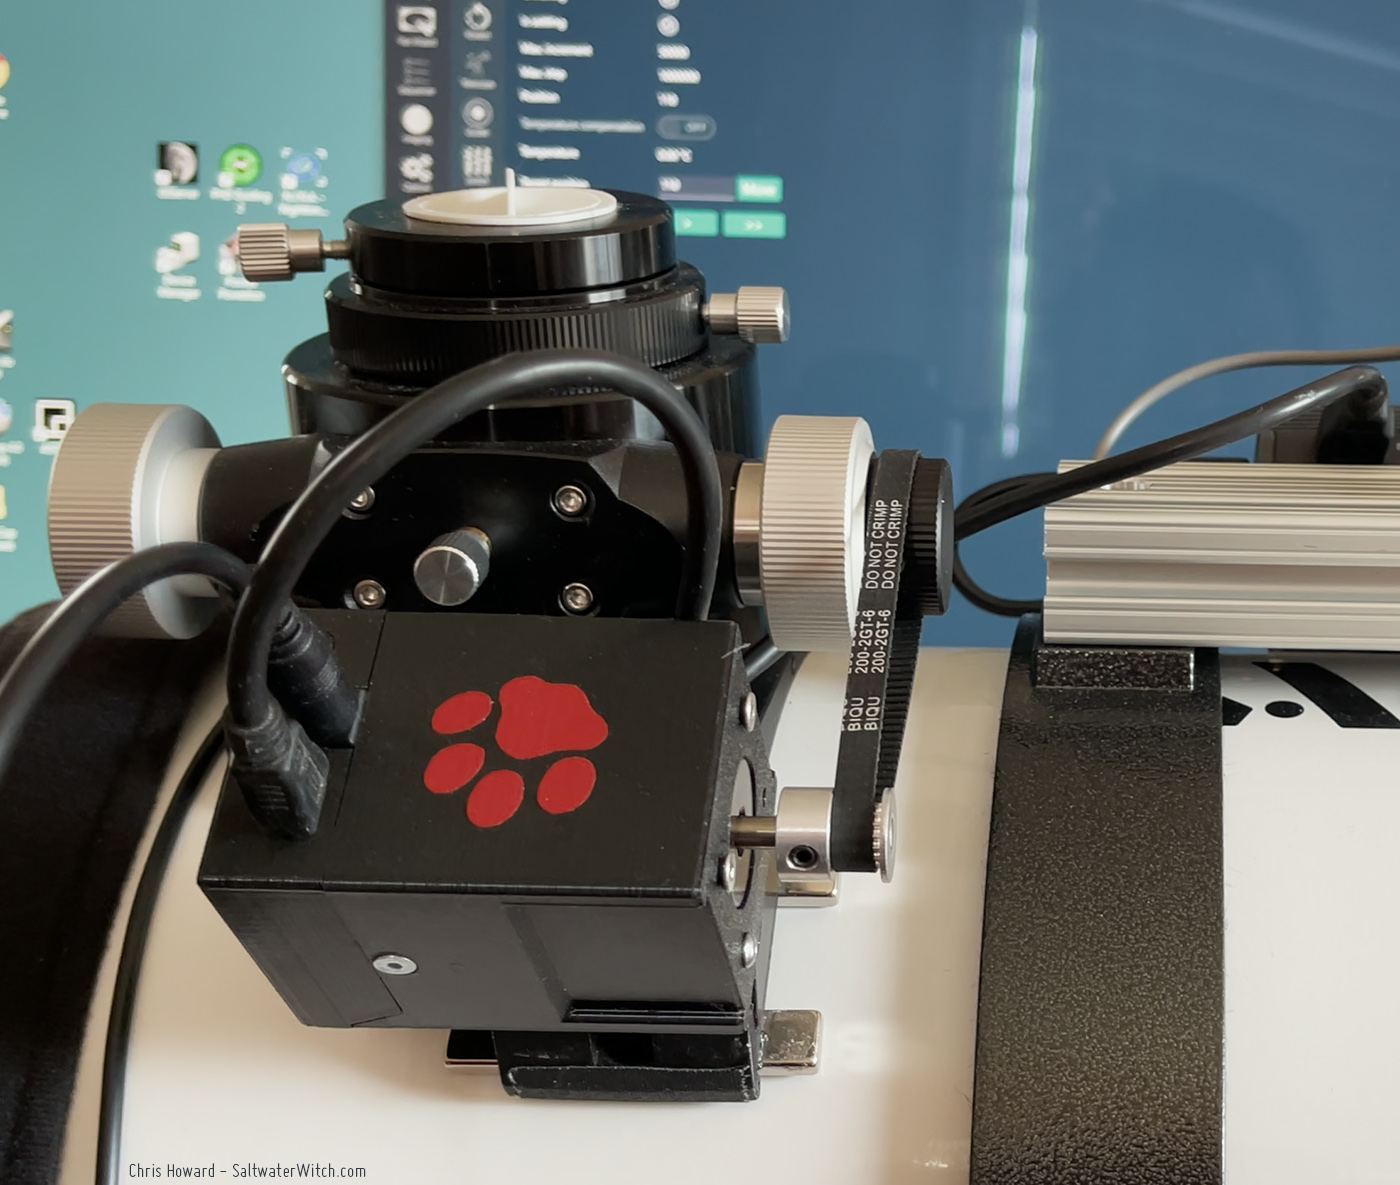
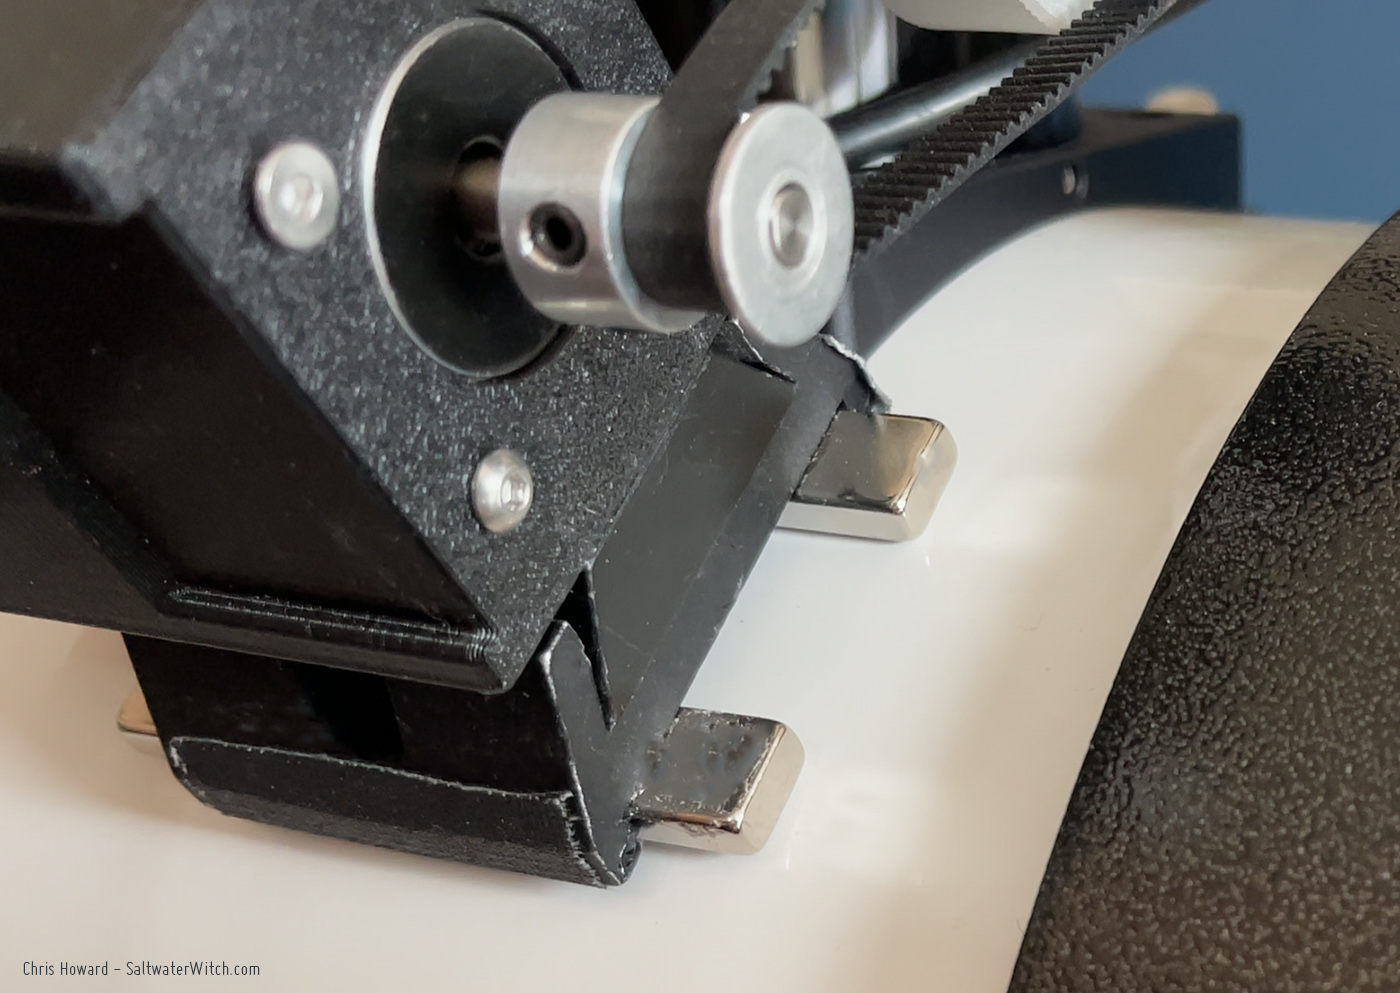
I was tinkering with options for using the AF3 for focusing the Newt. The obvious approach would be to use something like the ZWO EAF bracket and couplers. Or... I could take a completely different path, using strong magnets to hold down the focus motor, with a timing belt to turn the 10:1 reduction focus knob.
This idea wasn't completely out of the blue. I've been using these neodymium bar magnets for a while to hold down Raspberry Pi devices and my Pegasus Pocket Powerbox. I bought a pack of adhesive-backed metal plates (link below) to hold down these devices. But I don't need them for newtonian scope because the whole thing is steel.
First off, these magnets are crazy strong, and you have to be careful with them. Get them around your tools or a box of hex bolts and it's like angry Magneto tussling with the X-Men. But if you glue two of these to a spare guide cam dovetail bracket, you have the perfect base for your autofocus motor on a steel OTA. I always tape over the magnets with gaffers tape (cloth tape) so I don't scratch my scope. I then glued a small 32mm dovetail to the AF3 motor housing and that's it. I let the E6000 glue dry for 24 hours, and tested out the setup up in N.I.N.A. The belt tension was easy to dial in by carefully sliding the dovetail base and testing the belt. I'm happy to report that everything seems to work well. The motor isn't going to budge with two of these magnets holding it down.
E6000 industrial-strength glue
https://www.amazon.com/dp/product/B071DXL2MP
Neodymium Bar Magnets
https://www.amazon.com/dp/product/B07QWMHGHZ
Adhesive metal plates for magnets
https://www.amazon.com/dp/product/B08CHF846J
Posted December 1, 2021
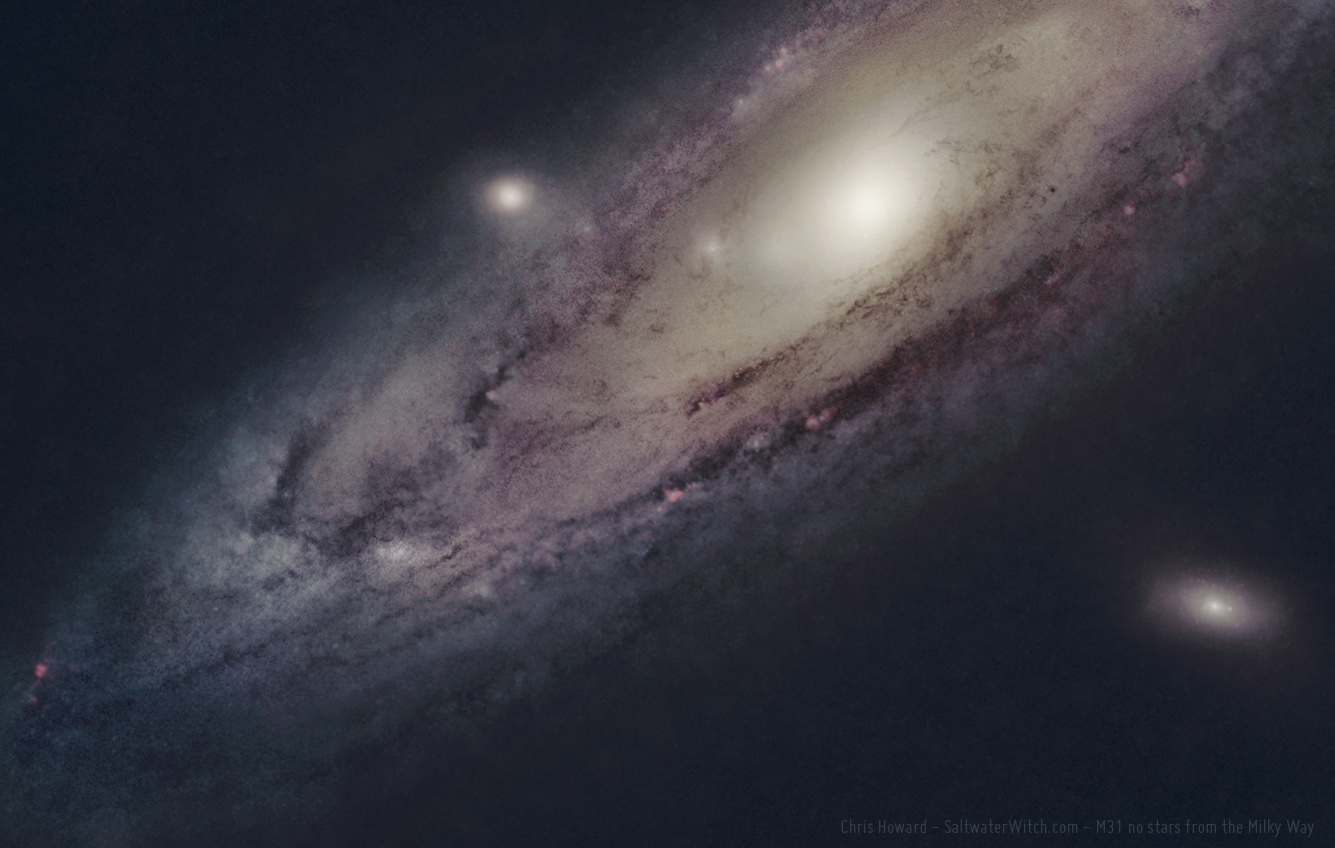
Nothing from the Milky Way
Here’s M31, the Andromeda Galaxy without any stars from our galaxy, the Milky Way. The two bright objects orbiting Andromeda are captured galaxies, M101 (bottom right) and M32 above Andromeda. Almost everything in this frame that generates light is a star in another galaxy.
