Harmonic Drive testing
Star Tracker Build: the 100:1 reduction Harmonic Drive gearhead arrived today, and I'm planning out the mechanics for the direct drive train and structure for a case (3D printing a prototype case that will hold everything together tonight). Harmonic drives are the way to go if you're looking for extreme precision, zero backlash, and just plain cool technology: https://www.youtube.com/watch?v=3mWemlMEzFk I will be using the original iOptron CEM25P saddle for testing, and the threaded holes in the harmonic drive line up neatly. Gearhead specs here: http://www.harmonicdrive.net/products/servo-mount-gearheads/harmonic-drive/csf-gh/14/csf-14-100-gh


Posted January 21, 2019
Connecting the iOptron StarFi adapter
My purpose was to avoid running another USB cable from the iOptron hand controller to the Raspberry Pi3B+, using iOptron's Wifi-to-serial adapter, "StarFi". Here's the basic setup: you plug in the hand controller normally. The adapter comes with two short cables with RJ jacks. The four lead RJ11 cable goes from the RS232 port on the StarFi to the serial port on the hand controller, and the 6 lead RJ-12 runs from the StarFi "Port" to the "iOptron Port" on the CEM25P mount. The instructions guide your through adding the device to your network and using it with ASCOM. I had no problem setting it up with Ekos/INDI, using an IP address instead of a serial port.
![]()
Posted December 29, 2018
Astro System Update
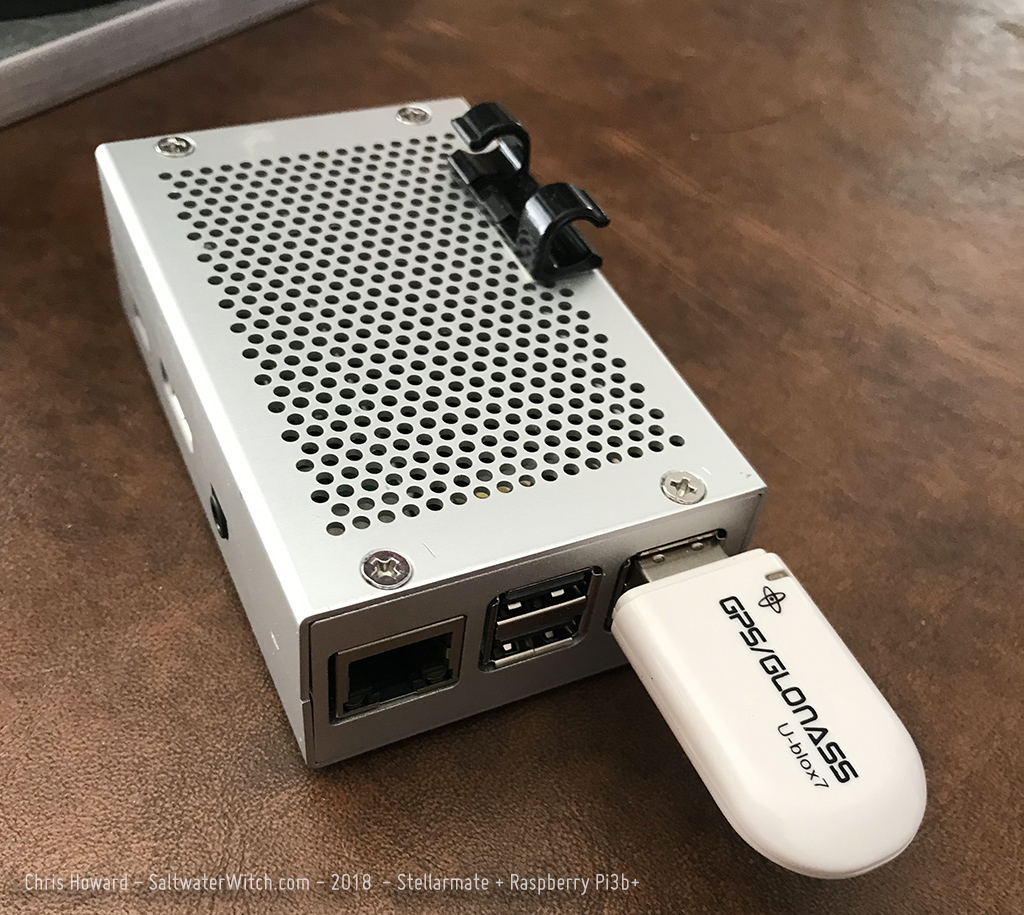
I bought Stellarmate OS in October and installed it on a Raspberry Pi3b+ (The latest Pi with a 1.4GHz 64-bit quad-core processor, dual-band wireless, and Bluetooth 4.2/BLE). This system is now running the INDI server core of my astro setup, and I replaced the second Pi in my "distributed INDI-based astro-imaging setup" post with an iOptron StarFi wireless telescope (mount) adapter. For the Orion Atlas EQ-G mount I'm using the Shoestring bluetooth-to-serial adapter (BT2EQ6 Bluetooth Module with DB-9 connector). I bought an inexpensive GPS dongle to get position and system time for Ekos and KStars. So far, Stellarmate is working out well. The only downside I have experienced is common on any remote astro system, that's the delays in the capture and focus workflows for large FITS files. My Atik 414EX had larger pixels and lower resolution, and ended up with 16-bit FITS files around 3 or 4 MB, while my higher resolution ZWOs (ASI071MC and ASI1600MM-P) are ten times that size.
Posted December 27, 2018
Small Refractor Mods: August 25, 2018
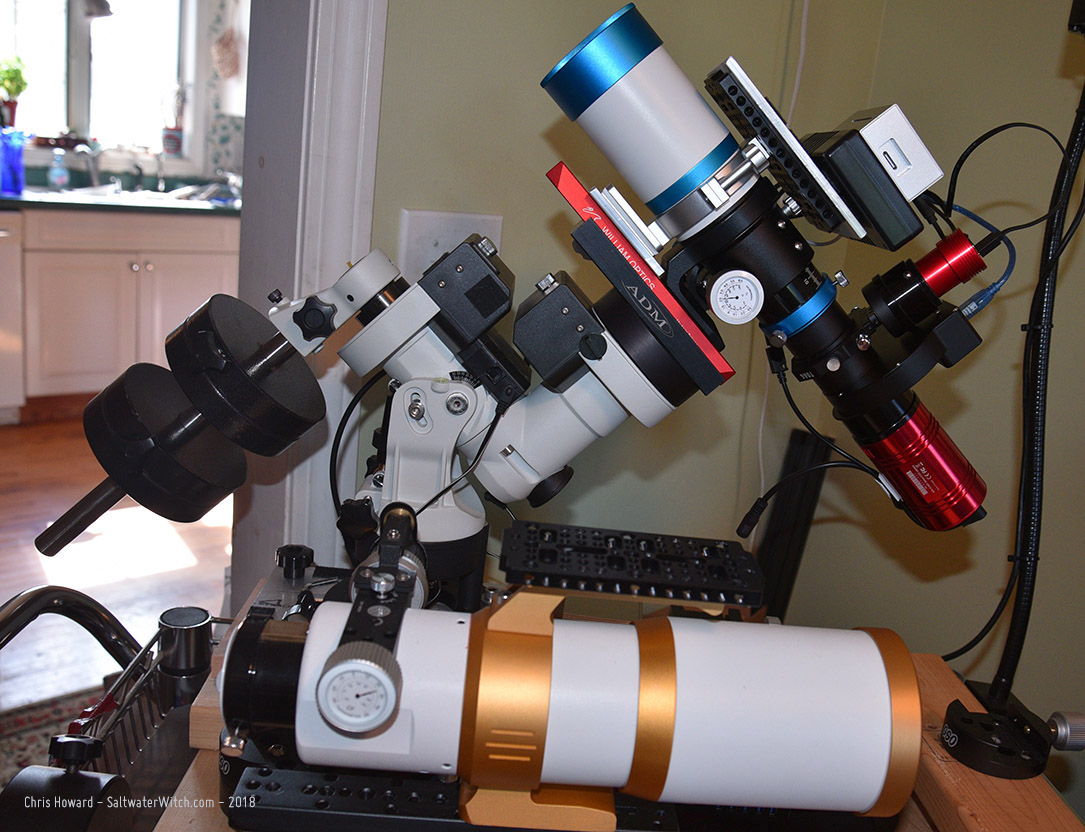
There were several high-quality 60mm apochromatic refractors that entered the market last year. They were pitched as portable wide-field scopes, and also marketed here in the US for the solar eclipse last summer. Starting around $450 USD, these little refractors, like the William Optics ZenithStar 61 sold out quickly. I didn’t get a chance to purchase one until May of this year.
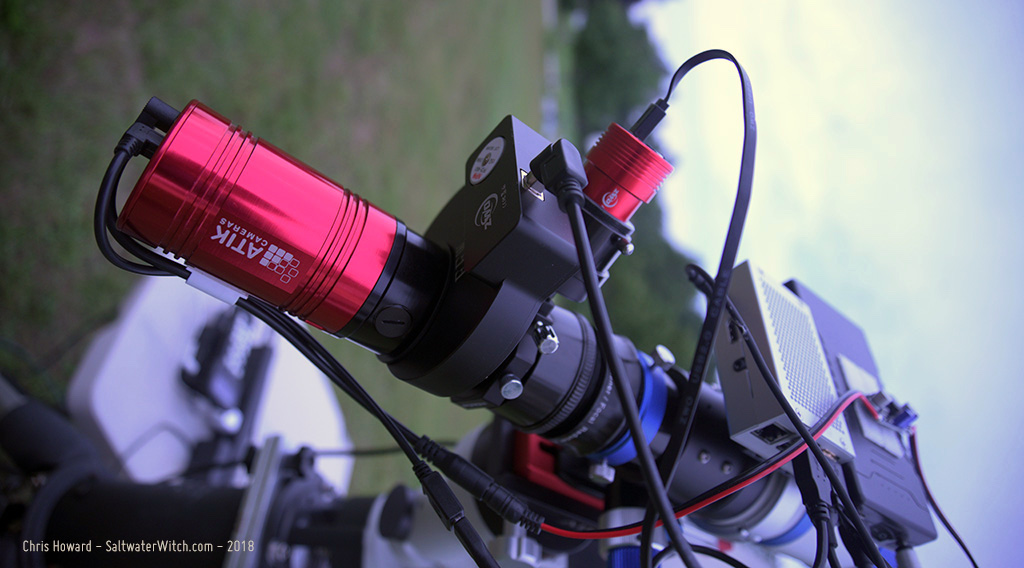
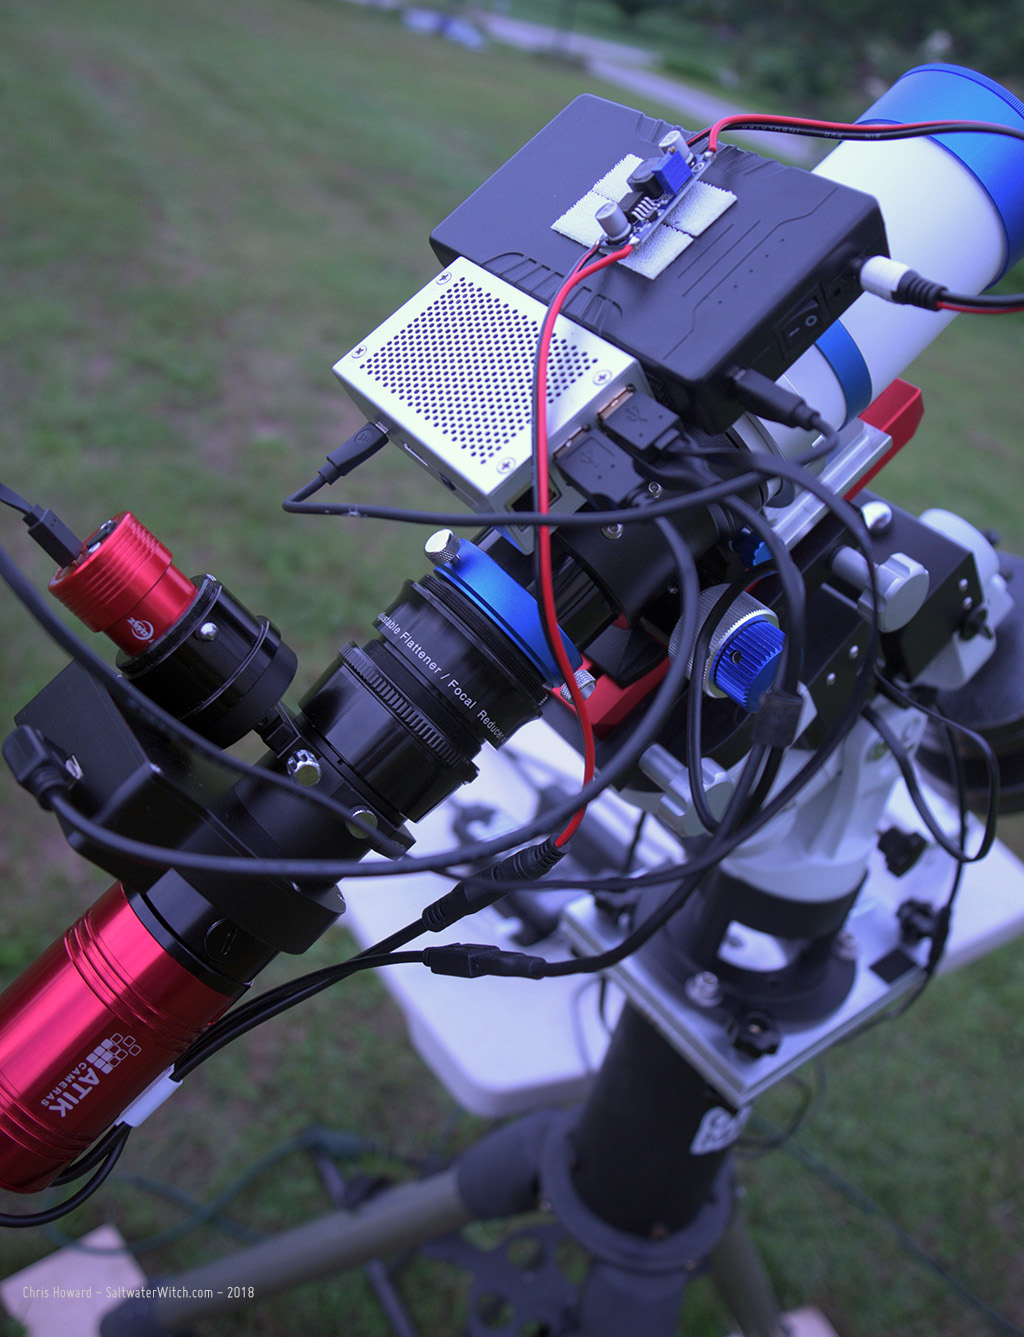
The ZS61 has a 360mm focal length at f/5.9, synthetic fluorite objective lens--FPL-53, which has some amazing optical properties. It’s a great scope, with a solid focuser. But there’s an easy modification that will make it even better. I found one thing when I added the imaging train--here’s my narrowband setup, with an Atik414EX monochrome CCD, a ZWO filter wheel with 5 filters, hydrogen-alpha, oxygen3, sulfur2, clear, and a near IR 685nm longpass. With the field flattener this ends up around 3.2 pounds or 1.45kg. These scopes--I keep saying these scopes because there are several varieties of the same basic components, a few of them with the same focuser, focal length, and aperture, differing--as far as I can tell--only with the hardware, knobs, lens caps.
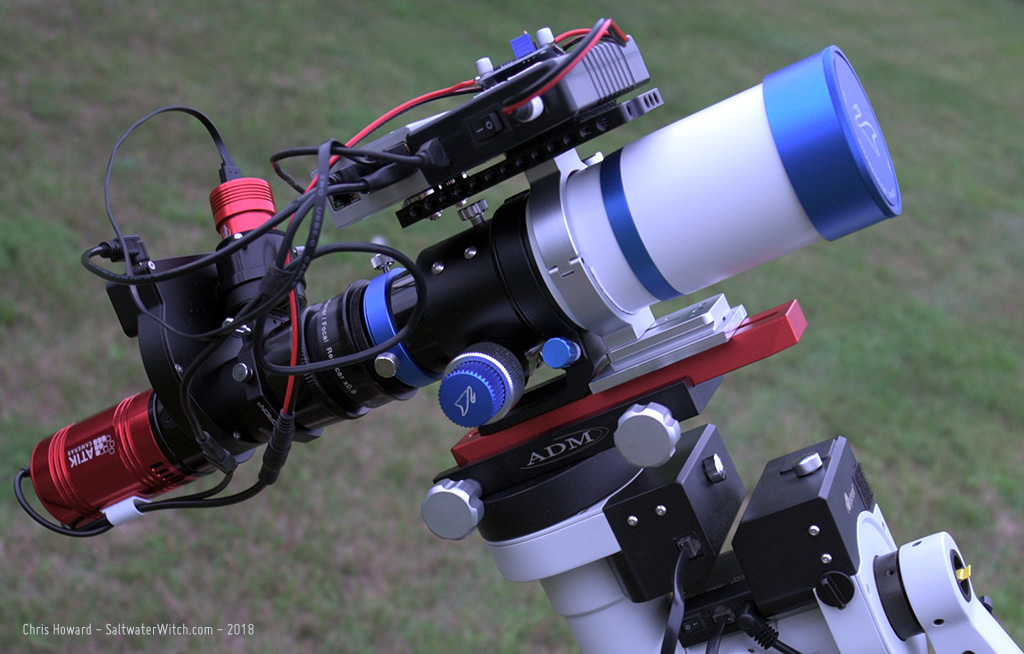
Anyway, the first thing you probably want to do with these is strengthen the scope’s connection to the dovetail bar. The stock version comes with this clamshell ring and shoe, and if you’re going to do anything other than some light visual astronomy, you will want to backup the stock ring with another. I found that when I added the camera, filter wheel, and guider, the whole system had a slight flex to it if I lifted or pushed down with the camera. At first I thought it was the focuser and was a bit bummed about that, but then I noticed it was the whole scope moving, and it all relied on this rather slender ring and shoe. The focuser itself is very smooth and very solid. It’s a dual-speed rack-and-pinion type, and so you may want to adjust some of the tension screws depending on the load you’re planning to add--a DSLR or more, but out of the box, this focuser along with FPL-53 glass makes this scope worth considering for your wider-field work.
To remove that flexure in the system, I bought a ZWO 78mm Holder Ring for ASI Cooled Cameras to see if it would work. The tube’s diameter is around 76mm, and with a delrin shim or something similar, the 78mm inside diameter of the ZWO ring worked almost perfectly. The one gap--literally--was with the two shoes of each ring. The stock William Optics one is ¼” (6.35mm) taller than the ZWO ring. Easy solution: I went to my favorite aluminum supplier (you have one, right? See the links below) and bought a set of stock aluminum pieces, 2” x 3” x ¼”, then drilled, and stacked it with the dual ring setup. Now the whole system is perfectly rigid with two strong foundations.
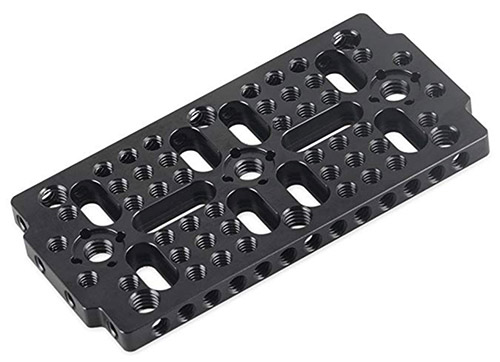 The other advantage of going with the ZWO holder ring are the risers with the threaded holes on the top and bottom. I added one of these SmallRig cheese grater mounting plates on the top--you should always have one or two of these on hand for bolting things together. They’re tough, anodized aluminum, and full of threaded holes of varying sizes. I use these on the ZS61 and my William Optics GT81 to connect the control hardware and power--usually a Raspberry Pi3b and 12v battery pack. What’s nice is I can use a couple hexcap screws to quickly add or remove all devices from one scope to the other.
So, there you have it. An easy way to build more rigidity into a nearly perfect portable wide-field setup. Let me know if you have questions, or a better way to accomplish this. I added some links below for the components I used.
https://www.highpointscientific.com/zwo-78mm-holder-ring-for-asi-cooled-cameras-ringd-78
https://www.amazon.com/dp/B019C2ZM8Q
For aluminum: Stoners Tools and Raw Materials
https://www.ebay.com/str/stonerstoolsandrawmaterials
Ebay listing for the 2” x 3” x ¼” aluminum bar stock:
https://www.ebay.com/itm/281291003556
Posted August 25, 2018
Astro Automation: August 19, 2018
Running a distributed INDI-based astro-imaging setup
This sounds grander than it is, but it’s not incorrect. And INDI makes it easy, with distributed processing built into the protocol, so that once you have your devices plugged into some number of machines (e.g., Raspberry Pi's) and you establish a chain of priority--who's calling who, there's no difference in the way any app (like Ekos) interacts with the INDI-based system, whether it's a single computer or a group of computers.
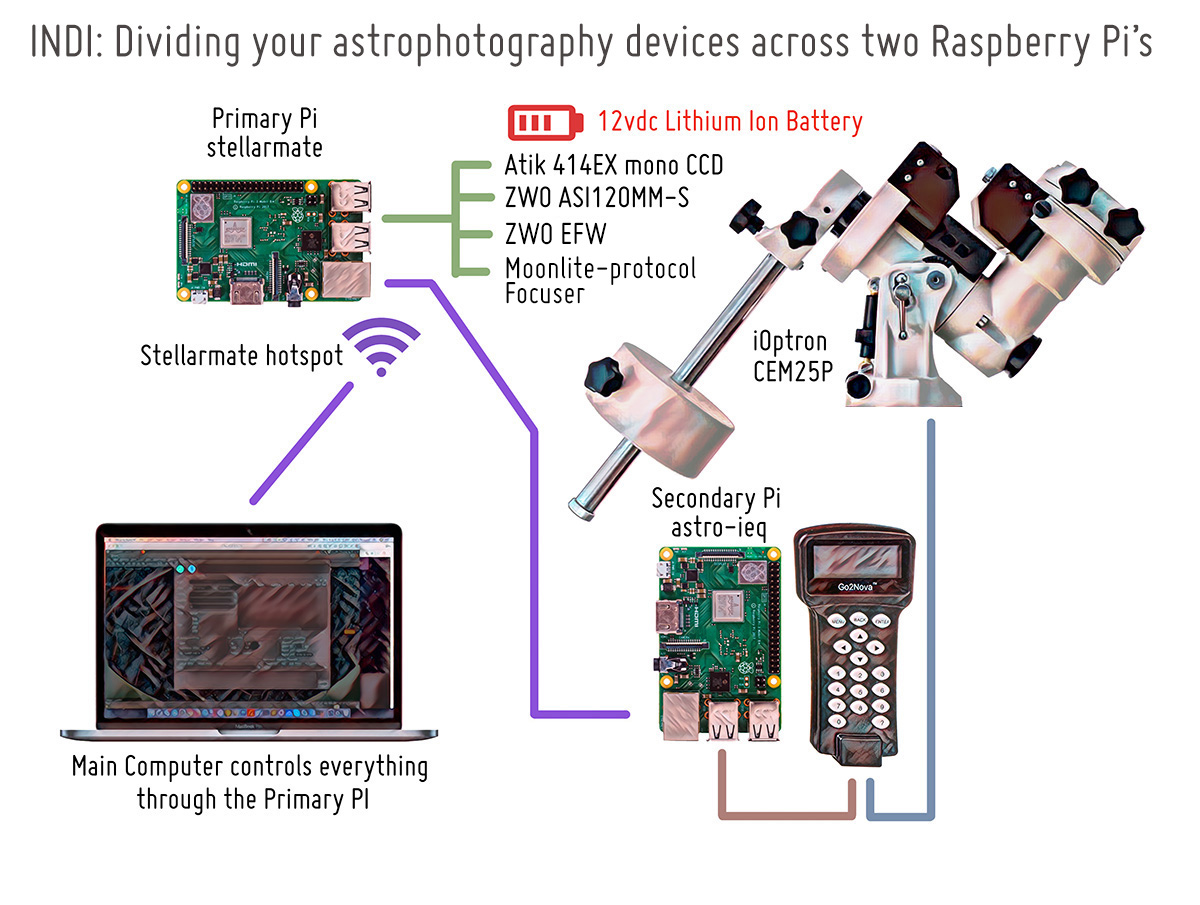
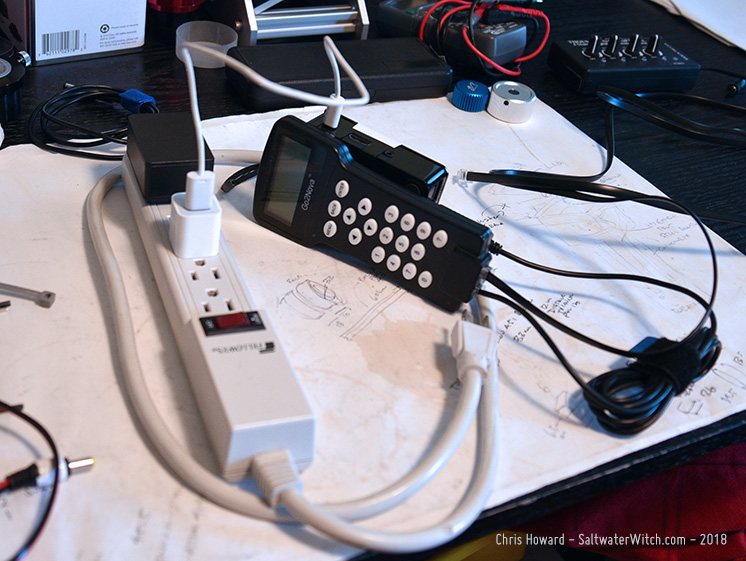
My main reason for dividing instances of the INDI server across two Raspberry Pi's is to separate my iOptron CEM25P mount from the rest of the hardware (CCD, filter wheel, focuser, guide camera). I want to run the telescope-based components over wifi, with a dedicated battery pack, so there are no cables running from the mount to...anything. Everything is attached to the scope, including the rechargeable battery. And everything is controlled from my Macbook Pro over wifi. The problem to solve, which started me down the chained INDI server path, was to exclude the Go2Nova 8408 hand-controller from the mix. The iOptron mount passes all slewing and guiding commands (and everything else) through the controller over serial. I don't know if this is unique to iOptron mounts, but I don't have to do this with my Orion Atlas EQ-G; the serial cable from the computer plugs directly into the mount, without having the SynScan controller in the middle. Here’s the general idea with the CEM25P: in order to control the mount from any command software using INDI or ASCOM you connect the Go2Nova controller to the mount as usual, and then run a serial cable (RS232 -> RJ9) cable from the controller to your computer, in this case, a Raspberry Pi3B+ mounted on the telescope. This is fine if you don’t mind running cables to and from your scope, cameras, focuser, filter wheel--for power and data. This is how I’ve run things on this mount for the last year or so.
What changed? I’ve been looking at the StellarMate gadget for a while now, and Jasem’s presentation on the Astro Imaging Channel (https://youtu.be/XkgwY_KsBjc) tipped me toward checking it out. He did a great overview of single-board computers in astro automation, with particular focus on Raspberry Pi's and the Atom-based Windows machines that have become popular. My goals with astrophotography have also changed over the last couple years; I've been moving more toward portability and automation, minimizing setup time, and using smaller refractors and lightweight but accurate EQ mounts. (Another general reason to go with StellarMate OS is it works great with the faster Rasp Pi 3B+. Just purchase the OS on stellarmate.com, download, flash an SD card, and you’re good to go).
Here's a diagram that shows one of my astro device setups. I spent the day getting this going, but haven't been able to get out under the stars with this yet. So far I've tested out the startup process several times, and successfully used all the connected equipment--slewing in KStars, taking a dozen exposures with the main CCD and guide camera, testing the focusing system. Everything worked well, but I think the final test will be guiding. I don't expect any problems, but that's the one connection that relies on one INDI server talking to another without any complications.
 Any downsides to this setup? I don’t see any with the system distribution side of things. The only critique of chaining INDI servers I’ve read is about potential inefficiency and network latency, but I don’t see a problem here. Correct me if I’m wrong, but network speeds, even over a slow-ish wifi connection, are still going to be astronomically faster than the serial communication rates we use--9600 bits/sec to control a telescope mount, for instance. Even for guiding, where you need response times in seconds, latency shouldn't be a problem. With these inexpensive Raspberry Pi’s that can support 5.0 GHz wifi with speeds in the hundreds of millions of bits/sec, one second is still a long time.
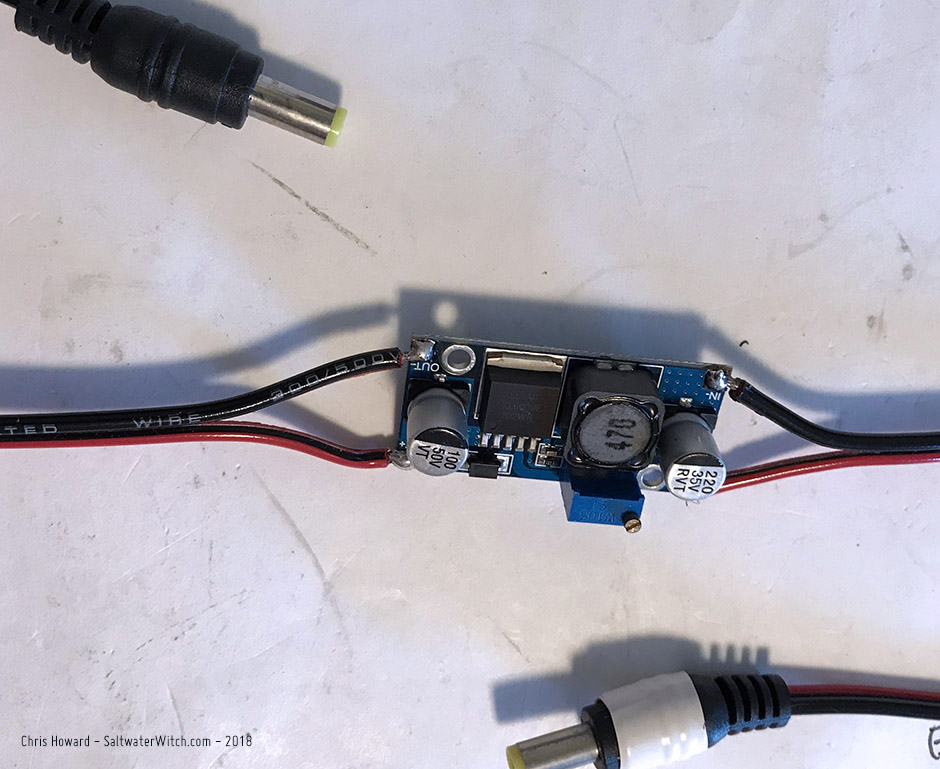
I have only done some preliminary testing on the power side of this setup, with a boost converter (DC step-up) to maintain a fairly constant 12vdc output for the devices, and with a load the battery and converter can handle. I'm also looking at mounting a separate battery dedicated to dew control, and again it's about maintaining voltage and current.
Some helpful links, including Jasem’s distributed INDI tutorial:
http://indilib.org/support/tutorials/159-indi-on-multiple-devices.html
http://indilib.org/forum/wish-list/811-connecting-ekos-to-multiple-indi-servers.html
Here’s an overview of the settings I'm using:
All three systems--primary pi, secondary pi, Macbook Pro--are running over the Stellarmate Wifi hotspot. The secondary Pi (astro-ieq) has a static IP of 10.250.250.105
Secondary Pi: astro-ieq
Connect through USB to Serial to the iOptron Go2Nova 8404 controller and CEM25P
Run this command:
indiserver -m 100 -v indi_ieq_telescope
Primary Pi: stellarmate
Connect USB to: Atik CCD, ZWO guide camera, ZWO Filter Wheel, Moonlite-protocol focuser, and the remote connection you just started on the Secondary Pi: iOptron CEM25 on astro-ieq
Add a hostname to /etc/hosts that identifies the Secondary Pi
10.250.250.105 astro-ieq
Run this command:
indiserver -m 100 -v indi_atik_ccd indi_moonlite_focus indi_asi_ccd indi_asi_wheel "iEQ"@astro-ieq:7624
I don't think you need to sudo these commands, but I did in my tests. The "iEQ" designates the device ID for the iOptron CEM25 series of mounts. This parameter "iEQ"@astro-ieq:7624 tells the INDI server to connect to the "iEQ" device (iOptron mount) on astro-ieq (the secondary pi) through port 7624 (default INDI port). The tip from Jasem's tutorial (link above) on chaining multiple Raspberry Pi's together is to run indiserver -m 100 -vv indi_ieq_telescope first to get the verbose output and grab the device IDs. That's how I found the ID "iEQ", which works for several iOptron mounts, including the CEM25P and iEQ30.
Main computer
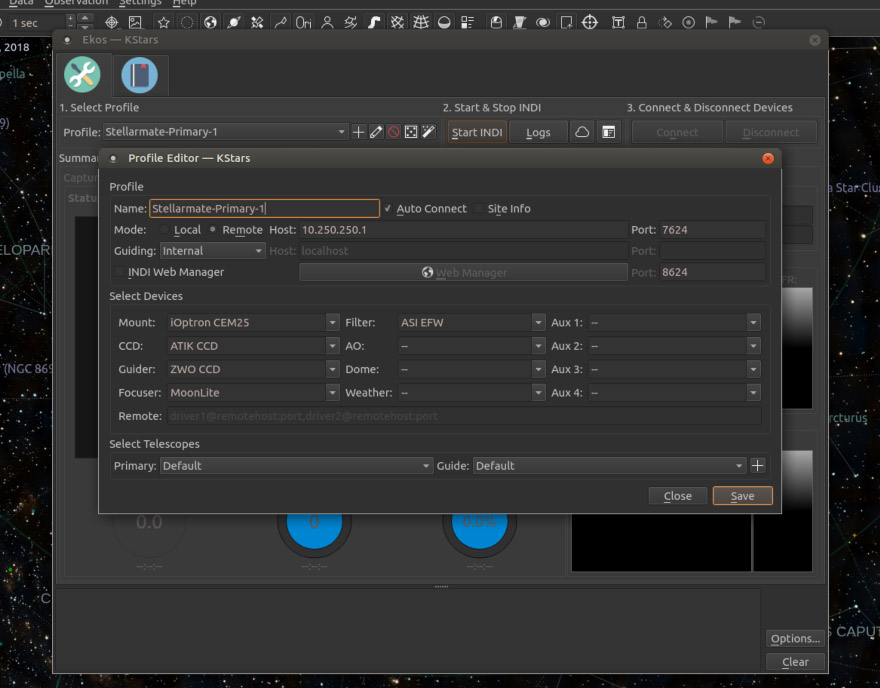
I have a Macbook Pro running Ubuntu Mate 16.04 in a Parallels VM. From here I setup a remote mode profile for the Stellarmate Primary Pi, which is running on 10.250.250.1. From the main computer's point of view--my point of view--there's nothing different about any of the operations in Ekos. That is the advantage of using the underlying INDI protocol, which supports distributed components at a deep level. After startup, you just do your imaging runs like you always do: polar alignment, create or manage your sequence queue, schedule new sequences. Everything just works!
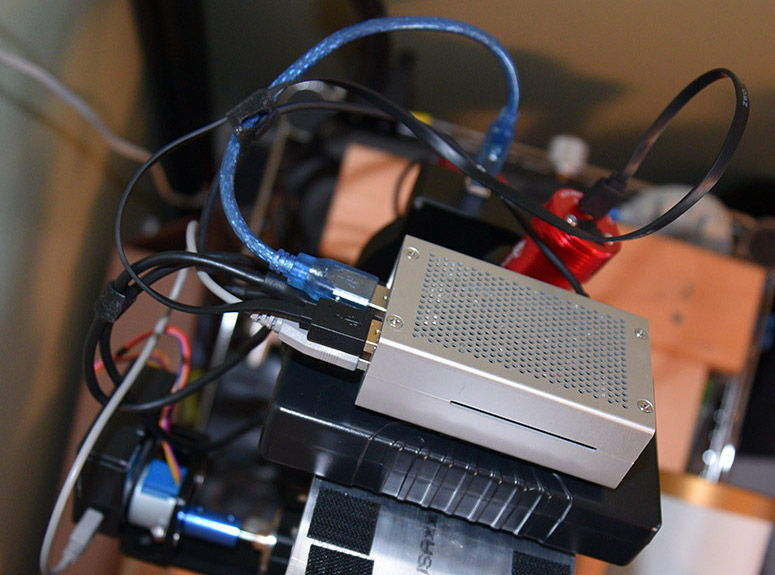
Here are three shots of my working multi-node setup, showing the primary Pi (running StellarMate OS). The aluminum box on the top is a Raspberry Pi 3B+, with all four telescope-mounted components plugged in: Atik 414EX mono CCD, ZWO filter wheel, ZWO ASI120MM mini guide camera, and Moonlite-protocol focuser (not in view, other side of the scope. This is a new DIY focuser and controller I'm also testing out, which uses an Arduino Nano, 28BYJ-48 stepper motor, and ULN2003 motor driver board). The black box beneath the Raspberry Pi is a 6000mAh Li-ion battery with 12vdc out (https://www.amazon.com/dp/B00ME3ZH7C), along with a 5vdc USB power port. I run the Pi off the USB port, and the Atik camera off the 12v line, with a step up (boost) converter between to make sure we keep a steady 12v. You see that cable hanging down by the camera? That's the power line. I disconnected it before I took the pics because I'm measuring the boost converter for a 3d-printed case. For the system test I just velcro'd the PC board to the battery pack.
Close-up of the boost converter I used my testing so far, the XL6009 DC-DC step-up power converter https://www.amazon.com/dp/B06XWSV89D. I put this inline between the battery and the camera's 12v connector. The problem I'm solving is the battery pack will drop voltage over time as the batteries discharge, and I'm willing to trade-off amperage in order to keep the voltage stable at 12v along that curve. Again, this is a test, so we'll see how this works out. My concern with real-world use is how much the camera draws for TEC (thermoelectric cooling) when I'm maintaining a sensor temperature at -20C? I still have to figure this out and see what I need to do for power to support this.
This next pic shows the secondary Pi, the black box velcro'd to the back of the iOptron CEM25P hand controller. The RJ-11 line from the conroller plugs into the mount, the RJ-9 (4-pin serial -> USB) cable plugs into the secondary Pi. For now I'm testing this off AC power, but for portability I will also run this side off of a battery pack.
Another shot (from the top) showing the Pi running Stellarmate, with the four telescope-mounted devices using all the USB ports.
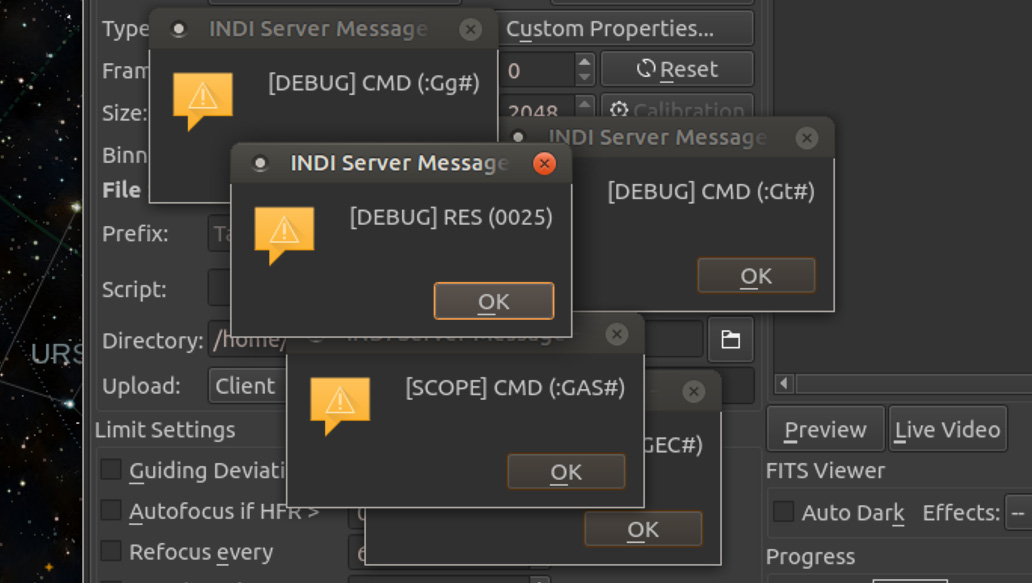
Here's a tip for you: if you're not actually doing any debugging, turn off debug on the Options tab in the INDI control panel for all your devices or you’re going to see a bunch of dialogues with commands sent to devices, status codes, and other fun stuff.
