Daylight Focusing
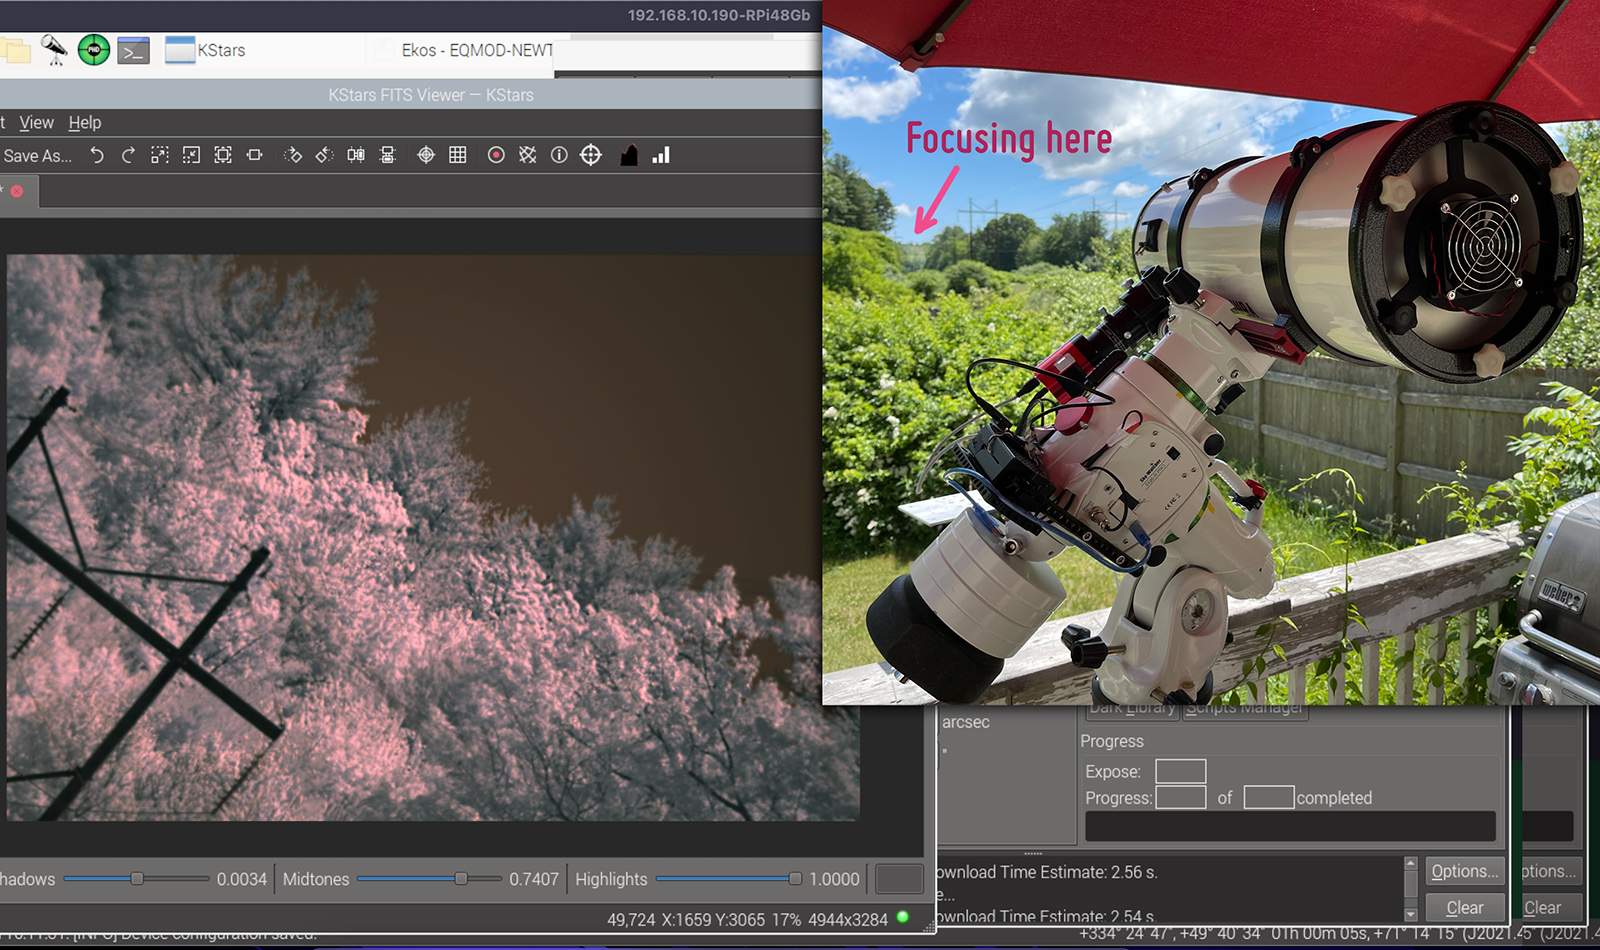
Doing some daylight focus testing with the 8" Newtonian and the ZWO ASI071 camera + Ha filter to cut down on the light. Focusing on that tree line about half a mile away.
I'm still waiting for the final piece of the Newtonian reflector puzzle, a coma corrector. This scope is fairly fast at f/4, and so the coma introduced by the parabolic primary mirror needs some correcting. Without the corrector the star field in images from a large sensor camera will bend away from the center--"coma".
In the meantime, I'm out on the deck today testing focuser position with an old William Optics field flattener/reducer, which brings the scope to 640mm focal length at f/3.2. And it doesn't look too bad. That tree line is about half a mile (~.75 km) away. It's so bright out and this astro camera is so light-sensitive that I'm shooting frames at .001 seconds with a long-pass hydrogen-alpha filter, which is only letting light in from 640nm out to about 800nm, so most of the visual spectrum is cut, and what's left is this range of near infra-red.
Posted June 12, 2021
New Scope!
Looks like I'm going to become an OTA-wieldin' Collimatin' Reflector guy! I have been a refractor guy from the beginning. My first serious scope was the William Optics GT81--six or seven years ago! I used a Nikon D3100 and then the full-frame Nikon D750 for a little while before diving in completely with narrowband and a monochrome astro camera, an Atik 414EX CCD.
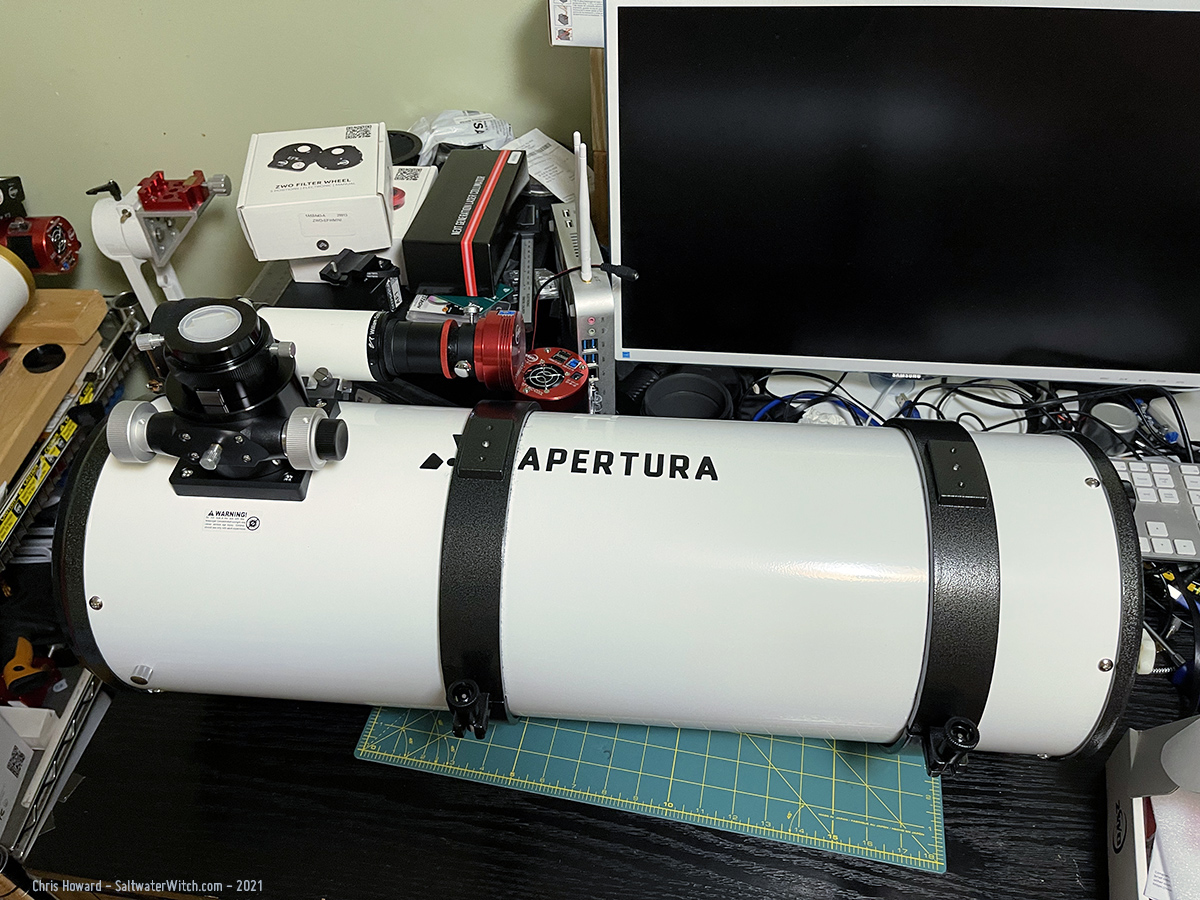
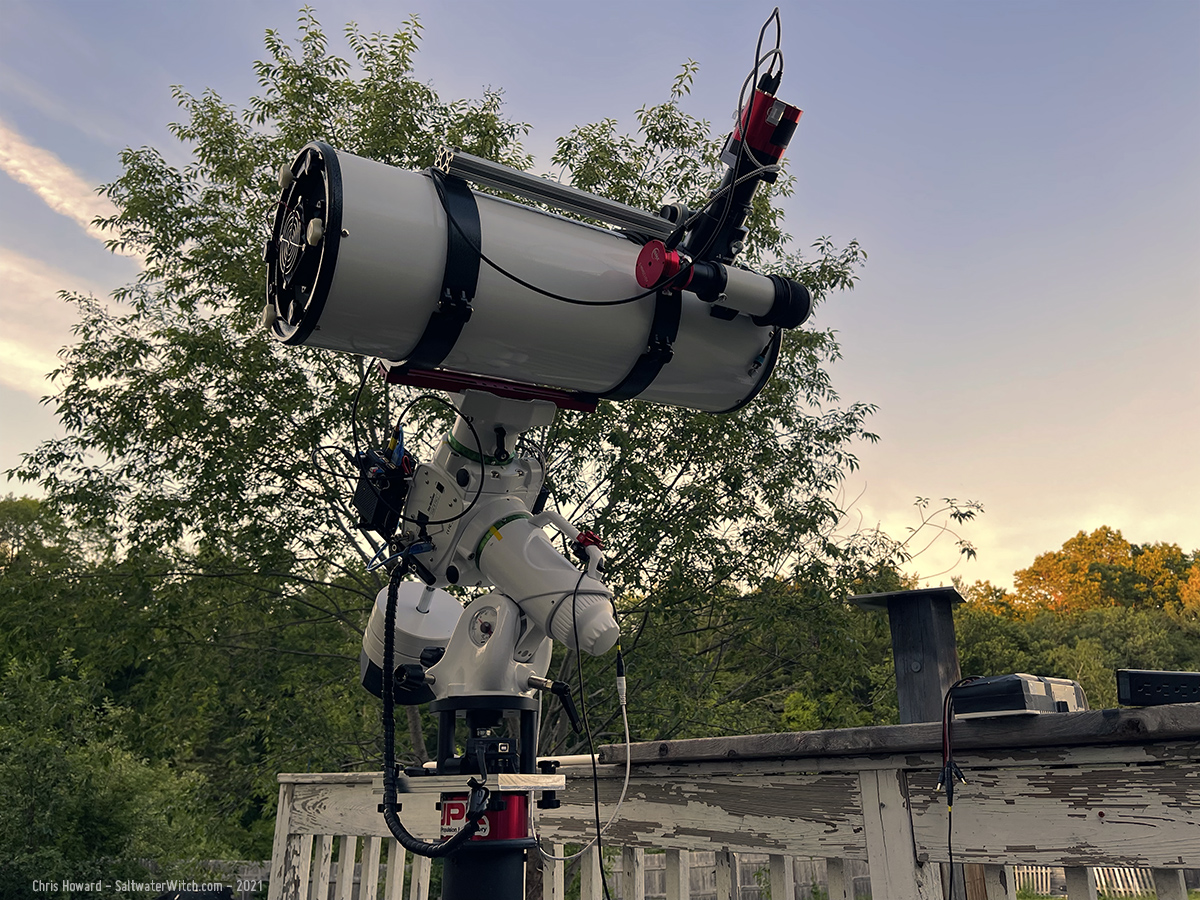
Last week I bought a new telescope and it arrived today, an Apertura 8" Newtonian Imaging scope with a focal length of 800mm at f/4. There are a bunch of inexpensive fast Newtonians on the market, sold under different names and brands, and at least some of them, including Apertura, TPO, TS-PHOTON are rebranded/painted OTAs made by GSO (Guan Sheng Optical) in Taiwan.
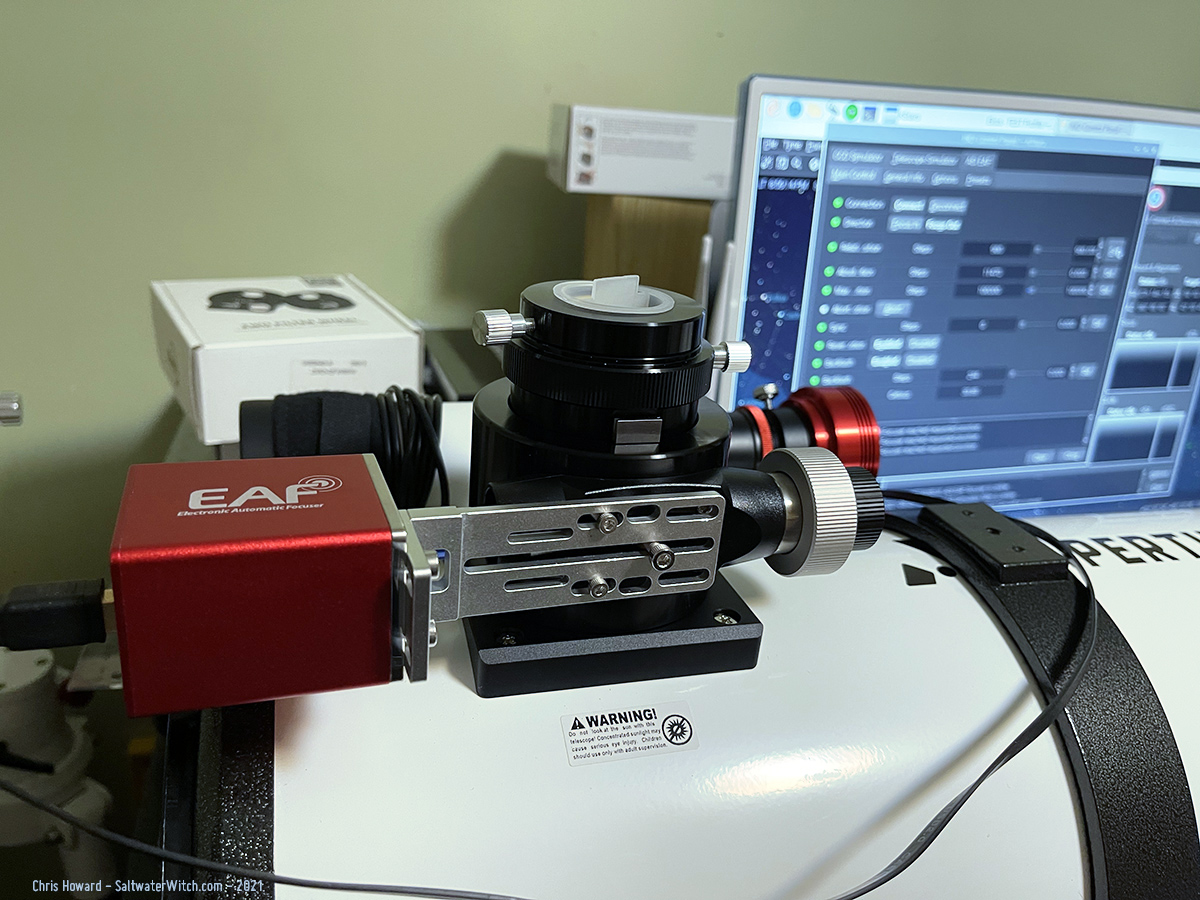
The Apertura came in at $499, one of the least expensive 8" Imaging Newts, but it has some upgrades over what's pictured on the Highpoint Scientific site: better focuser, better dovetail bar (see the red vixen bar in the pic below--that's included). Even the guide scope shoe has two threaded hold downs, but the product shots only show one. Pleased about that. (It came with one thumb screw, and I can add one. No problem. For the guide scope I replaced both with hex socket cap screws).
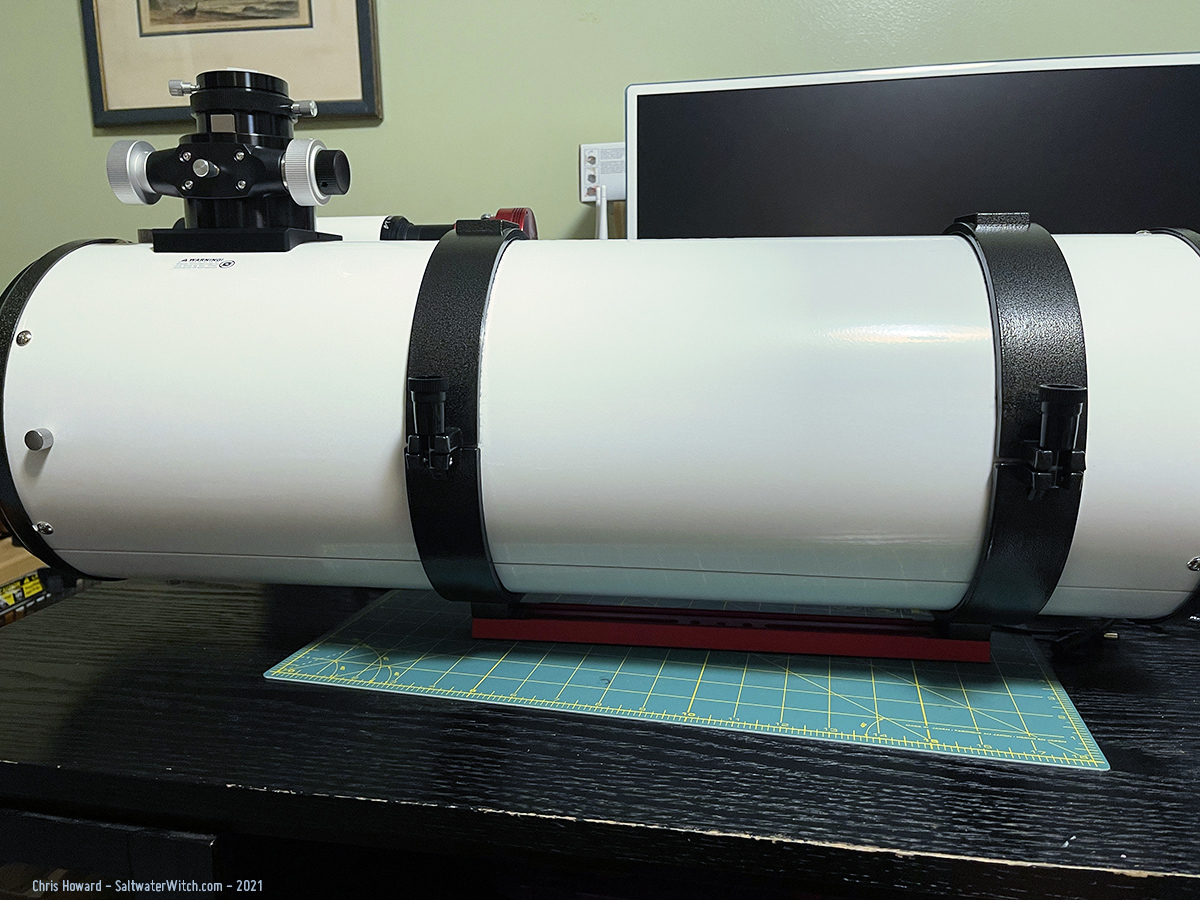
The focuser surprised me because my old Astro-Tech RC scope came with the bottom of the line GSO crayford, and that's what I expected here, given the product pics on Highpoint, but when I opened the box I noticed this one came with the better and newer GSO focuser, the linear bearing crayford. It's no Moonlite, but it'll do.
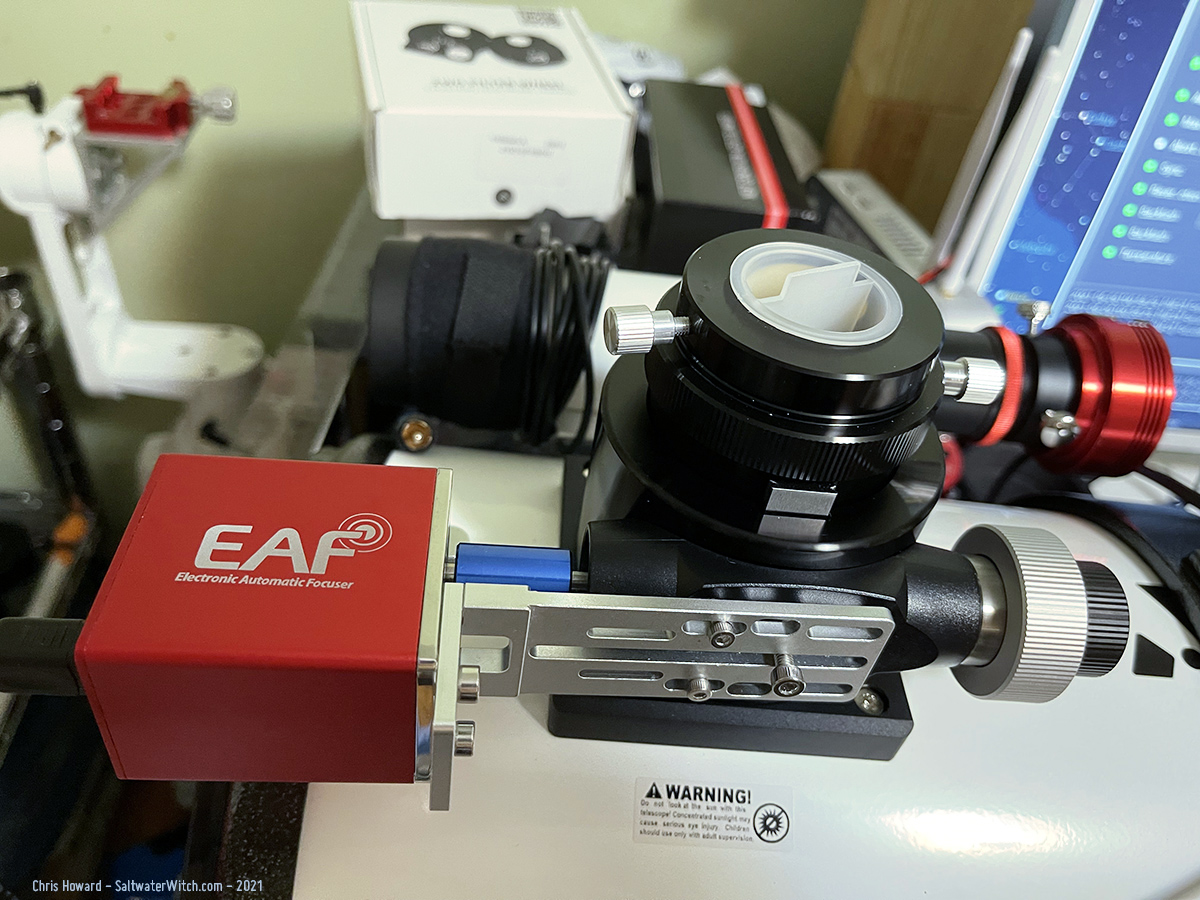
I spent no time at all adding the ZWO EAF autofocuser, the 2nd generation model that's powered off the USB and doesn't require the 12v dc line in. This has been sitting on my workbench for months, waiting for a scope to autofocus! I'm testing it out right now in Ekos (on the screen in the background). That's my William Optics 50/200mm guide scope + ZWO ASI120MM-S camera attached to the Apertura behind the focuser.
The Apertura came with a really nice red-anodized Vixen-style dovetail bar--13"/330mm long. Perfect.

Of course, an hour after UPS dropped it off it started raining--a full on summer downpour.
I'll test things out when we get some clear skies. I'm still waiting for a coma corrector--it seems there isn't one Baader coma corrector Miii anywhere on this planet for sale. I'm on hold until late June for more stock, so it may be July before I get some serious imaging out of the Apertura 8" Newtonian. There is a much less expensive (around $100) Apertura coma corrector, which I may try.
Link to Highpoint Scientific: Apertura 8" f/4 Imaging Newtonian OTA - 8F4N
Posted June 8, 2021
Project of the Week: Flat Frame Light
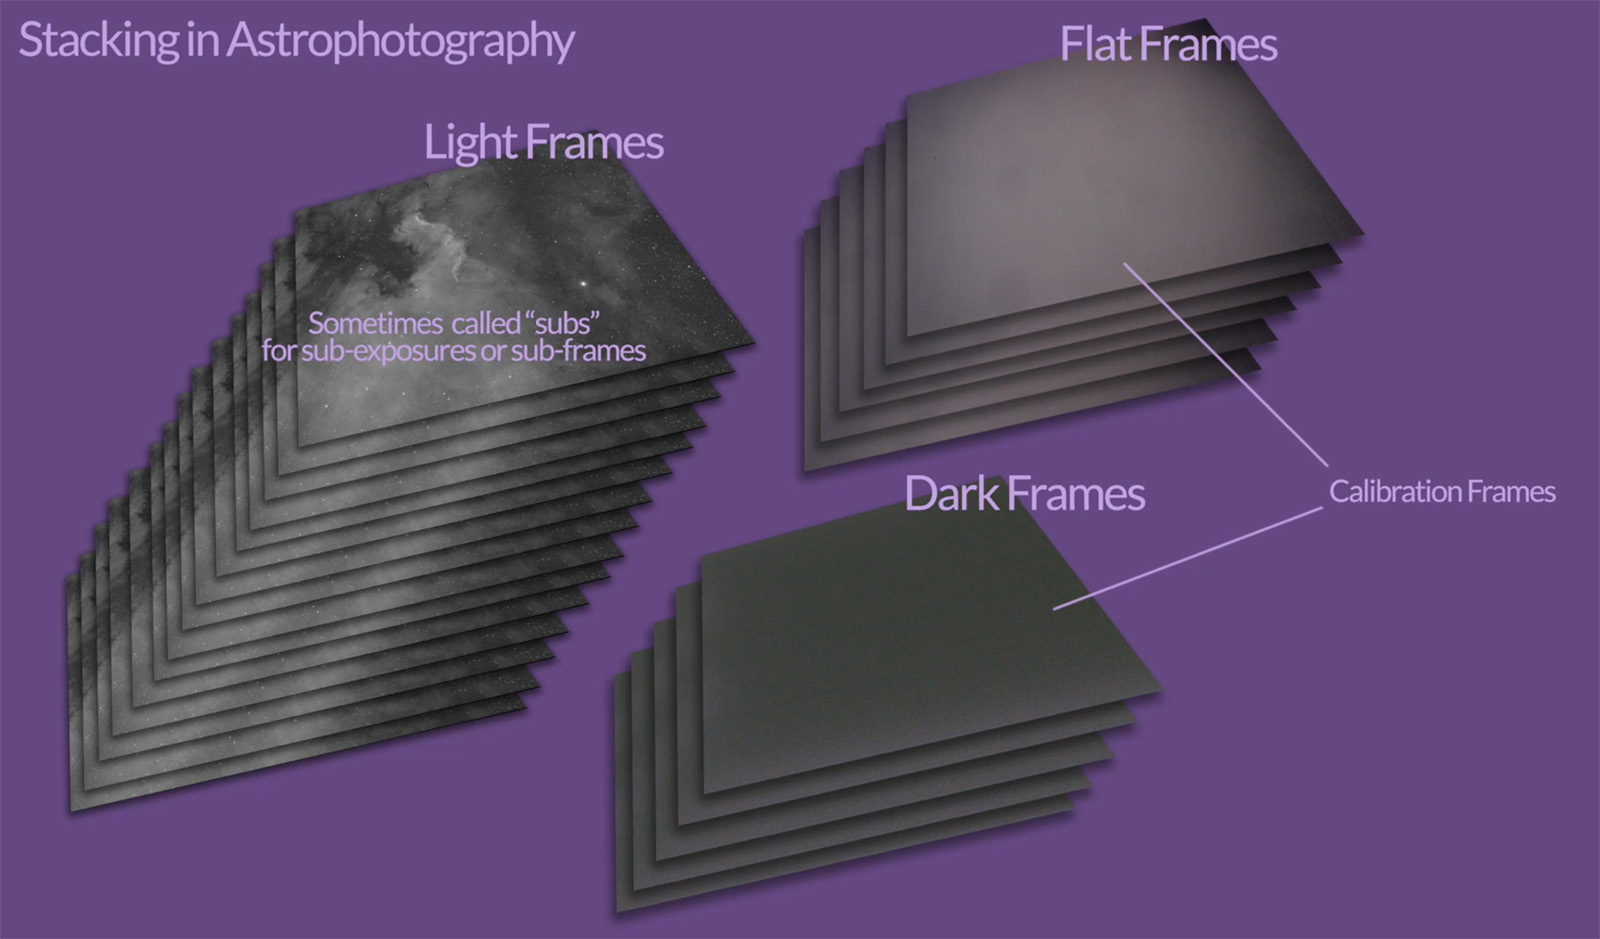 Astrophotography relies on many stacked images of the same target in the night sky, anywhere from 20 to over a hundred or more, all merged together with sophisticated algorithms to form one image. The purpose of stacking is to shift the SNR—Signal to Noise Ratio—to our advantage, so that there is more signal (nebula, galaxy) and less noise (light pollution, read noise, etc.)
Part of that stacking process involves calibration frames, which provide additional data in the stacking process for reducing noise, including read noise, thermal noise, removing dust on the sensor, vignetting, uneven field illumination, and other stuff we don't want in the final image.
One type of calibration frame is a Flat Frame, which involves shooting ~20 - 40 exposures of an even, luminous source, with the same camera used to shoot your deep sky objects set to the same temperature and somewhere near your normal focus position (there's some leeway with focus). Exposure times are based on filters and camera settings. One way to do this is to point at a blank wall or by covering the front of the scope with paper or a white t-shirt, and taking a batch of exposures—both during daylight hours. We usually take new Flat Frames every month or so, or whenever anything in the imaging train changes significantly.
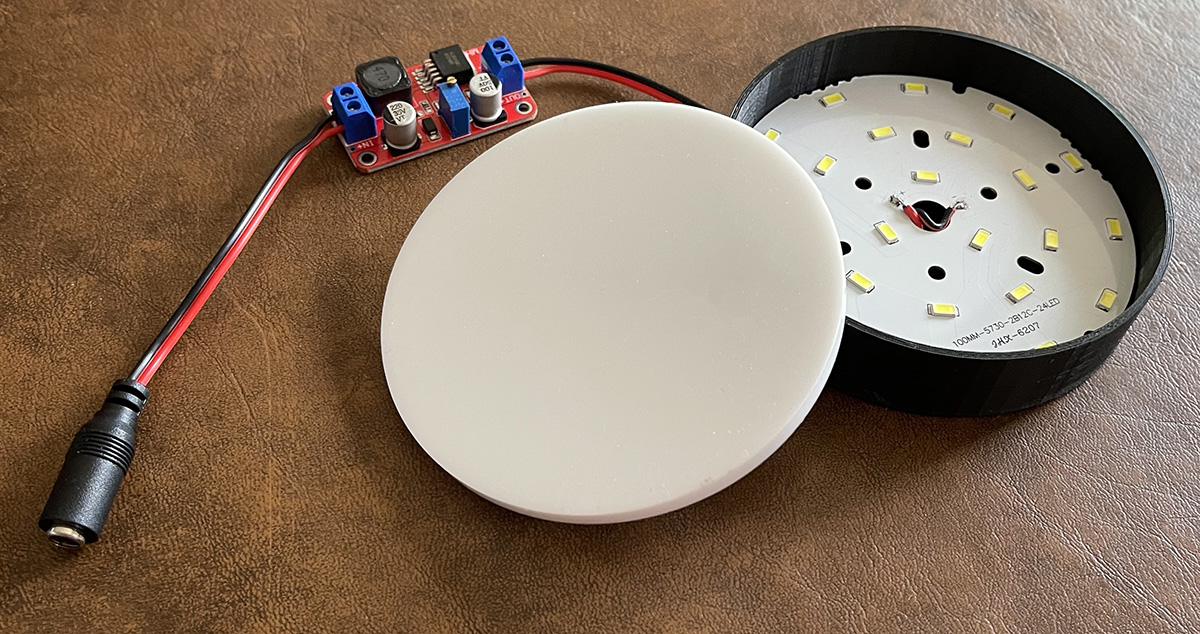
I made an LED Flat Frame Light for my SpaceCat 51 using some inexpensive hardware and a printed enclosure—links to everything below. There's not much to it, other than making sure you have the DC voltage connected the right way—positive to positive, ground to ground and all that. The step-up converter I'm using for this project has a potentiometer to change the output voltage. First thing I did was plug the input side into a 3amp 12v adapter, and then with the meter attached, used a screwdriver to adjust the output toward 40vdc—I think you'll get something out of the LEDs at anything over 30 volts, but keep going, make it bright! The specs on the LED board say anywhere from 36-42v DC is in range, and this particular XL6019 converter can output up to 40v.
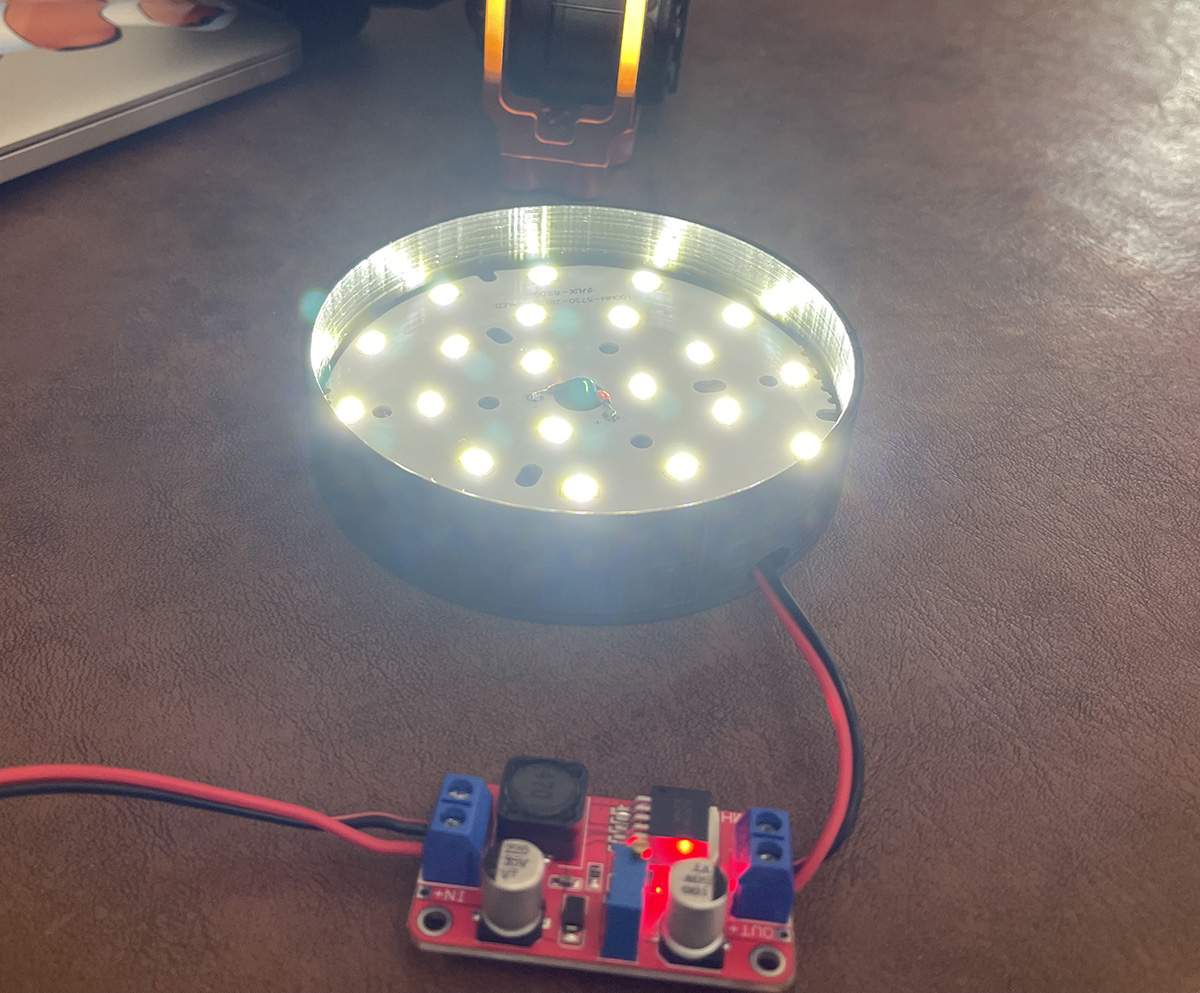
I'm still testing illumination across the acrylic face plate. The space between the LEDs and white acrylic is a little over a centimeter, and that seems to look evenly illuminated to my eyes. That's the one thing that remains to be tested and potentially adjusted—most likely away from the LEDs by small amounts until it works. I'm also going to add a strip of aluminum foil around the inside to make the most of the reflected light.
I used E6000 glue (link below) to hold the LED board to the stand-offs on the printed enclosure. The board is aluminum and acts as a heatsink. E6000 is supposed to work at high or low temperatures, but we'll see how that works out after some serious testing.
Where to go from here? A larger diameter light is probably where I'm going next, to support the the William Optics GT81. I might try different LED boards, some with more LEDs. Also, this is a pretty cheap step-up converter, and I have a couple different kinds I can try out. Making some 3D printed fittings for specific scopes is another thing to try.
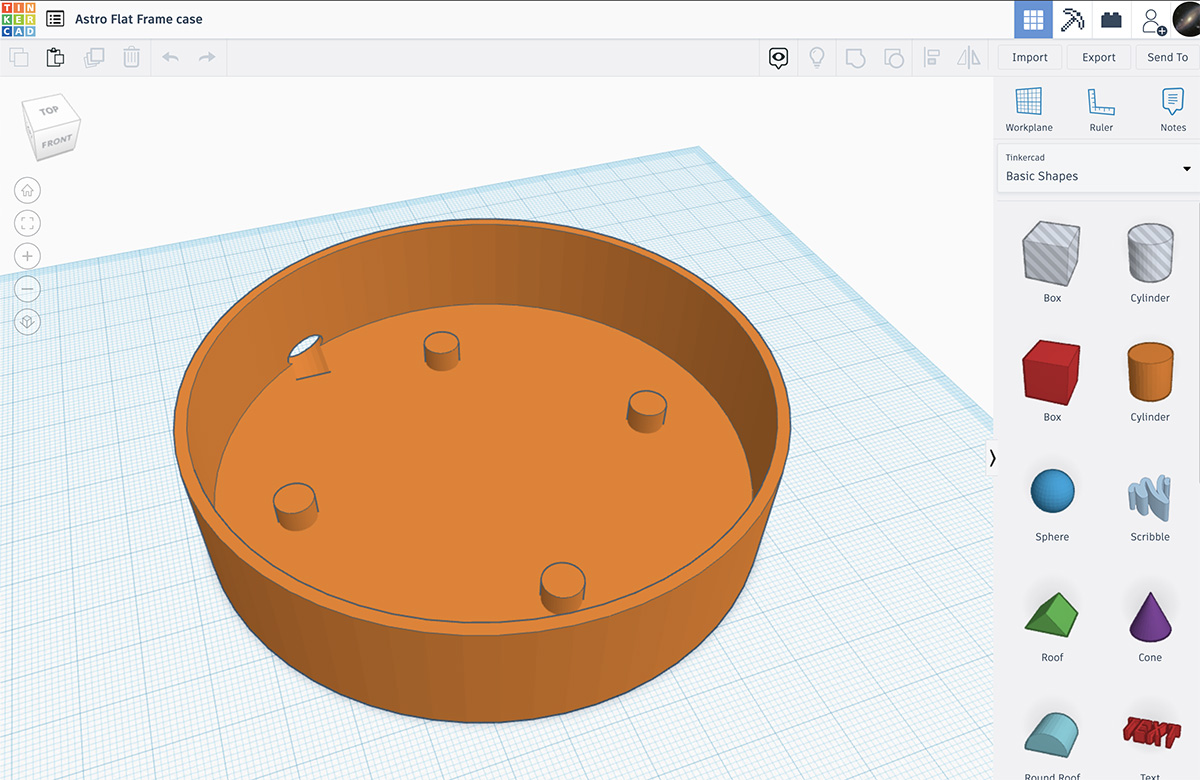
Here's a screenshot of the enclosure I made in Tinkercad:
And with the lights on!
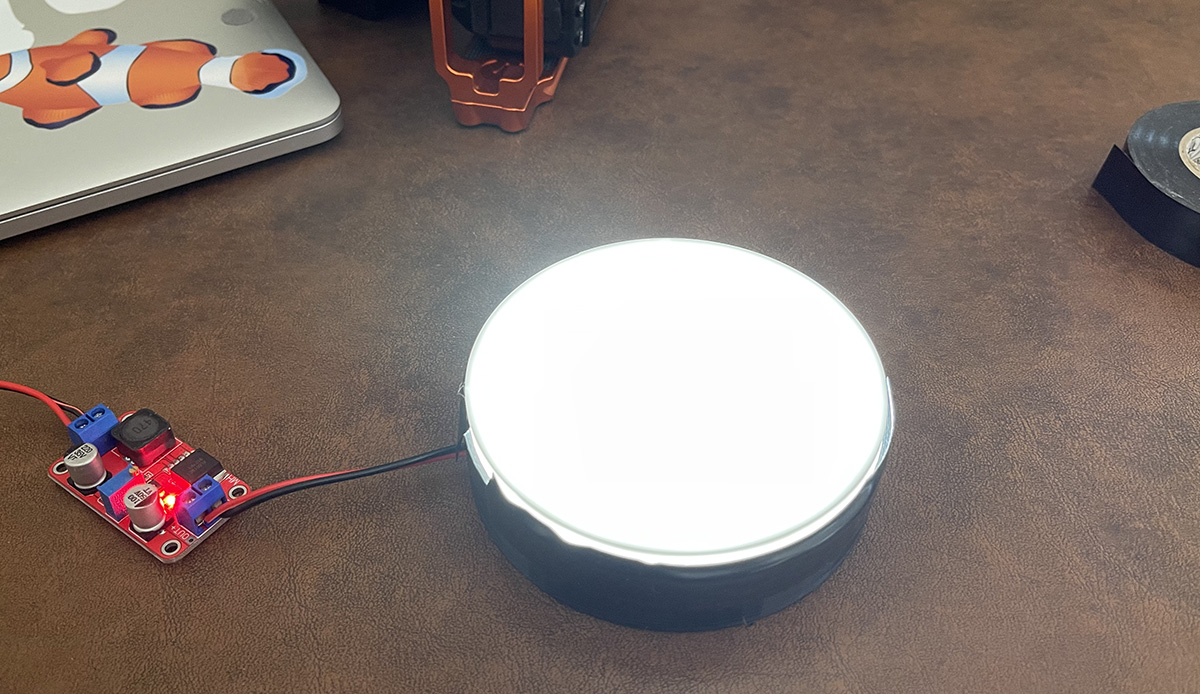
Using electrical tape to hold the acrylic disc in place, and a strip of aluminum foil around the inside to reflect the light:
I made a 3D Printable Flat Frame Light enclosure:
https://www.tinkercad.com/things/5ThpmrMrqdR-astro-flat-frame-case
STL File I used for printing:
https://saltwaterwitch.com/files/AstroFlatFrameCase.stl
Amazon Shopping List:
5A High Power DC to DC Step-up 5V 6V 12V 24V 3-35V to 5-40V XL6019 Converter
https://www.amazon.com/dp/B07Z5M89N1
LED: Aluminum Circuit Board 5730 SMD LED Chip Module 12W 300mA 6500K Diameter 100mm
https://www.amazon.com/dp/B07VFHP5P5
Acrylic blank Opaque White Round 2 Pieces (4" Diameter, 1/4" Thick Opaque White)
https://www.amazon.com/dp/B07BPVL622
DC Power Cable 12V 5A Plugs Male Female Connectors (5.5mm x 2.1mm, 10 Pairs)
https://www.amazon.com/dp/B07C7VSRBG
E6000 High Viscosity Adhesive, 3.7 Fluid Ounces, 1 Pack, Clear, 3 Fl OZ
This: "temperature resistant – unaffected by extreme heat or cold once cured"
https://www.amazon.com/dp/B0044SB3M8
Posted May 17, 2021
New Astro Pier in the Backyard
I'm upgrading the "pier" that I have right off the back deck.
What's interesting is I set that up as a temporary solution for winter imaging. We can get a lot of snow. That was 2 1/2 years ago or so, and having a semi-permanent platform for imaging made things so easy--with fast setup because it was always close to polar aligned. That's also when I started using this generic 6x8 inch aluminum plate for connecting my mounts. This temporary pier was so easy in fact that I continued to use it for the next couple years.
So, I have finally started the upgrade. I'm also using 4x4 treated lumber for this, although 4 4x4s bound together with lag bolts. It's basically a solid block of hard wood that's weather treated.
I have also upgraded the mounting plate. The old one is just connected to the post with 3" deck screws. It's solid for a smaller mount like the iOptron CEM25P. I cut several pieces of 80/20 extruded aluminum for the new mounting plate, and this is perfect for larger mounts like the SkyWatcher EQ6-R Pro.
So, this is what it looks like with one bag of Quikrete, just about to add the second:

And here's a video on some of the details:
Posted October 25, 2020
Sky-Watcher EQ6-R Pro - First Impressions
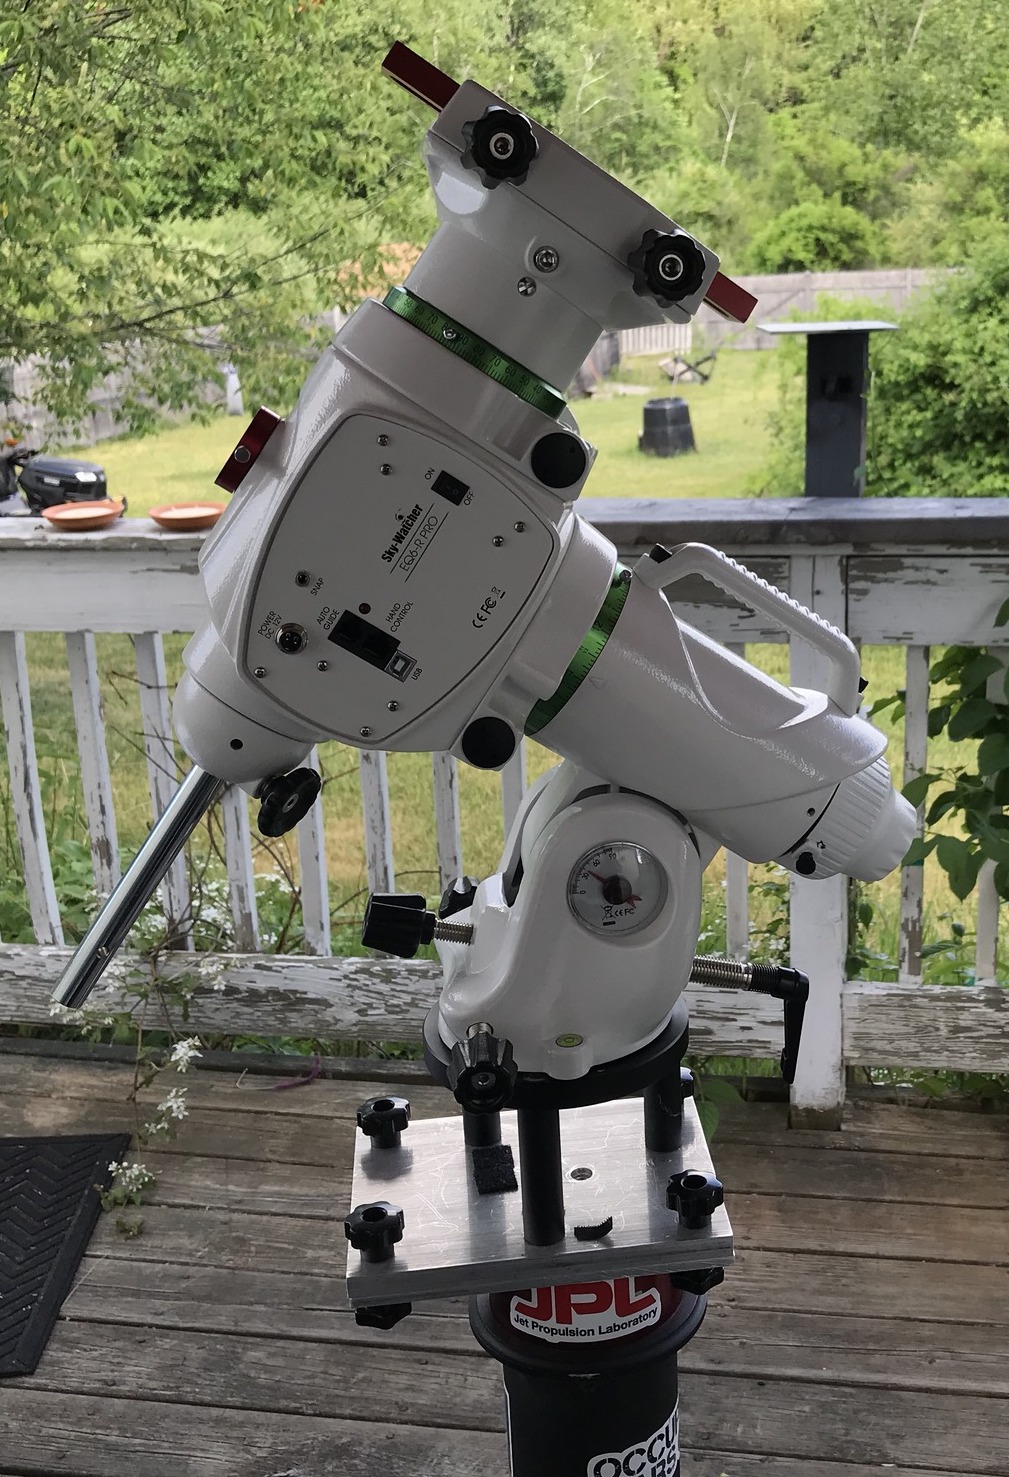
I just bought a new equatorial mount, a Sky-Watcher EQ6-R Pro, to replace the Orion Atlas EQ-G, and this is my first impression of the upgrade. I know I'm late to the party with the EQ6-R. It seemed like I was one of the few people on this planet without one.
Anyway, I'm deliberately using the word "upgrade" here because I think Sky-Watcher has made some significant improvements to this line of mounts—I'm including both the NEQ6 lines and Orion Atlas EQ-G. They didn't simply slap on a thicker coat of paint, add a fancy latitude dial under glass, and call it a new mount. There was a lot of thought that went into some of these improvements, some of them minor but great to see.
The Foundation
Starting with the tripod, it looks like Sky Watcher took their existing sturdy base with the 2"/50mm legs and extended the swing of the three pivot points—just a bit, giving the whole thing a broader and more stable stance. I believe this was rolled out with the NEQ6 line a while ago—maybe a couple years, but never made it to Orion. As far as I know the Orion Atlas EQ-G still has the narrower, slightly less stable design, but the Orion Atlas II will have the tripod upgrade (Orion OEMs the Sky-Watcher mounts, adding their branding and colors—black and silver instead of white and green). Stability improvements in the tripod is what I like to see. It's a minor enhancement at best, but it means someone at Sky-Watcher is thinking about the details, the small stuff that will add up to make the whole much better--noticeably better.
Belt Drive
The first time I slewed with my Orion Atlas EQ-G the high-pitched whine of gears surprised me. Until I realized that was normal. I don't really notice it anymore, but compared to the smooth and quiet operation of other mounts like my iOptrons, it's enough to frighten new astronomers. At their core, all of these mounts using worm gears for RA and DEC will have some backlash, but with belt-driven mechanics, the gears can remain engaged to some extent and backlash will be reduced. Periodic error will also be reduced. So, quieter slewing, reduced backlash, lower periodic error. Thank you, Sky Watcher.
There are a couple nice improvements to the EQ6-R Pro front panel.
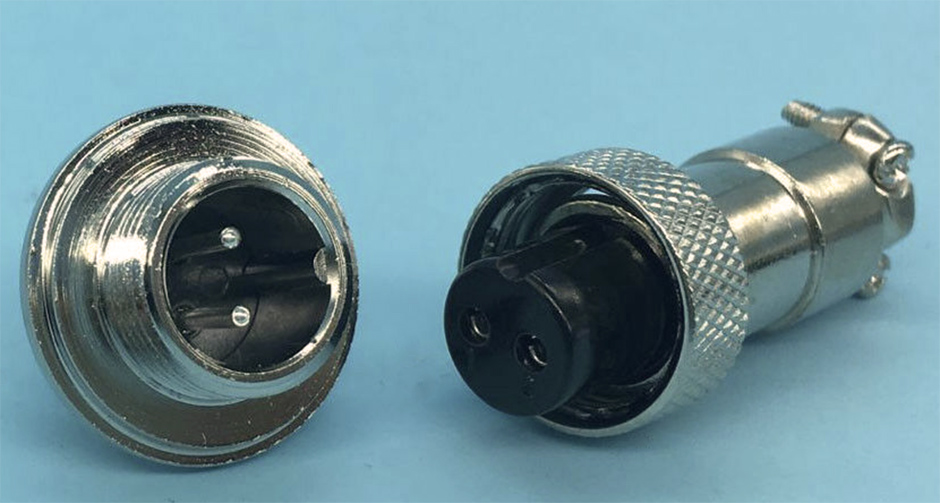 The power connector upgrade to a threaded aviation plug that allows you to easily connect and secure your 12v dc cable is an interesting improvement. I have never had a problem with the 5mm jack falling out, but I've heard that others have, so this approach definitely works, even it uses less common hardware: a GX12-2 pin aviation connector. I have seen reviews from the UK where Sky-Watcher included a 4 amp power supply with the mount, but the version I bought in the US only includes the power cord with the 2-pin connector at one end and a 12vdc "cigarette lighter" connector on the other. I immediately cut that off and soldered in a female 5mm jack—that works so much better for my power situation.
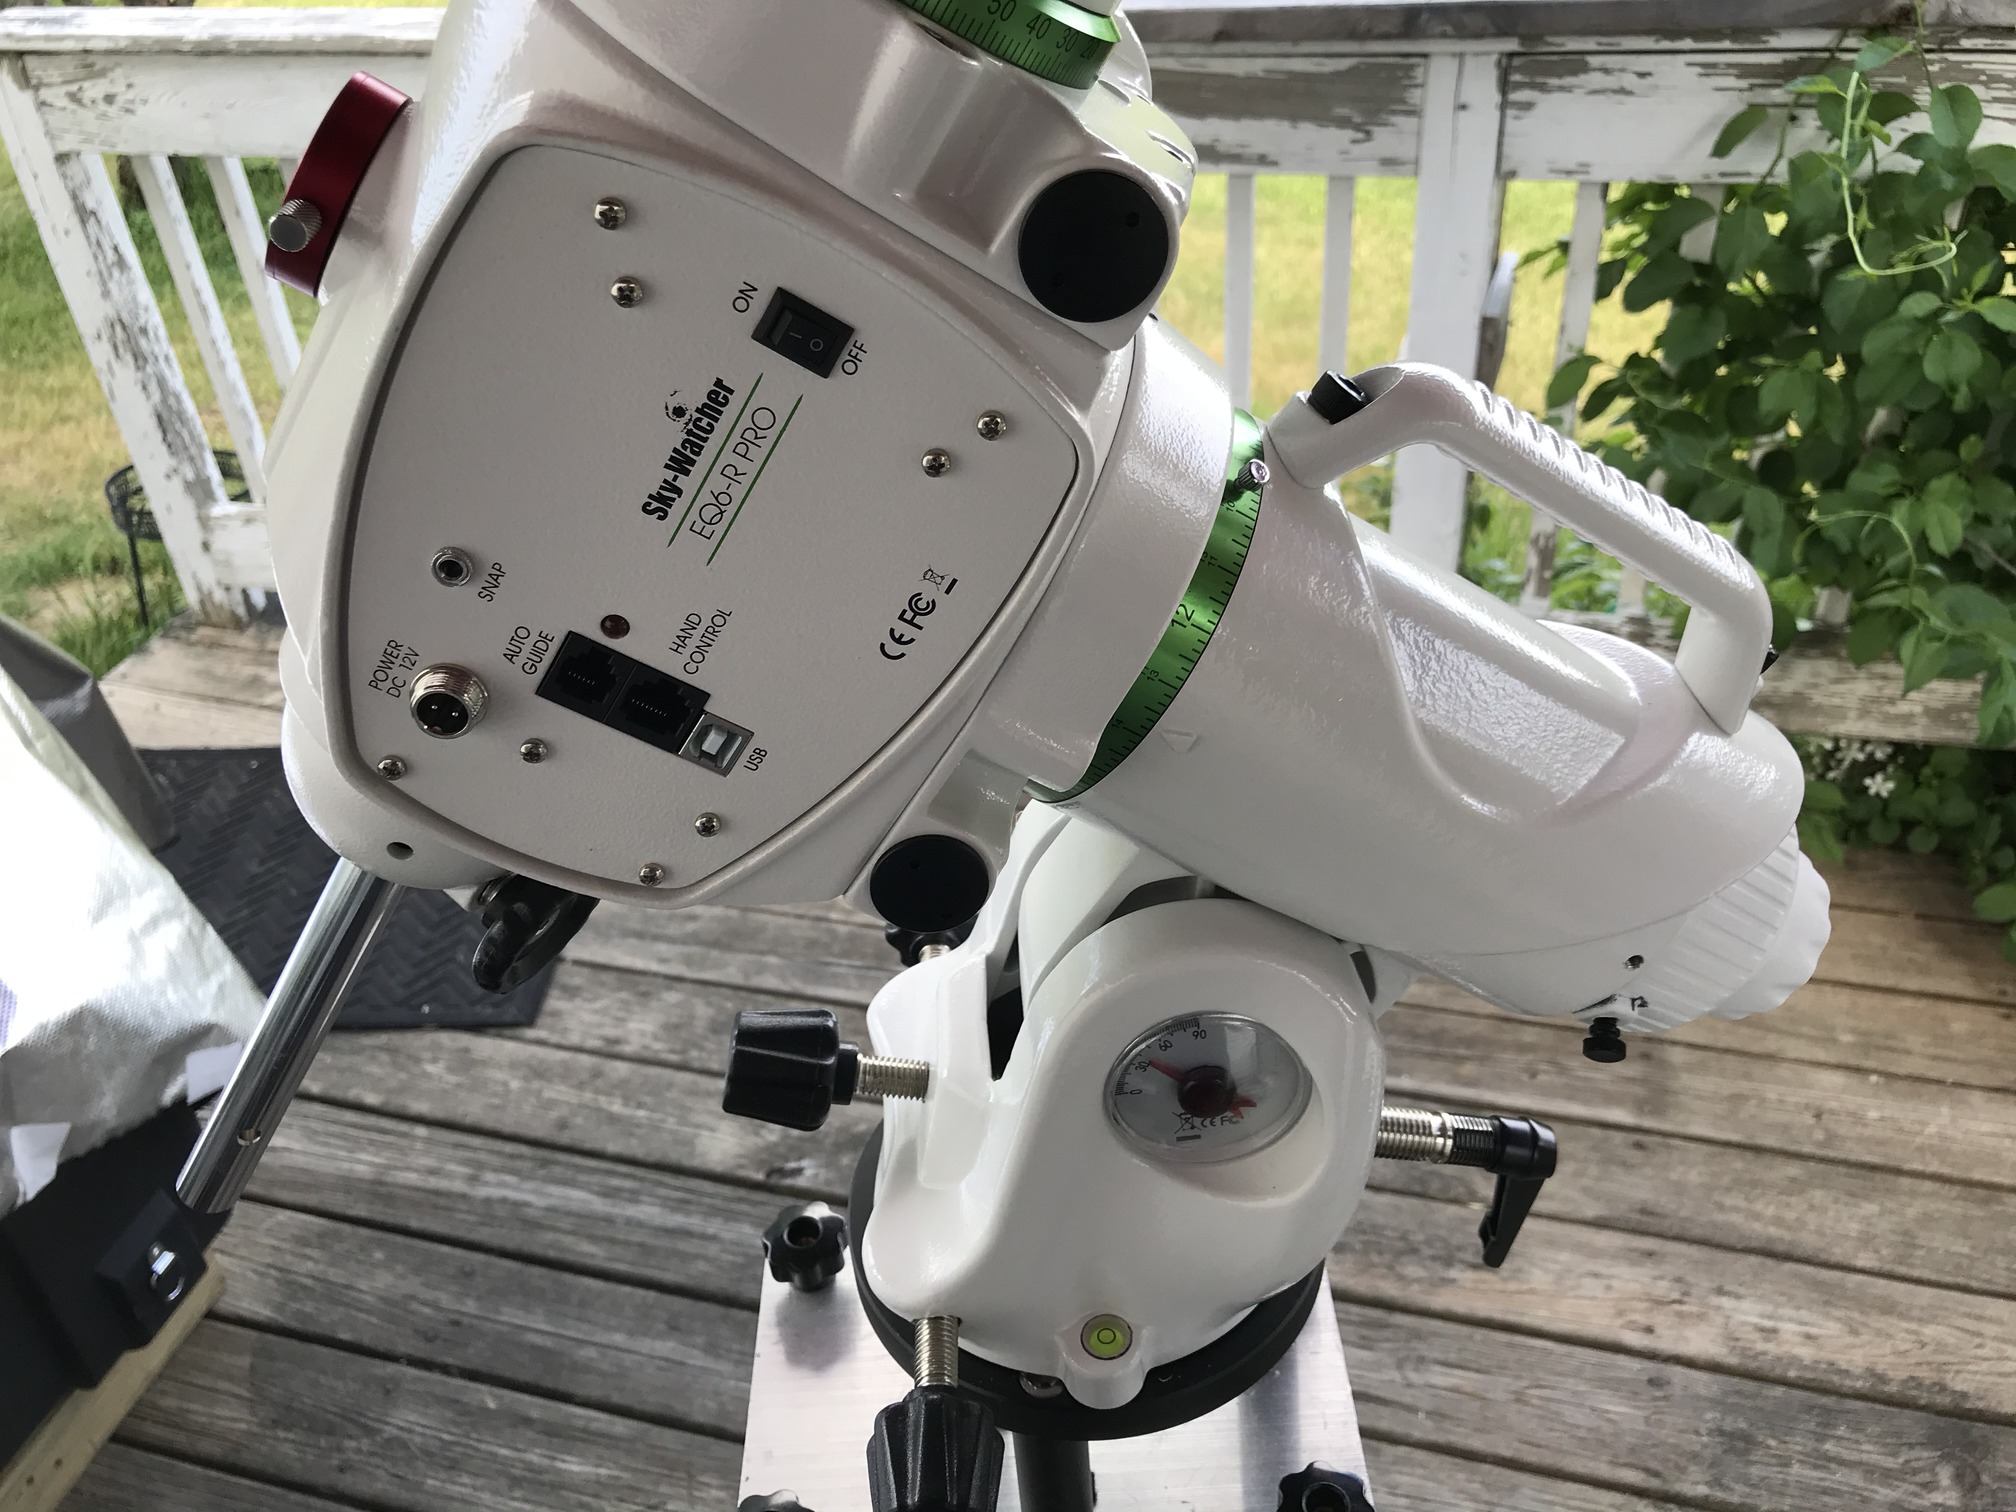 USB Port
I know there was a first generation EQ6-R that did not include the USB type B port on the front panel--see the pic. This doesn't impact mount operations or control through EQMOD or INDI, but it's definitely a nice upgrade that doesn't require proprietary cabling—any USB A to B cable will work. Again, small but significant. The DB-9 serial port on the EQ-G has always worked well, and I'm sure the serial comms through the RJ-45 jack (the one used for the hand controller in the EQ6-R) works equally well. The USB port on the front panel is another minor but useful improvement--see, these are adding up.
Altitude and Azimuth Adjustment
I'm very happy with the changes Sky-Watcher made to the mount's base, with an upgraded altitude and azimuth adjustment design, as well as improving the smooth movement between the surfaces of the mount's bottom face (footprint?) and the tripod with the azimuth adjustment dowel. It can't just be the massive azimuth adjustment knobs, there is definitely an improvement in how smooth the operation is with the EQ6-R Pro, and maybe that has to do with how weight is distributed?
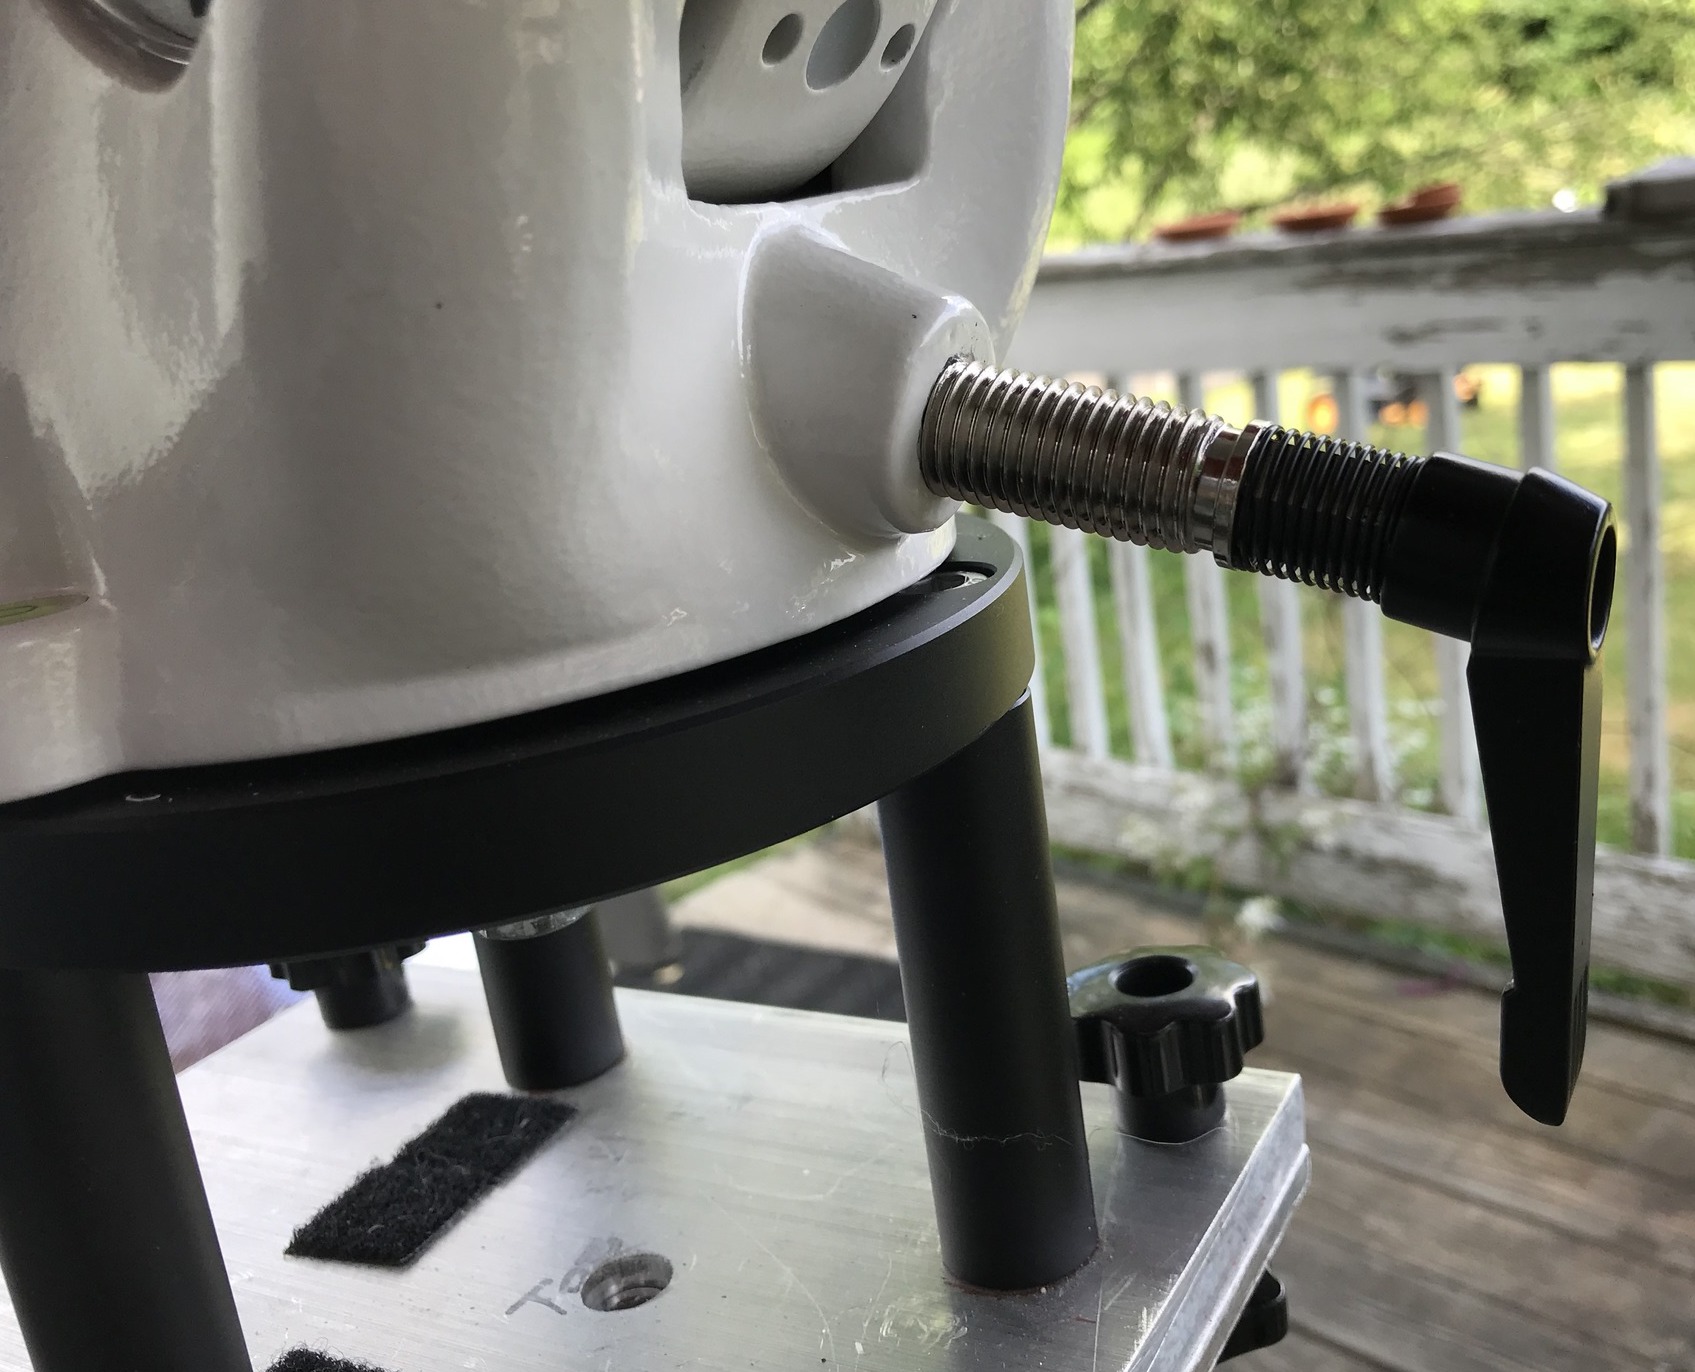 The altitude adjustment upgrade is the real winner for me with the EQ6-R Pro, even if they are essentially using the same design, with heavy-duty bolts pushing against a thick metal tab that sticks out from the bottom of the central RA axis component. I have not put this mount through a serious imaging session yet, but through several setups, alignments, and adjustments, it seems like a significant improvement over the altitude adjustment mechanism in the Orion Atlas EQ-G. Oh, and the big chunky knobs and increase in the diameter of the bolts is so nice to see.
Some flaws
Okay, the old wobbly skinny counterweight shaft must go! I can only assume that some exec at Sky-Watcher, a former engineer, designed this thing back in the day, still thinks it's the coolest thing, and they refuse to let it go. Seriously, Sky-Watcher, I have heavier duty counterweight bars on my star tracker. It is so out of place on this heavy duty mount. Out of the box, and without some mods, the bar wiggles back and forth and can seriously affect your system on a meridian flip. There's a "clunk" when the mount moves to the other side and the weights shift. It doesn't matter how much you tighten down the locking knob—that just acts as the pivot point between your weights and the rest of the counterweight bar above. I ended up removing the saddle, taking out the counterweight bar and wrapping electrical tape around the top—so there's a slightly tighter fit within the DEC column. I also removed the locking knob completely and took out the concave piece—a thrust pin? This piece of hard plastic or metal sits loosely between the end of the threads and the counterweight bar. Its purpose seems to be keeping the chrome finish free of marks? Whatever its purpose, it dramatically reduces the ability to lock the bar in place. I've managed to almost completely remove the wobble on the counterweight side by removing it.
 The saddle is a bit disappointing. But unlike the counterweight shaft, which is a mess right out of the box, and could use an upgrade, the EQ6-R Pro saddle is perfectly fine if your scopes and OTAs have Vixen style dovetail bars. However, I don't know if I would trust it with the wider Losmandy dovetail plates. (Or I might go with a beautiful ADM machined aluminum replacement). The problem is one side of the stock Sky-Watcher saddle is noticeably taller--offset vertically--from the other side of the saddle, and the wider plates will sit in the saddle at an angle. I'm not sure what happened here with the design or manufacturing, but someone wasn't paying attention. Again, not a problem for Vixen dovetail bars. And I also want to add that maybe this doesn't affect all the EQ6's? I noticed that Chuck has his RASA 8 on an EQ6-R Pro with the wide dovetail bar, and it looks fine.
Other interesting things
 There are some new features that are not really important to me, but may be to others. One is the latitude dial, which seems a bit decorative and maybe too fragile for the mount. It's an interesting addition, but not really useful for my setup. I image almost exclusively from my backyard, so I probably won't look at this again. I use a lighter mount like the CEM25P or the SkyGuider Pro when I want to shoot from other locations. The second is the Snap shutter-release port for DSLRs and Mirrorless cameras. I rarely use either for astro-imaging, so I'm not sure how significant this is. But it is a new feature and it seems important, so, well done Sky-Watcher.
Oh yeah, one more thing...
That handle! Holy crap, why haven't we had a handle all along? With the mount head alone coming in at 54 lbs/25kg, setting up the EQ-G was always a chore. It was like carrying heavy ordinance around your house and into the backyard, hoisting it onto the tripod—I mean, what the hell? We're just doing some astro-imaging here, not arming a B-1 for a serious bombing run. But that's what EQ-G setup has always felt like. Yes, if I have to call out a feature I'm happiest with—other than the new and improved altitude/azimuth adjustment--it's that handle.
At the end of night (see what I did there?) what matters is how well this mount functions for our purposes, how well it will fit into our existing astro-imaging workflows, how easily it will be to pick up and use reliably for new astro-geeks. I am assuming most of you are into astrophotography, and the EQ6-R Pro is a great choice if you're looking for a fairly inexpensive, moderately portable mount that can handle a wide range of sizes and weights for refractors, SCTs, Newtonians, and RASAs. If you're coming from an Orion Atlas or NEQ6, you will be very comfortable with this upgrade, and very happy with the improvements. I also think this is a great mount if you're new to astrophotography. The EQ6-R Pro is the perfect balance of weight, stability, and accuracy with versatility. I just can't think of an example, except maybe the ability to hike miles carrying your astro gear, where this mount isn't going to help you out or improve your imaging. The community of EQ6-R, NEQ6, and EQ-G users is massive. Sky-Watcher builds thousands upon thousands of these mounts, and there are so many users out there—around the world—who have the answers to any possible question or concern you might have. The ASCOM and INDI support for this line of mounts is very solid, and arguably the most thoroughly used and tested of any of the mount control systems. Even if EQMOD is a little clunky and outdated looking, you will find it easy enough to use, and the support you will receive from other users—because there are so many—is invaluable.
So, there you have it, you've done a phenomenal job with this round Sky-Watcher. Just lose that crappy counterweight bar in the next and I'll be back for another upgrade!
NOTE: As of this writing, the EQ6-R Pro is on sale at OPT, where I bought mine. Go get one!
Posted June 5, 2020
SpaceCat 51 Autofocus
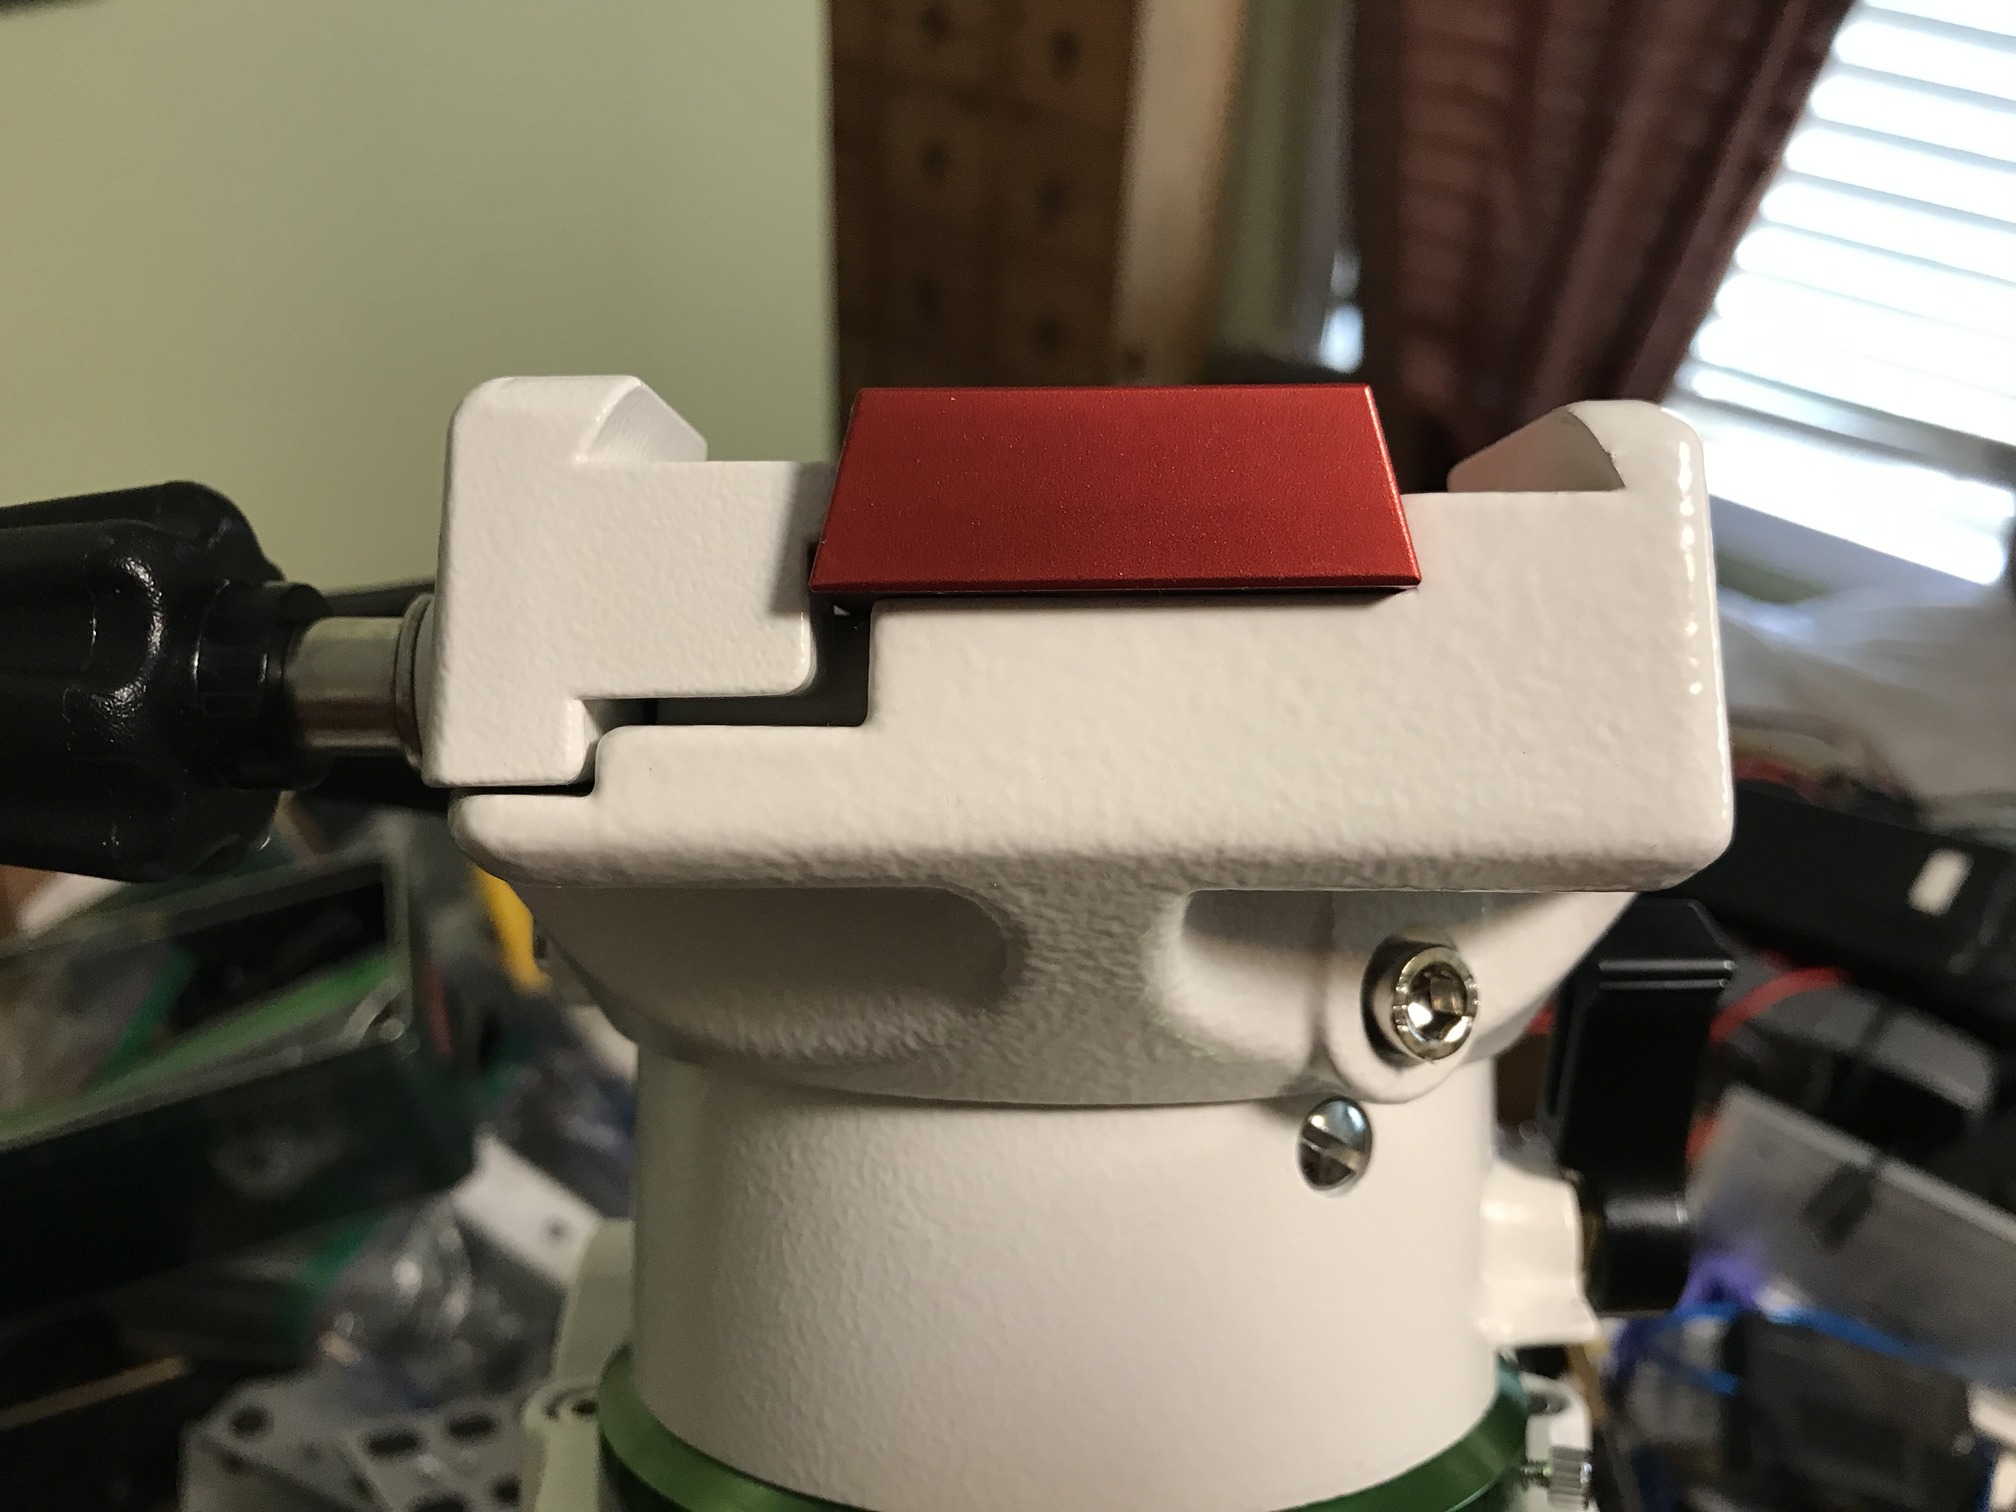
Another autofocuser configuration I'm trying out with the William Optics SpaceCat51 and the Deep Sky Dad AF3 stepper and focus ring. The goal is portability, and I have the motor and controller bolted to a guide-scope shoe that can be easily added or removed from the scope. I 3D printed a tension adjustment bracket--that's the gray half-cylinder piece on the opposite side of the handle.

Posted May 9, 2020
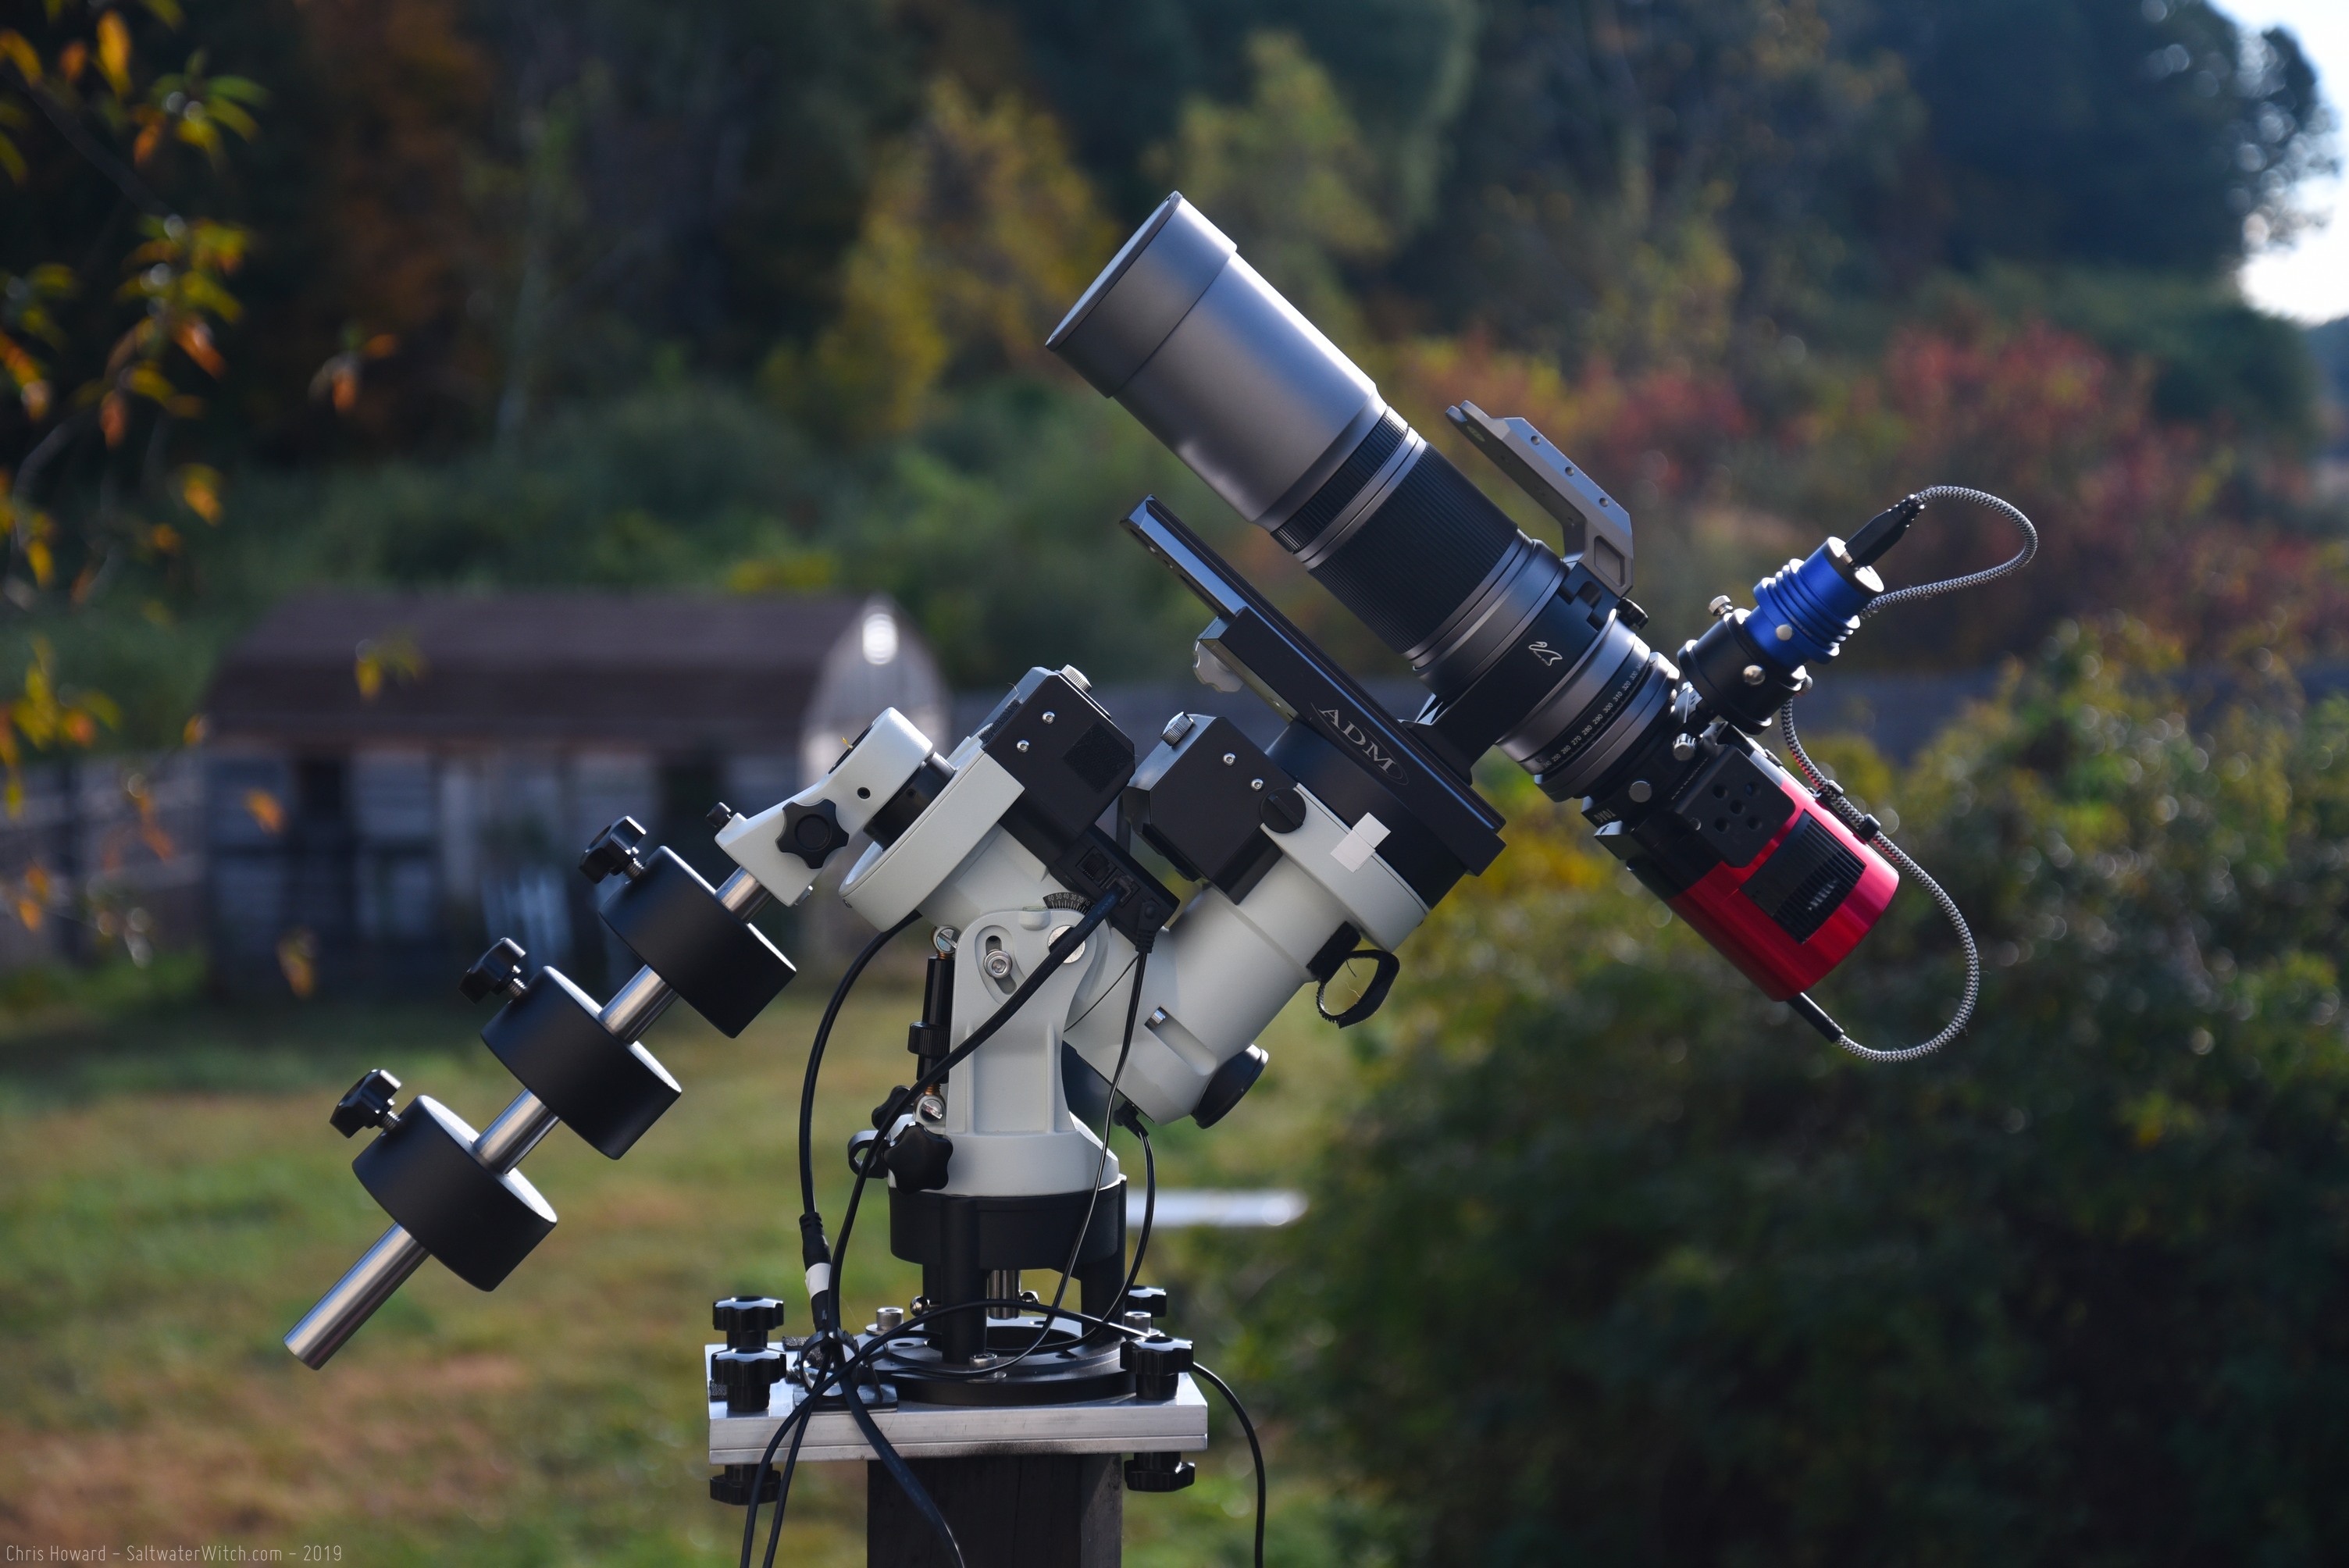
Moonlite Focuser on the AstroTech 6 Ritchey-Chrétien
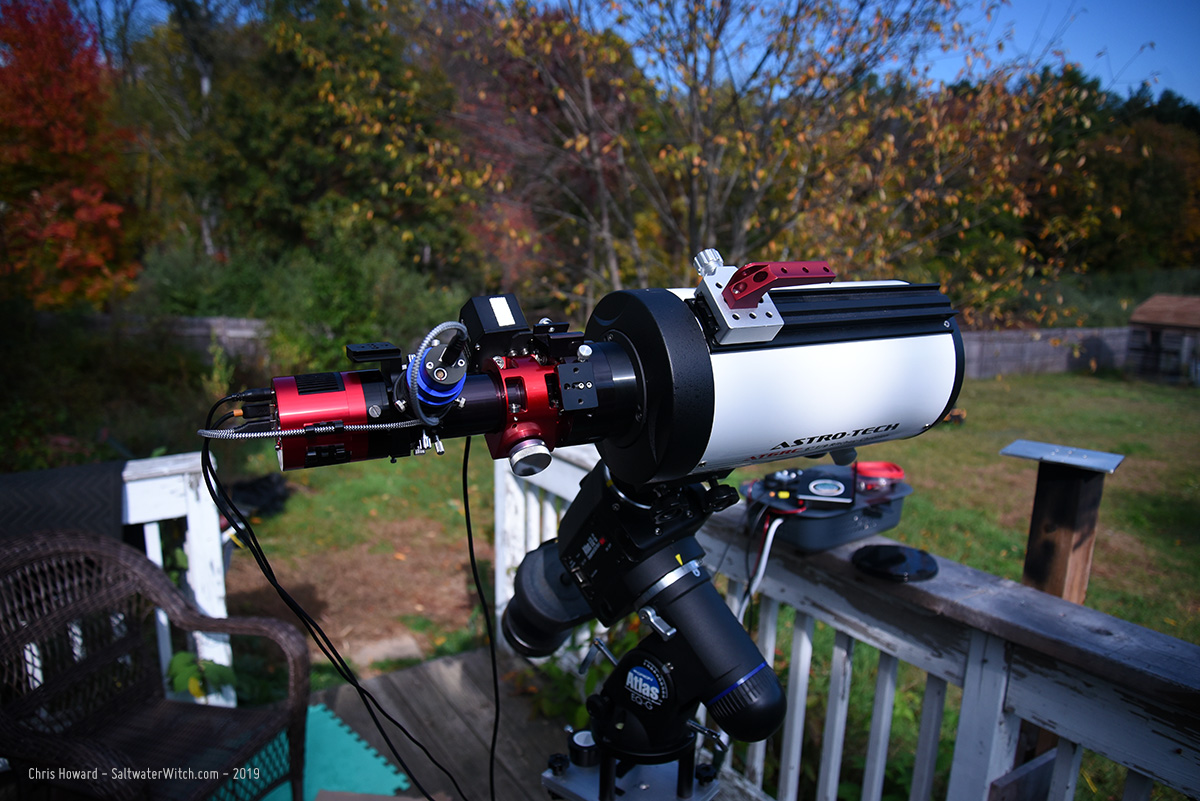
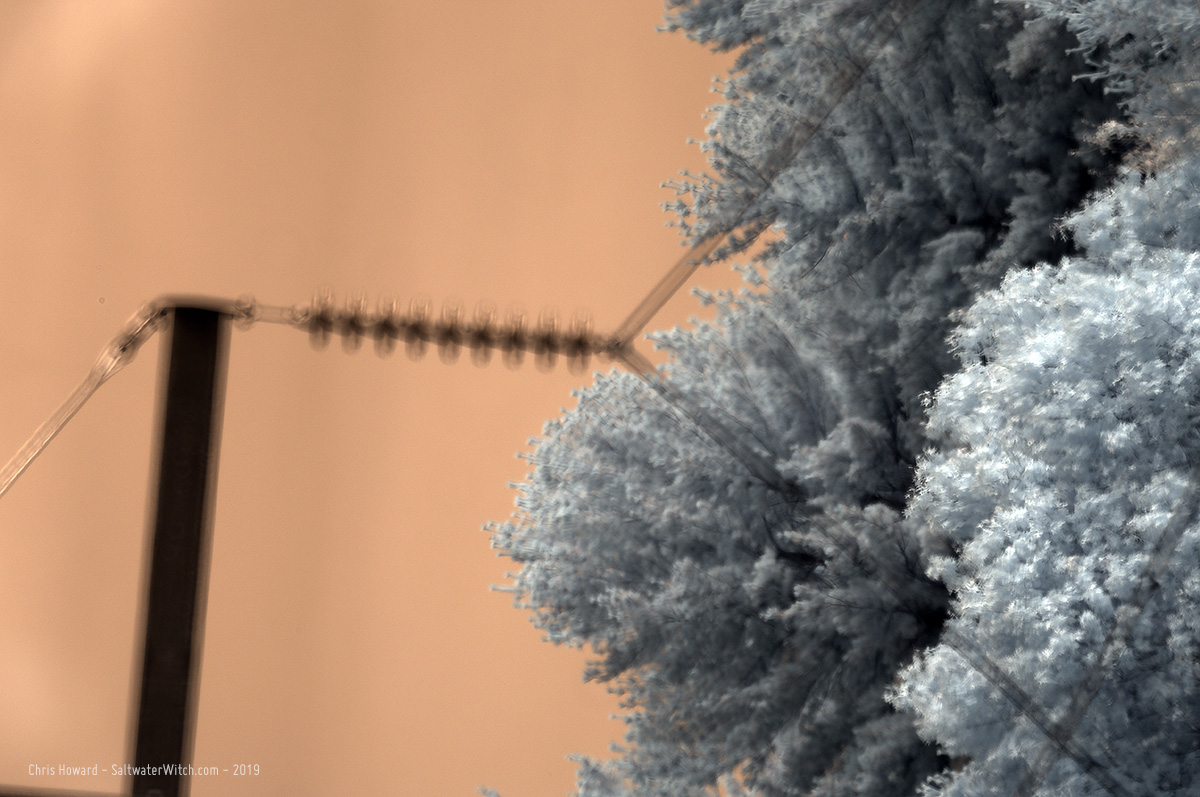
I moved the Moonlite focuser from the William Optics GT81 to the AT6RC scope and spent half an hour getting the focus distance more-or-less dialed in. I'm focusing on a tree line about 1600 feet / .5km away. That transmission pole is almost 500 feet closer to me. I'm using the color imaging train with the ZWO ASI071C and a longpass hydrogen-alpha filter, which is why the test frame has that white-tree IR look. In the images with the setup you can see the color in the trees. It's a beautiful fall day out there, although I don't think it's supposed to be that clear tonight. Just have to wait and see!

Posted October 14, 2019
Focus Testing for the William Optics SpaceCat 51
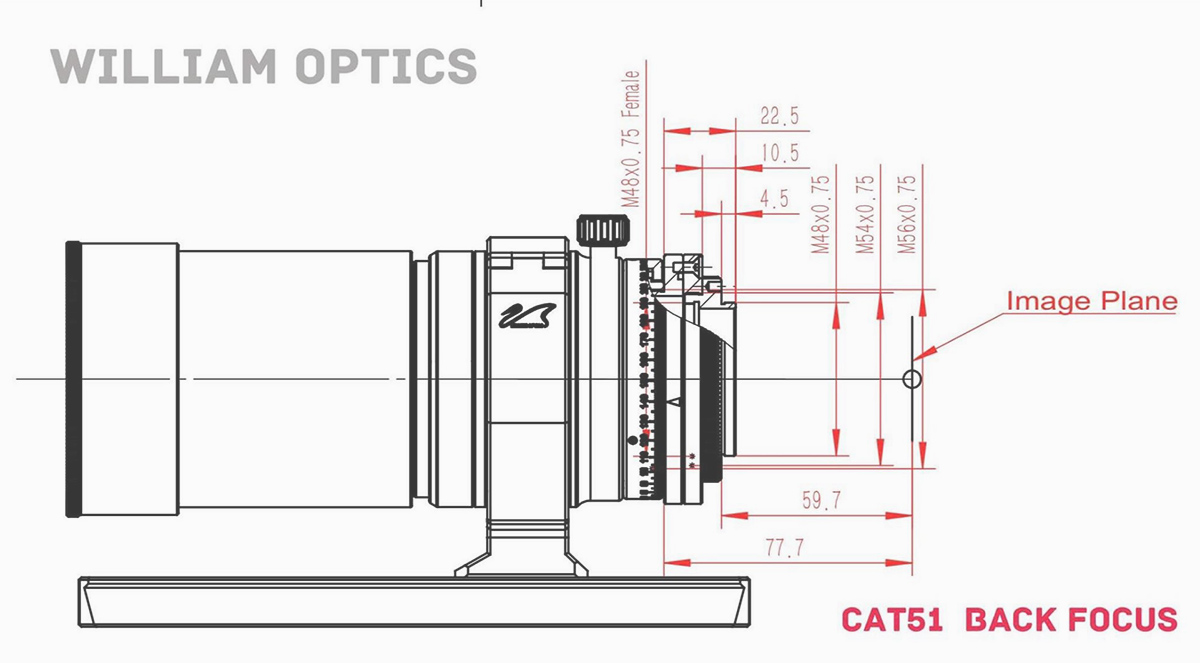
According to the William Optics SpaceCat 51 backfocus specs, I have a 59.7 mm backfocus from the flange face of M54->M48 adapter. The SpaceCat has a different configuration from the first generation RedCat. It includes a tilt adjust ring with a 54mm threaded facing (Takahashi wide mount 54 mm, 0.75 pitch thread) plus an M54 to M48 (T2) adapter. I think William Optics designed the thickness of the last adapter to avoid changing backfocus specifications across the various cats. And so any configuration I have will work with the original RedCat 51s as well as other breeds--WhiteCat, BlackCat, and K-Astec Limited Edition.
I have two main astro imaging trains, and both come in under 57mm. The color train is a ZWO ASI071MC, 2" filter drawer, Orion Thin Off-axis Guider with QHY5iii178 guide camera. For daytime testing I threw in a 2" hydrogen-alpha longpass filter. My narrowband imaging train consists of a ZWO ASI1600MM-Pro, ZWO EFW (Clear, 6nm Ha, 6nm OIII, 6nm SII, 685nm Near-IR), Orion Thin Off-axis Guider with ZWO ASI120M-mini guide camera.

I set up the iOptron CEM25P this morning, and used SharCap Pro to test the focus for both trains. I'm happy with the results. The color train is a bit worrying because the ZWO ASI071MC has a crazy 17.5mm depth to sensor. I was able to focus on some distant trees, but the SpaceCat's focus ring was only slightly out from infinity. We'll see what my results are with the stars!
The ZWO ASI1600MM-Pro on the narrowband train only has a 6.5mm depth to sensor with the ZWO filterwheel, and I had the focus ring on the cat further out. Should be no problem with DSOs in this case. I may miss having autofocus though.
Some shots from my morning focus testing with the beautifully machined William Optics SpaceCat 51 apochromatic refractor.